- REVIEWS
Camera Reviews 
More Reviews Mobile Reviews Photography Reviews - GALLERIES
- VIDEOS
- BUYER'S GUIDES
How to Create Beautiful HDR Images with Photo Merge in Lightroom (VIDEO)

Here's a tutorial from one of the world foremost post-processing experts who demonstrates how easy it is to use Photo Merge in Lightroom Classic to combine bracketed exposures into a High Dynamic Range (HDR) DNG file that contains all of the quality and flexibility of a Raw file. If you've avoided this editing method, thinking it was beyond your skills, that's going to change in the next six minutes.
Julieanne Kost is an adept photographer, workshop instructor, prolific author, and a specialist in simplifying Lightroom and Photoshop post-processing techniques. In this episode she merges multiple exposures of a scene into one image with perfectly balanced tones that would be impossible to achieve with a single shot.
Kost begins by selecting a trio of images that were captured with three different exposure settings one stop apart. You can always combine more or fewer photos depending upon how many exposures are needed to faithfully capture the entire dynamic range of a scene.
There are a few key settings required for optimum results, and the first is made in the Lightroom's Develop module where Kost enables Auto Sync. She then moves to the Lens Correction panel where she selects Remove Chromatic Aberration and enables Profile Corrections.
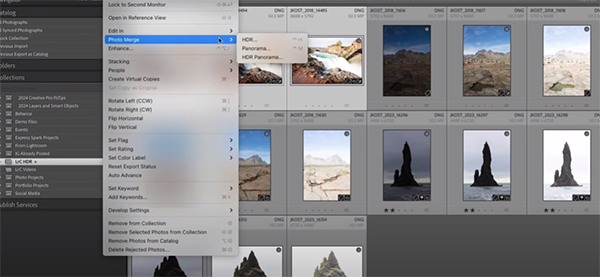
The next step is tapping the "G" key to return to a Grid view, then Kost clicks the Photo tab atop the screen and chooses the Photo Merge option from a dropdown menu that appears. You'll see why it helps to expand the HDR Merge preview up to a limit of 2,048 pixels.
Auto Align is enable by default, and this tells Lightroom to align each of the images if there was camera movement between each of the exposures you intend to merge. Uneven edges will also be cropped once the multiple exposures are aligned. These automatic corrections are especially beneficial when you captured the photos without the camera locked down atop a sturdy tripod.
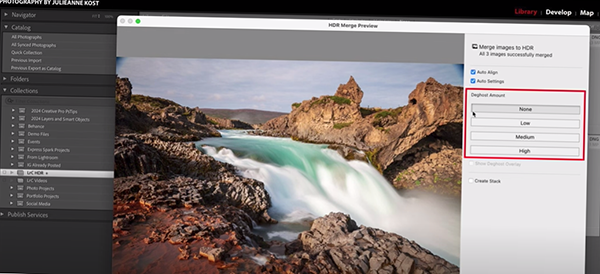
Kost notes that the foregoing changes "are non-destructive and can be refined or removed from the resulting HDR file without any loss of quality." After modifying a few other options for specific situations, you're ready to complete the simply process and Kost walks you through every step of the way.
We encourage you to spend time on Kost's instructional YouTube channel where you'll find helpful lessons for just about any post-processing technique imaginable.
And don't miss the recent tutorial we featured with another image-editing expert who reveals seven straightforward Lightroom hacks that are guaranteed to speed up your photo-editing workflow.


![]()
Get the Latest Photo Tips, News & Reviews from Shutterbug!
| Camera Reviews Other Reviews | Mobile Reviews Photography Reviews Columns | News | Features | How-To | Resources |
 © 2025 Shutterbug
AVTech Media Americas Inc., USA
All rights reserved