Easy Photoshop Elements 12 Tip: How to Add Zoom Effect To Existing Images
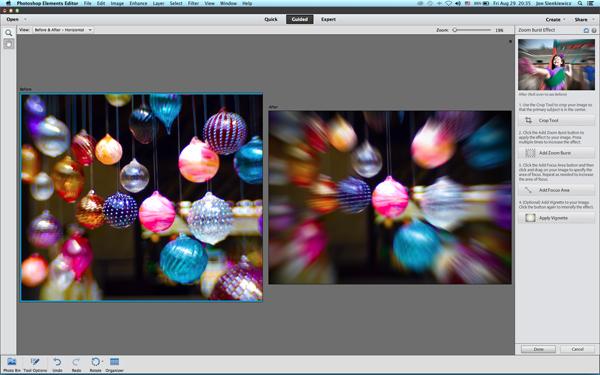
Last month readers enjoyed our Easy Photo Tip that explained how to zoom during exposure to create an exciting special effect. But a few readers had trouble mastering the technique. Here’s a way to achieve nearly the same results using Photoshop Elements 12.
Photoshop Elements 12 costs less than $85, about two week’s worth of designer lattes, give or take. But don’t let the bargain price fool you. Elements is a high-powered editor and offers one sublime advantage over full-blown Photoshop: your choice of three modes to help you learn while you create.
The three modes are Quick, Guided and Expert. As you might expect, the Quick mode is highly automated. Choose Adjustments (Exposure, Sharpness, etc.), Effects, Textures or Frames. A thumbnail preview appears on the right. Pick what you like and watch the magic happen for you.
In the Guided mode, the offerings include Touchups (Levels, Crop, etc.), Photo Effects (High/Low Key, Vignette, and so forth), and Photo Play (Puzzle Effect, Picture Stack and three more). Make your selection and the right-side navigation panel walks you through the necessary steps. Is it as cool as having an instructor there beside you? Of course not, but if you are motivated to learn and pay attention, it can be very educational.
The Expert mode is more closely akin to real Photoshop. You need to know what you’re doing (at least a little bit) but it’s still an easy way to learn how Filters, Layers and many other features work.
Now back to today’s tip, the zoom thing.
Illustrated here is the Zoom Burst Effect. It looks a lot like the lens was zoomed during exposure but it was not. I’ve included the before and after here so that you can see the straight shot we started with. The effect was applied in the Guided mode. The entire procedure is just four steps, and the fourth (Apply Vignette) is optional. There is enough latitude available in adjustments that you can feel like your creation is truly a one-of-a-kind because unless you just blindly click buttons, your creation will be unique.
Although the less expensive Elements does just about everything most casual users ever need, there are major differences between these two image editors that cannot be ignored. Elements does not support CMYK, for example. And there is no Channel Mixer, so if you’re into processing infrared images, move on.
There are major differences in the way PS and PSE handle raw images. If you shoot raw, you should know that the Adobe Camera Raw dialog box shows different options in the two applications. If you don’t know what ACR means, then these differences are unimportant to you.
On the other hand, dwelling on what Photoshop Elements CAN do (instead of what it lacks) is more fun—and more productive. For $85 (or less) it’s an incredible buy.
For a complete rundown on the differences, visit Adobe’s website: https://forums.adobe.com/message/4568487#4568487
While there you can also download the full-powered trial version and take it for a test spin before buying a license key.
—Jon Sienkiewicz


