Digital Light Modification: Post Processing To Enhance Exposure
The following discussion about ways to alter your images after-the-fact is based on the assumption that you are shooting in Raw mode. JPEG images can also be altered, but not to the extent that Raw files can be improved and enhanced. If you are serious about producing images that can be considered fine art and that will look great as large prints, Raw is the only way to go. I say that because there are many important advantages, the most significant of which is that Raw files retain detail in the highlights and shadows better than JPEGs. Because JPEG files compress data, some information has to be discarded. First to go is the texture and detail in the highlights and shadows. This is the last thing you want.
Color Cast
In the film days if you used daylight balanced film and photographed indoors with tungsten lights, or you shot with indoor balanced film outside in daylight, the colors were off and there was no way you could correct it. Sometimes photographers purposely used daylight film indoors or tungsten balanced film outside to create unexpected color effects, but if you did that the correct colors could never be recaptured unless the picture was taken again. Filters and darkroom magic couldn’t bring the colors back from being either too yellow/red or bluish.
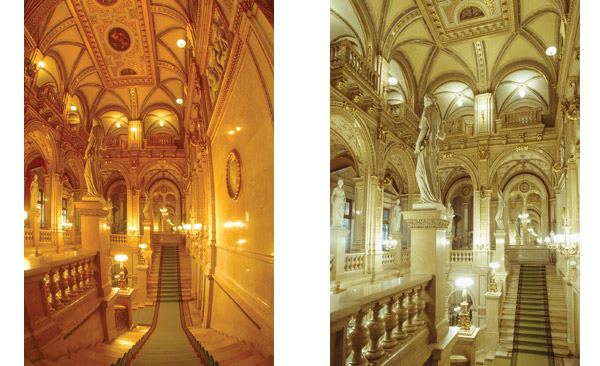
The pictures of the opera house in Vienna (#1 and #2) show what I’m talking about. The lighting in both instances was from tungsten bulbs, and (#1) shows the golden color cast from using daylight film while (#2) is an example where I used tungsten-balanced film to shoot tungsten lights. The colors turned out as I saw them without the golden tones typical of daylight film being used with tungsten lights.
All Photos © Jim Zuckerman
In the digital realm, if you shoot in Raw mode the white balance can be changed in post-processing. Note that you can do this with many processing programs, even the software that comes with your camera. In the examples I will be showing you I chose to work with Adobe Camera Raw (www.adobe.com), but you need not work with this specific program to get the effects achieved.
In the Adobe Camera Raw dialog box, the red arrow in figure A indicates the temperature slider, and this is the tool I used to make the images warmer (more red/yellow) or imbue them with cooler tones (more bluish). No matter what white balance you used to take the picture, it can be changed as if you had used another white balance at the time of shooting. The small box just above the right end of the temperature slider (the blue arrow in figure A) is the color temperature in degrees Kelvin, 5500K is the benchmark. This is the color of light from a direct sun at noon in temperature latitudes. Any number below this is yellowish and numbers above it are bluish.

You can further tweak the colors in your images using the sliders seen in figure B by clicking on the fourth icon from the left (indicated by the red arrow) on the right portion of the dialog box. Here you can tweak individual colors with respect to their hue, saturation and luminance. The luminance option allows you to lighten or darken individual colors.

Chromatic Aberration
Color fringing is another way to think of chromatic aberration. This is an ugly little secret that virtually all lenses have, and in some of them—like wide angles—the problem is quite apparent when enlarging the digital file on your computer or when making a large print. At 100 percent, you can start to see it, and at 200 percent and above it’s pretty obvious.
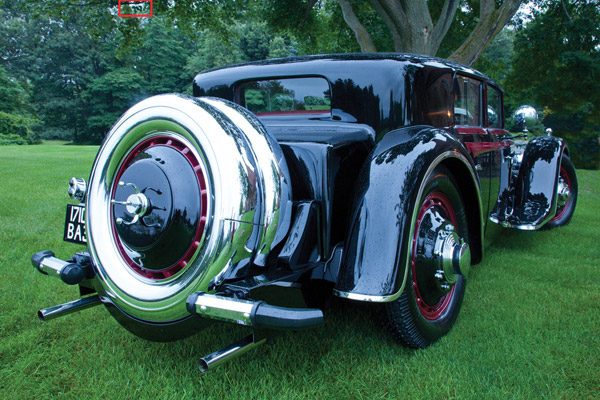
The picture of a 1932 Bucciali (#3) is perfect at first glance, but upon closer examination of the trees at the top of the frame (in the red box), you can see the chromatic aberration (#4). This is enlarged to 200 percent, and if you emailed the entire photo to a friend or posted it on a website, you wouldn’t see this flaw at all. However, if you were to make a large print, say 20x30”, it would be obvious.

In Photoshop, there is a pull down menu command (Filter>Lens Correction) that is designed to eliminate this unattractive and unwanted color fringing, but it doesn’t work well. Using the tools in ACR or Lightroom, you can do a much better job.
In figure C, the red arrow indicates the icon you must click to access the two sliders that allow you to eliminate chromatic aberration: Fix Red/Cyan Fringe and Fix Blue/Yellow Fringe. The names of these sliders tell you that color fringing comes in different colors, and it takes trial and error to remove all the colors. There are only two sliders and they only move left and right, so it will take you no more than a few seconds to get rid of the offending colors.

Graduated Filter
Many landscape and travel photographers have been big proponents of using graduated neutral density filters. These filters are placed over the lens at the time of shooting to darken a sky that would otherwise become overexposed. Now this can be done in post-processing, and it is indeed a tool you will soon come to believe is indispensable.


In figure D, you can see a classic situation in which a light sky detracts from the darker foreground. This is a shot of the infamous Auschwitz death camp in Poland, and I wanted the sky to be dark and ominous to underscore the heavy feeling of this place. In the dialog box, the red arrow points to the icon that you click to access the graduated filter. Once this is clicked, the sliders on the right change and you can take the cursor and drag it down through the sky. Figure E shows you what happens—guidelines indicate where in the sky the filter will be applied. By using the exposure, brightness and contrast sliders, you can adjust the amount of the change. In the final result (#5) you can see how dramatic I made the sky.

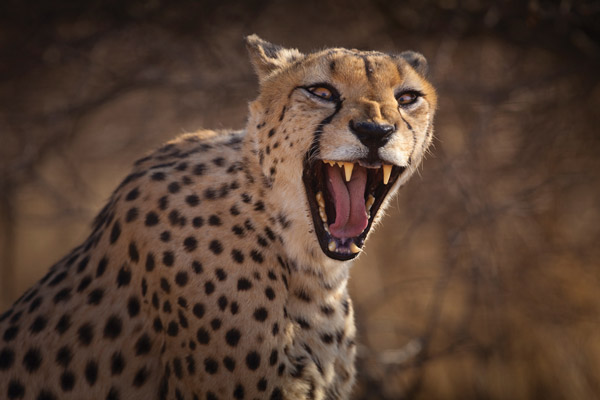
The cursor can be dragged across a photo starting from the bottom, the sides, or even from a corner and dragged diagonally through the picture. You can also apply the graduated filter many times to darken the periphery or any part of an image. Compare the two versions of a cheetah I photographed in Namibia (#6 and #7). By darkening the background as well as the cat’s shoulder and back, I forced all of the attention on the face. The original picture is fine, and some people may think the post-processing version is artificial, but from the standpoint of art and drama, I think it’s more compelling and more attention grabbing than the original. At least you can see the options available with this remarkable tool.

HDR
High Dynamic Range is the name given to a technique that manipulates light in post-processing. It solves the problem of the inability of digital sensors to capture the range of light and dark tones in a single otherwise contrasty photograph that our eyes are able to see. By holding down the exposure on the highlights and by increasing the exposure in the shadows, the HDR technique brings these tones, however extreme the contrast may be, together in a single photograph with a perfect exposure throughout the composition.
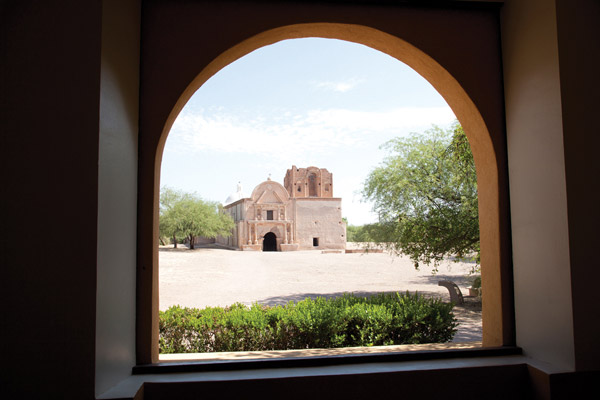
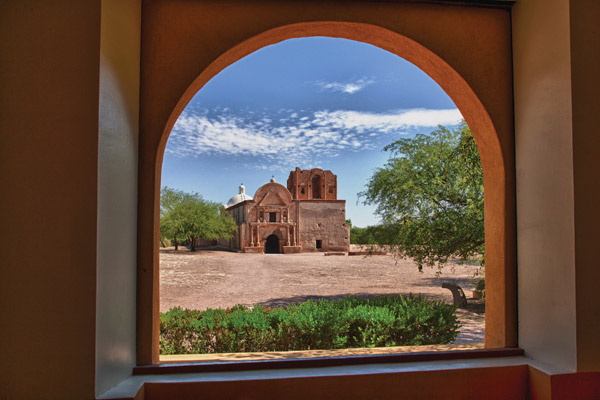
There are many software programs on the market that enable you to do this. A good example of the necessity of HDR is seen in photo (#8). I photographed the Tumacacori Mission south of Tucson, Arizona when they opened at 9AM, but in mid-June the sun is already too high for the beautiful desert sweet light. In fact, the contrast is so bad that a good picture of the exterior is impossible. I wanted to frame the old mission with an arch, but a compromise exposure between the interior and the brilliant sunlight in the courtyard produced a terrible picture as you can see. This is completely unedited. When I reduced the exposure so the sunlit areas were correctly exposed (#9) I lost the detail on the shadow side of the arch. I didn’t want this kind of shot.

The only way to manipulate the situation to have a perfect exposure throughout was to use HDR. I took 6 separate frames, from a tripod, using the same lens aperture of f/32. I varied the exposures by changing the shutter speed in one stop increments, going from extreme overexposure to extreme underexposure to make sure I captured the detail in the shadows as well as the highlights. The software I used for this example, HDR Efex Pro (www.niksoftware.com), assembled the 6 pictures together, taking from each one the tones that produced a perfect end result (#10).
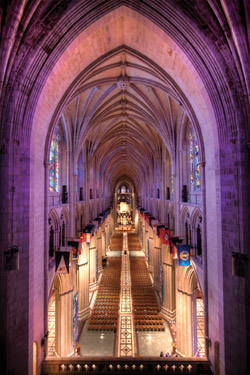
HDR works best when you are shooting subjects that don’t move. Landscapes and architecture are ideal. In places such as dark cathedrals, this technique allows you to hold detail in stained glass windows as well as the darkest corners, revealing a breathtaking sense of dimension and detail that heretofore has been impossible to achieve. The picture of the National Cathedral in Washington, DC is an example (#11).
Plug-Ins
To give you an example of the amazing range of post processing tools I’d like to show you some work done with one such software program, Nik Software’s Color Efex Pro 3.0. Note that there are numerous other programs available for creating post-exposure magic from your shots. Many of the filters contained in this program manipulate light in artistic ways. For example, Galmour Glow adds a glow and a warmth to a scene as if it’s bathed in magical light. A portrait I did in India, (#12) is a good example, and so is a shot of the castle in Prague, Czech Republic (#13). In the fantasy composite of a unicorn and a young lady (#14) the Glamour Glow filter made the original backlighting on the horse seem like it was heaven sent. The filter infused the scene with a fairytale-like atmosphere that made it more captivating than the original composite.


The Sunshine filter is also a remarkable tool. Compare the original and the filtered version in photos (#15 and #16) and you can see how the image has been imbued with additional color and light that totally transforms the beauty and majesty of the tall ship. Within the dialog box of this filter, figure F, and all of Nik Software’s filters, there are many levels of control that allow you to make fine or coarse adjustments to every aspect of the image. Using these same settings, I transformed an ordinary shot of a staircase to one that looks completely magical (#17 and #18).


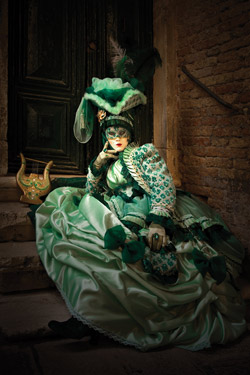
One of the most useful filters in Color Efex Pro 3.0 is darken/lighten center. This filter enables you to darken the periphery of an image while keeping the center of the picture—i.e. the subject—light by comparison. I photographed the costumed model in Venice (#19) in soft and diffused lighting, but with this filter I made it look like I had set this up in the studio with expensive lights. This is similar to the graduated filter tool in ACR and Lightroom, but Nik makes this an easy procedure with all the control you need.
If you are interested in learning more about how to use plug-ins from Nik Software, I wrote an ebook on the subject titled Creative Techniques With Nik Software. Here is a link to it on my website: www.jimzuckerman.com/ebooks.php.


