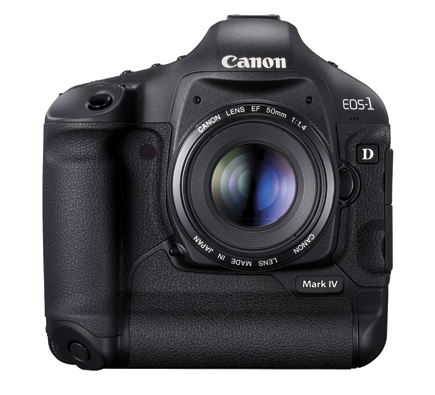
I wish to buy a new one canon camera, its look like future gadget. There are also different kind of video assist equipment available for Video Recording.
Canon’s EOS-1D Mark IV; An EOS Evolution
The new 1D Mark IV is a step up the evolutionary ladder from EOS Erectus, going where all SLRs are heading these days—High-Definition (HD) video capture.
 |
|
 |
|
 |
|
|
Video aside, in today’s D-SLR world a $5000 16-megapixel camera might not seem like such a big deal, especially when the 18-megapixel EOS 7D, also with video capture, sells for $1699. The 1D Mark III delivered 10.1-megapixel resolution, which doesn’t seem like much today but in May 2007 seemed a whole lot bigger. But it’s not just the number of pixels that impact image quality, it’s also the size of those pixels. The Mark IV’s sensor measures 27.9x18.6mm vs. the 7D’s 22.3x14.9mm, all of which translates into better looking images and improved low-light and noise response. All that is wrapped around a dust- and weather-resistant magnesium-alloy professional body with a shutter Canon rates at “up to 300,000 cycles.”
While it’s true that the Mark IV’s imaging chip has 63 percent more megapixels than the Mark III, at 27.9x18.6mm vs. 28.1x18.7mm, the physical chip size is actually smaller. (See the “Mark IV Vs. Mark III” chart in the Instant Links section of the Shutterbug homepage.) That’s because the new camera’s imager is built with “gapless microlenses” positioned closer to the photodiodes for more efficient light gathering. Improved photodiode construction is said to enhance dynamic range and the transmissive quality of the sensor’s color filter array was enhanced to improve sensitivity while upgraded sensor circuitry reduces noise before exporting image data. The camera’s Low Pass Filter has a fluorine coating to repel dust and enhances the built-in cleaning system that produced dust-free images the entire time I used the camera.
 |
|
|
Dual DIGIC 4 image processors and 14-bit A/D data conversion translates into a wide ISO range and sound barrier-breaking light sensitivity. Out of the box, the Mark IV’s ISO range is 100 to 12,800 in 1⁄3- or 1⁄2-stop increments. These ISO numbers are expandable using the Custom Function megamenu to 50 on the low end and 25,600, 51,200, or 102,400 for photographing inside coal mines. The camera can shoot video clips at ISO settings as high as 12,800. Interestingly, the Mark IV also offers an Automatic (A) ISO setting that seems quite PowerShot-like to me since pro users should be able to figure out what sensitivity they need in a given situation.
 |
|
|
That 14-bit per channel conversion provides smooth image tonalities, capturing 16,384 tones in red, green, and blue channels, and is the basis for the camera’s Highlight Tone Priority feature. When enabled via the Custom Function menu, the Mark IV’s Auto Lighting Optimizer (ALO) automatically adjusts images for optimal brightness and contrast and reduces clipped highlights while keeping shadow areas open in Raw, JPEG, or video files. An improved white balance algorithm appears to make colors more accurate when shooting under low color temperature sources such as tungsten light; I found overall image color to be clean and neutral when compared to other Canon SLRs.
The Mark IV’s autofocus system uses 45 AF points, including 39 cross-type focusing points that should be capable of tracking moving subjects at speeds up to 10 fps (frames per second). It has twice as many cross-type focusing points as the Mark III and a new AF sensor construction is supposed to improve performance in low light and with low-contrast subjects. (More on this later.) Face detection is possible with the Mark IV when used in Live View or Video mode but not with viewfinder viewing, at least not in the now-traditional way. If you’re viewing through the standard eye-level finder, the ALO has some built-in face-detection capability. If ALO detects a backlit face when analyzing image data, it applies a tonal curve adjustment to lighten that face or similar shadow areas of the photograph.
 |
 |
|
|
||
The Mark IV offers three Raw
shooting modes: Full Raw (16 million pixels), mRaw (nine million pixels), and sRaw (four million pixels). I don’t get the concept of smaller Raw files, so maybe it’s just me. If you want to know why, read my EOS 7D review at: www.shutterbug.com.
The Mark IV also offers three JPEG recording formats (M1, M2, and Small) and the mix ’n match Image Size menu lets you choose any combination of Raw+JPEG files the camera offers. This is particularly useful when shooting using the camera’s Picture Styles options so you can capture a monochrome JPEG while retaining the original color image as a Raw file. Raw images shot on the Mark IV use the entire 14-bit space when converted to 16-bit TIFF files in Canon’s Digital Photo Professional (DPP) software, which is supplied with the camera at no extra charge and allows you to apply Picture Styles to Raw files after the fact.
 |
 |
|
|
||
I think wedding and portrait photographers, especially, will appreciate the copyright information feature that lets you set copyright data directly into the camera and append that information to every image file in the EXIF metadata. They’ll also appreciate the silent running shutter mode available through the Drive setting button that minimizes shutter clatter when photographing inside churches.
All This And Video, Too
The Mark IV features the inevitable HD video capture packaged inside one of Canon’s professional camera bodies. Canon says their EOS HD Video technology has “opened new doors for multimedia journalists and Hollywood cinematographers” and while I’m guessing most Shutterbug readers don’t fall into either of those categories, you may still want to take advantage of the camera’s manual exposure control, selectable frame rates, and interchangeable lenses to shoot video, especially wedding photographers looking to add another dimension of coverage they offer to clients. The images are going to look even better than the impressive video I was able to capture with the EOS 7D because of the larger APS-H-sized image sensor that’s similar in size to a Super 35mm (24.89x18.66mm) motion picture film frame.
 |
|
|
To shoot video clips—please let’s not call them movies—the Mark IV must first be set in Live View by choosing still or video options in Tool2’s “Live View/Movie Func set” menu. Before recording, you select the video clip’s resolution from “Movie Rec size” in the same menu. To start capturing video, you push the FEL (Flash Exposure Lock) button just behind the shutter release to start and again to stop. That may be a few more steps/buttons than other cameras (Olympus, for example) use to accomplish the same thing, but it won’t hurt your brain. In case you’re wondering, you can make a still image while recording video by pressing the shutter button. When you do, the video clip will have a still “moment” lasting about a second and video shooting will automatically resume.
- Log in or register to post comments


