- REVIEWS
Camera Reviews 
More Reviews Mobile Reviews Photography Reviews - GALLERIES
- VIDEOS
- BUYER'S GUIDES
The BEST Photo Export Settings for Prints, Web Use & More (VIDEO)

Have you ever captured a great image, edited it perfectly, uploaded it to the web or made a print, and then said to yourself "that's not how I remember this photo looking after post processing?" If so, it's possible that the Lightroom Export settings were incorrect for the way you intended to share the shot.
Instructor Lachlan Garutti is an Australian pro specializing in landscape, travel, and adventure photography, and in this video he reveals the Export Settings he prefers so that there are no surprises when you view your images on Instagram, Facebook, your online portfolio, or when examining a high-res print.
He says the following when it comes to preparing a photo for social media usage: "Every time you upload to Instagram or Facebook, the site compresses your images to make them easier to load." The problem is that the resizing process causes a loss of quality with regard to sharpness, saturation, contrast, color, and other important attributes.
The good news, however, is that your imagery will look great by using the Export settings that Garutti recommends in the 10-minute video below. You'll also learn how easy it is to make a few timesaving presets that are optimized for a variety of low- and high-resolution purposes. This way you'll have a one-click solution for most-common exporting tasks.
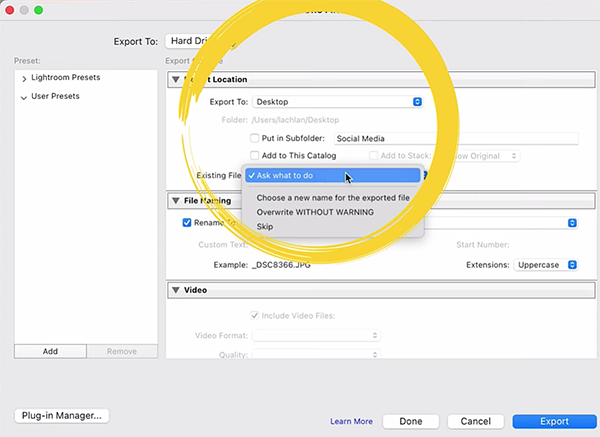
The settings you're looking for can found within Lightroom's Develop tab. Then simply navigate to the photo you want to export. One you click on File atop the screen and choose Export from a dropdown menu that appears, you'll be presented with a variety of options.
After demonstrating the best configuration for Instagram, Garutti turns his attention to modifying these settings for using images in different ways. He explains why her prefers exporting photos to the desktop or in a clearly labeled sub-folder, rather than adding them to a Lightroom catalog.
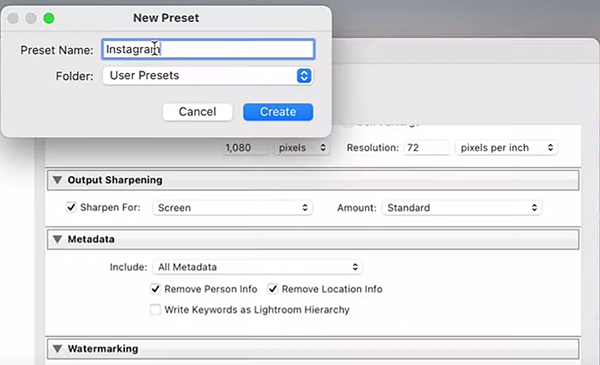
The process includes making the right choice for File format, Quality, Color Space, Image Size, Resolution, and other important settings like Aspect Ratio. And if you follow his advice for creating presets, you'll only have to do this once for each configuration you want to save.
Garutti's instructional YouTube channel contains many more straightforward shooting and editing videos like this one, so be sure to take a look.
And don't miss the recent tutorial we featured with another accomplished shooter who demonstrates how to harness the power of Lightroom's Color Mixer tools to create photographs with perfect Hue, Saturation, and Luminance.


![]()
Get the Latest Photo Tips, News & Reviews from Shutterbug!
| Camera Reviews Other Reviews | Mobile Reviews Photography Reviews Columns | News | Features | How-To | Resources |
 © 2025 Shutterbug
AVTech Media Americas Inc., USA
All rights reserved