Astronomy: Scanning The Night Skies: 2013 Astronomy Photographer Of The Year Contest Winners & New Contest for 2014
The skies have been a source of fascination for humankind since our earliest days. But only in the past 100 years or so has photography provided tools to enable people to capture, view, and enjoy the astonishing images astronomers were privileged to see in their elaborate telescopes.
Astronomy is no longer strictly the domain of professional astronomers. Dedicated amateurs have access to relatively inexpensive but powerful telescopes and highly sensitive camera equipment that allow them also to explore and record the beauty and mystery of the night skies. Depending, of course, on the subject matter, stunning and astronomically meaningful images can also be made without the use of telescopes.
The Contest
To encourage amateur astrophotography and acknowledge outstanding work being done, the Royal Observatory Greenwich, in cooperation with the BBC’s Sky at Night Magazine, has conducted its Astronomy Photographer of the Year contest since 2009. Winners of the 2013 contest in several categories—drawn from more than 1200 entries—were announced last fall. Details for the 2014 competition, which closes on April 24th, are available at www.rmg.co.uk/royal-observatory.
The 2014 winners will go on display at the Royal Observatory Greenwich on September 18, 2014. They also may be viewed after that date on www.rmg.co.uk/whats-on/exhibitions/astronomy-photographer-of-the-year.
Details for the 2015 contest will be available at the Observatory’s site early next January.
The Royal Observatory, Greenwich, England, is home of Greenwich Mean Time (GMT) and the prime meridian line. Established by King Charles II in 1675, it is, by international decree, the official starting point for each new day, year, and millennium—at the stroke of midnight GMT as measured from the prime meridian.
Recognition in the competition is given not only to images of deep space and the solar system captured using telescopes, but to photos made with unaugmented photographic equipment. In fact, the 2013 winner and overall winner was Mark Gee (Australia) with an image entered in the Earth and Space Category. He was also a winner in the People and Space Category. Both shots were made without the use of a telescope.
Competition categories include Earth and Space, Our Solar System, Deep Space, People and Space, Young Astronomy Photographer of the Year (under 16 years of age), Sir Patrick Moore Best Newcomer Award, and Robotic Scope Image of the Year.
Cash awards range from £500 for various category winners, £250 for runners up, and £125 for highly commended. The exception is the People and Space Category for which awards are £350 for the winner and £125 for the runner up. Winner of the Sir Patrick Moore Best Newcomer Category receives £350 as does the best Robotic Scope Image. The Astronomy Photographer of the Year receives an additional £1500. (Editor’s note: As of this writing the British pound traded at about $1.62.)
The eight contest judges were drawn from multiple disciplines—astrophysics, amateur astronomy, photography, contemporary art, and science journalism.
• Earth And Space Category
Winner and Astronomy Photographer of the Year
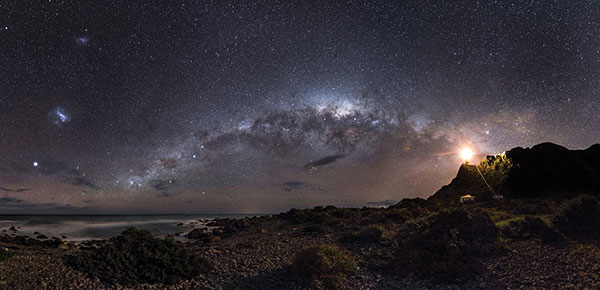
The skies of the Southern Hemisphere offer a rich variety of astronomical highlights. The central regions of the Milky Way galaxy, 26,000 light years away, appear as a tangle of dust and stars in the central part of the image. Two even more distant objects are visible as smudges of light in the upper left of the picture. These are the Magellanic Clouds, two small satellite galaxies in orbit around the Milky Way. The image consists of exposures made with a Canon EOS 5D Mark II using a Canon EF 24-70mm f/2.8L at 24mm. Post-processing was in Lightroom with 16-bit TIFFs exported to Autopano Giga. Final adjustments to the mosaic were made in Lightroom.
© Mark Gee (Australia)
Runner Up
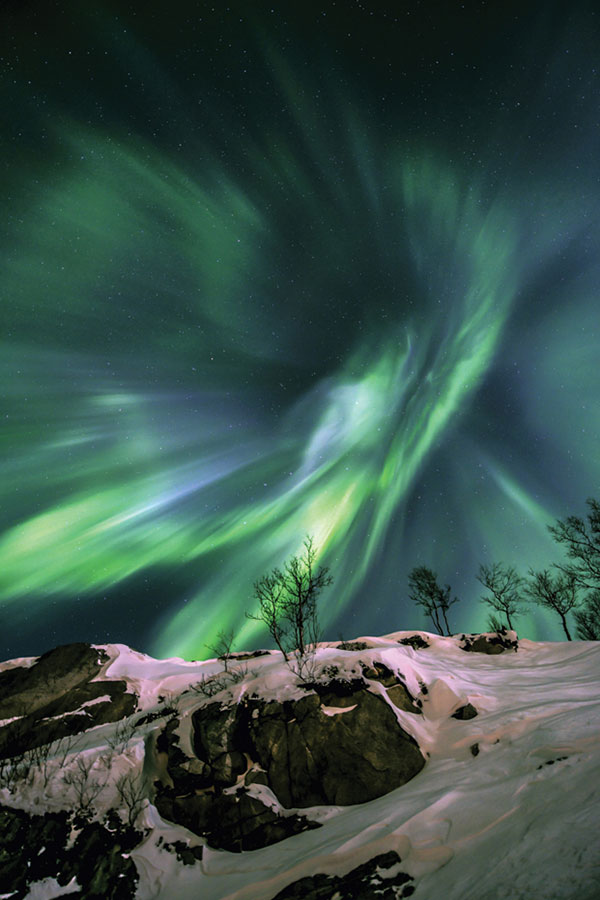
The shifting lights of the Aurora Borealis can take on many shapes and forms as they are molded by the earth’s complex magnetic field. Sheets and planes of glowing gas appear to be twisted into a giant vortex above Grøtfjord in Norway. Image made with a Nikon D800 with an AF-S Nikkor 14-24mm at f/2.8, 14mm. The exposure was 4 seconds, ISO 800.
© Fredrik Broms (Norway)
Highly Commended

All of the light that reaches the ground from space must first travel through the earth’s atmosphere. During its journey the light can be altered by all sorts of atmospheric phenomena. Tiny ice crystals high above the ground refract the moonlight diverting it into a number of beautiful halos. The image was made with a Nikon D7000 and a Samyang 8mm lens at f/5.6. The exposure was 30 seconds, ISO 500. The WB was 4000K.
© Dani Caxete (Spain)
Highly Commended

Like the snowy mountains in the foreground, the nucleus of Comet Panstarrs is composed largely of ice and rock. The nucleus itself is just a few miles across but, as it neared the sun in early 2013, ice evaporating from the surface formed a tail of gas and dust hundreds of thousands of miles long. Image made with a Nikon D800 with an AF-I Nikkor 300mm f/2.8 at f/3.2. The exposure was 16 seconds, ISO 640.
© Fredrik Broms (Norway)
Highly Commended
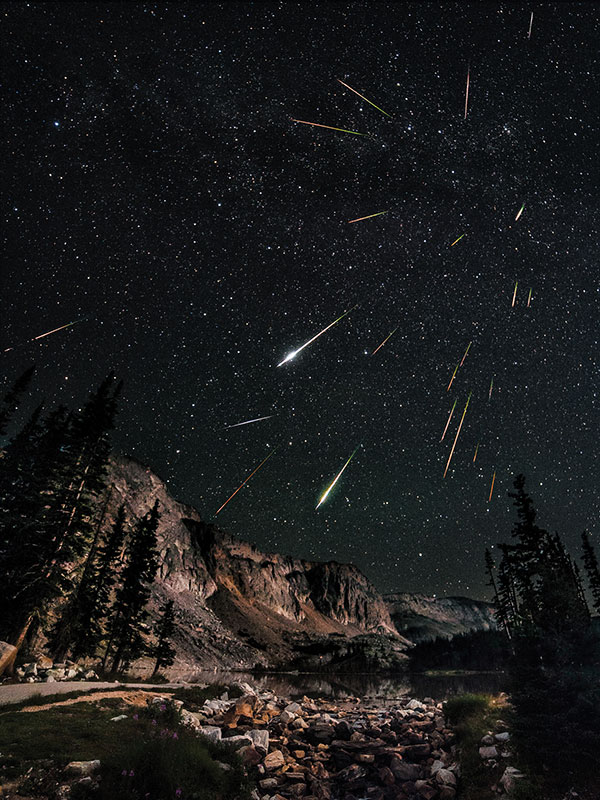
A great deal of careful planning, a long night of photography, and hours of painstaking image processing went into creating this startling composite image of the Perseid meteor shower. The Perseid meteors get their name from the constellation of Perseus from where they appear to come. However, even at the peak of the shower it is impossible to predict exactly when or where the next meteor will appear. The photographer combined 23 individual stills to convey the excitement and dynamism of this natural firework display. The image was made with a Nikon D700 and a Rokinon 14mm f/2.8 lens at f/2.8. The exposure was at 30 seconds, ISO 3200, taken continuously over seven hours. Lightroom was used to sift through all of the images and to do Raw conversions. All shots with meteors were loaded into Photoshop as layers and each layer rotated to correct their position in the sky. This is due to the radiant of the meteor shower changing throughout the night because of the earth’s rotation. One frame was then used as a base and other layers were masked out to reveal only the meteors. One image taken during twilight was used to brighten the foreground slightly.
© David Kingham (USA)
• Our Solar System Category
Winner

This image is a demonstration of both precision timing and rigorous post-processing. It gives the viewer a window into the elusive outer atmosphere of the sun—the corona. A natural dimming of the sun’s blinding brightness, courtesy of the moon, reveals the ghostly glow of gas that has a temperature of 1 million degrees Celsius. By photographing this event, the breathtaking experience of viewing a total solar eclipse is captured indefinitely. Image made with a Canon EOS 50D and a Canon EF 70-200mm f/4 set to 200mm at f/4. Exposures were at 1/500 sec, 1/250 sec, 1/100 sec, 1/50 sec, 1/20 sec, 1/10 sec, 1 sec, 2 seconds, 2.5 seconds, 4 seconds, ISO 100. In all, 81 images were used.
© Man-To Hui (China)
Highly Commended

The moon’s orbit about the earth is not perfectly circular, so that, at different times, the moon can be slightly closer or farther away than usual. If the moon passes in front of the sun when it is at its farthest point, it will appear to be too small to entirely cover the solar disc. This is an “annular eclipse” in which a ring, or annulus, of the sun remains visible. This composite shot shows the progress of an annular eclipse in May, 2013. The image was made with a Canon EOS 5D Mark II with a Canon EF 70-200mm f/4 USM IS with a 1.4x extender. The photo is a composite of four images blended from a set of four exposures—1/125 sec, 1/500 sec, 1/2000 sec, and 1/8000 sec respectively at f/5.6, ISO 200. The post-processing was done in Photomatix for blending the HDR images and Photoshop for the final composite.
© Jia Hao (China)
• People And Space Category
Winner
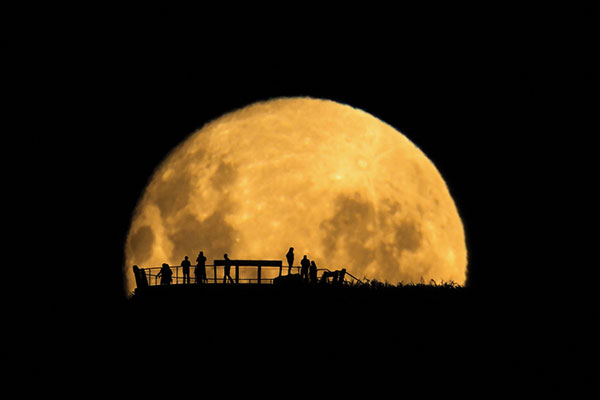
This is a deceptively simple shot of figures silhouetted against a rising moon. By photographing the people on the observation deck from a great distance, the photographer has emphasized their tiny scale compared to the grandeur of our natural satellite. Close to the horizon, earth’s turbulent atmosphere blurs and softens the moon’s outline and filters its normal cool gray tones into a warmer, yellow glow. The image was made with a Canon EOS-1D X using a Canon EF 800mm f/5.6 with a 1.4 extender at f/9.0. Exposure was 1/250 sec, ISO 400. Little post-processing was required.
© Mark Gee (Australia)
Runner Up

Appearing like a column of smoke rising from the horizon, a dark lane of dust marks the plane of the Milky Way in this photograph. This dust plays a vital role in the life story of our galaxy. Formed from the ashes of dead and dying stars, the dust clouds are also the regions in which new stars will form. Image made with a Canon EOS-1D X and a Canon 14mm f/2.8L II at f/2.8. The exposure was 30 seconds, ISO 8000.
© Ben Canales (USA)
• The Sir Patrick Moore Prize For Best Newcomer
Winner
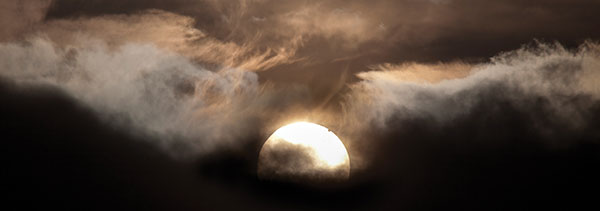
For those lucky enough to see it, the transit of Venus was one of the astronomical highlights of 2012. The planet took just six hours to cross the face of the sun, so cloudy weather was a potential disaster for observers. Here, the final moments of the transit are revealed by a chance gap in the clouds, allowing the photographer to capture the picture of a lifetime. Image made with a Canon EOS 5D Mark II with a Canon 100-400mm with a 1.4x extender at f/4. The exposure was 1/8000 sec, ISO 50. A polarizer was used.
© Sam Cornwell (UK)
Astrophotography Tips
By Tom Kerss, Astronomer at the Royal Observatory Greenwich
There’s a common misconception that beautiful photos of the night sky are a product of sleepless nights and big expense. While fancy equipment and ample free time may increase your chances of capturing amazing shots of the heavens, much can be achieved with the equipment most photographers already have, and a few minutes of experimentation—even if they’ve never thought about astrophotography.
The night sky is a unique low-light scene. All the usual rules apply, but each must be observed to the extreme. A tripod is essential, as exposure times will typically vary between a few seconds and a couple of minutes. Even a tripod will not deliver perfectly sharp stars unless the exposure is minimized because the sky is constantly rotating. Total compensation can be achieved only by using an equatorial tracking platform. Of course, star trails have a unique appeal and can be achieved with long exposures.
Whether you opt for equatorial tracking or not, here are several tips to help ensure dramatic images of the night sky:
1) Use a remote shutter release or timer to ensure there’s no vibration when the shot is taken.
2) Manually focus on a bright star (or the moon) using Live View and 10x zoom. Get the star to be as point-like as possible. If shooting the moon, focus on the edge—known as the limb.
3) Your lens simply won’t be able to autofocus on stars, so leave it on manual.
4) The stars are distant suns. If you want to capture their color accurately, use daylight white balance. The camera is often able to see hues of pale blue, orange, and occasionally deep red that your eye will not.
5) Shoot your images in Raw + Large JPEG. You can use the JPEG to preview and process from the Raw. Since stars are point-like, high-contrast subjects, optical aberrations in lenses are a leading factor in spoiled pictures. Many software packages can correct somewhat for these when editing in Raw.
6) If you’re taking long exposures, your camera’s sensor will become warmer than the ambient temperature. Give it time to cool down between exposures. Cooler sensors produce less noise. Controlling noise in astronomical pictures is best achieved by taking multiple exposures, but before exploring advanced techniques, give your noise reduction plug-in a chance. Modern software is very good at reducing noise, but preserving stars, even in a single exposure.
7) To minimize star trailing, use a fast wide-angle lens. Short, low-magnification exposures produce the sharpest images. A fast lens will give you more stars and a brighter image, and a wide shot will be more forgiving of drift—a star is less likely to spill over from one pixel to the next during the duration of a shot. Many of my images are made with a Tokina 11-16mm f/2.8 used at 11mm.
8) Exposure times are a matter of experimentation. A bright Northern Lights display can produce a stunning image in just 5 to 10 seconds. The Milky Way typically demands longer exposures—30 to 60 seconds. Meteor showers are sporadic in nature, so why not open your shutter for a few minutes on bulb and see what you get?
9) If your lens is f/4 or faster, then, in my experience, photos like the above can be achieved at ISO 400 to 800. Strive to use an ISO that keeps noise to a minimum.


