Adobe’s Lightroom 2; An Upgrade To Appeal To All Digital Photographers
What if you could take a physical light box—like that ancient cabinet model you once used for viewing slides—and put it inside your computer? Photos would appear instantly in a collection of albums, allowing you to mark them for later searches. A loupe would allow you to view the images up close and inspect them for defects. Editing tools—intended for quick cropping, brightness adjustments, and exposure tweaks—would be just a click away in a slide-out drawer. And, when it came time to print the photos or send them off over the web all it would take would be just another click of the mouse. That’s the promise of Adobe’s Lightroom 2, a powerful application intended for serious photographers. As I write this, Version 2.2 is the current state of the art, released last month with updates for current D-SLR cameras.
 |
|
 |
|
|
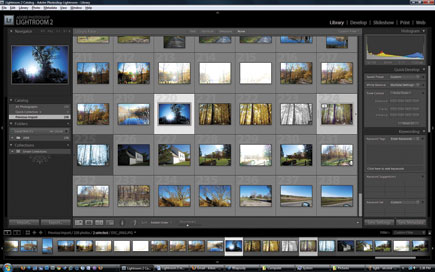
Lightroom 2 is the second manifestation of Adobe’s very popular photo workflow tool. It has five main functions: archiving, editing, slide shows, printing, and web. However, the core function is in viewing photo shoots to edit images and maintain an archive that allows you to access images when you need them. Unless you are a Photoshop fan and love to or need to do advanced editing, Lightroom 2 may be all you need. Editing functions can’t match advanced Photoshop techniques, but many photographers don’t do that kind of detail work anyway.
The Lightroom 2 interface is less cluttered than Version 1, with slide-out panels on the left and right.
A Volume Browser is a major new feature. In Lightroom 2, you can view actual image locations on your PC or a network drive as opposed to seeing virtual file locations. Lightroom keeps track of your original images in a Managed Photos folder, automatically tracking all changes. You can undo your edits in any order, and you can even edit the parameters of a previous editing change. If you are editing in raw, you can save edits and metatag information in a separate XMP file. This makes for strictly nondestructive edits.
 |
|
 |
|
|
I tested a Nikon D60 for raw support and it worked flawlessly. With raw support, you are storing and editing the original source file true to the camera settings and features, not a compressed computer file. Lightroom understands the raw language fluently—a major benefit.
Now, raw support is one thing—raw processing is another. Lightroom 2 is a 64-bit application and runs lightening fast on a PC or Mac. A new sync function can load photos into albums and keep track of the original file and the virtual file, and it worked very fast for raw shots. I tested the retouching features in Lightroom 2 extensively. I intentionally shot a rather minimalistic scene (a lone tree near a farm field) and then put Lightroom 2 through its paces to see what it could do. I was especially impressed with the Sharpening and Luminance controls, and used a Vibrancy slider to make my image look like it was captured in 1929. These tools are all positioned for easy access on the right of the main thumbnail view.
 |
|
 |
|
 |
|
|
Lightroom 2 adds a localized adjustment brush that allows you to paint an area of an image and apply exposure and editing adjustments just to that area. It worked extremely well, and borrows more than a few ideas from Photoshop, in that you may want to darken just one portion of a sky or add some redness to a face but not to the whole image. Lightroom 2 also supports selective masking, so you can do more than just adjust portions of an image—you can remove them altogether. Graduated filters are another new perk in Lightroom 2. And Lightroom does not discriminate against JPEGs, and allows access to processing functions previously reserved for raw format files.


