Micro And Macro Photography, Handheld: A Tiny World Made Large
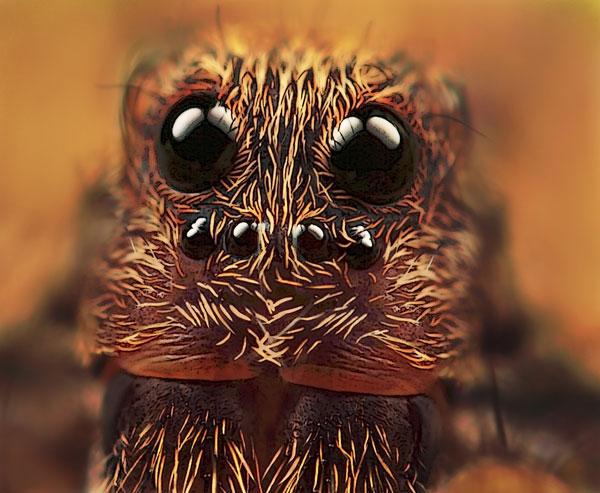
“As an object moves across the visual field, ommatidia are progressively turned on and off.”
One of my favorite books as a child was Eric in the Land of the Insects, written by the Dutch author Godfried Bomans. In this humorous fantasy, 9-year-old Eric enters the landscape painting that hangs on his wall and discovers a world of man-sized wasps, bees, butterflies, and other insects that are stunningly similar to the world of humans. Once photography became a part of my life my world was populated with grasshoppers, spiders, snails, flies, dragonflies, and butterflies—Eric’s world.

All Photos © Huub de Waard

Approaching Insects
Although most insects do not have orifices in their body for picking up sound vibrations, many use parts of their body, such as their wings, antennae, or special hairs, like TV antennae to detect vibrations in the environment. Any errant movement on your part could cause you to lose a shot, so be sure to tread carefully when approaching your subjects. Your job is to make yourself non-threatening. The first thing you want to do is to move very slowly. Look before you move, look at where you place your feet, look at where your equipment is, and, most of all, plan where you are going to put the front of your lens. Many potentially good shots have been ruined by the front of a lens bumping a branch or leaf where an insect was resting, causing it to flee.
Insects, such as the housefly, the hornet, the butterfly, and the beetle, have what are called compound eyes. These eyes are made up of many separate units called ommatidia. Each ommatidium samples a small part of the visual field. Having multiple ommatidia allows the animal to easily detect motion. Some, like the dragonfly, have as many as 30,000 units per eye, each with its own lens. With a compound eye the insect sees a mosaic image. This looks something like the highly magnified dots of a newspaper photograph. Because the lenses in the insects’ eyes have a fixed focus, and can’t be adjusted for distance, insects see shapes poorly.

As an object moves across the visual field, ommatidia are progressively turned on and off. Because of the resulting “flicker effect,” insects respond far better to moving objects than stationary ones. Honeybees, for example, will visit wind-blown flowers more readily than still ones. Houseflies and dragonflies have eyes that cover most of their head. This gives them almost 360-degree vision, enabling them to see predators coming from any direction. Most insects can see some color. While our eyes see a full spectrum of wavelengths from red to violet, many insects see a limited range of colors, the ones most useful for finding food and shelter.
Insects, especially flying insects, will try to escape from a predator by a simple escape reflex based on the direction and the velocity of a moving shadow or object. If a critical velocity is exceeded, the insect will try to fly away from the direction of the threat. Slow-moving objects or shadows often do not trigger this reflex. The lesson learned is that the best way to approach an insect is to move slowly and gently. Most of all, avoid casting your shadow on it.


Affordable Accessories And Options
When working in the micro/macro world there are some important terms to consider.
Strictly speaking, a lens is categorized as a macro lens only if it can achieve 1:1 magnification. Microphotography can be done with a normal macro lens that is equipped with modestly priced equipment.
A lens’ minimum focusing distance is the closest distance your macro lens will allow you to get to your subject while still maintaining sharp focus. A low-budget method to decrease the minimum focusing distance is to extend the distance between the lens and the sensor by inserting extension tubes or a continuously adjustable bellows. Both the extension tubes and the bellows do not contain optical elements. The further the lens is from the sensor, the closer the minimum focusing distance, the greater the magnification, and the darker the image given the same aperture.
Tubes of various lengths can be stacked, decreasing lens-to-subject distance and increasing magnification. Extension tubes and bellows can be used for different lenses. A small disadvantage is that the use of extension tubes and bellows may not preserve autofocusing, autoexposure, and auto-aperture operation.


By adding a tele-converter, an even greater magnification can be achieved. Application of a 2x tele-converter in the example used in the “Some Math” sidebar, however, can produce a maximum magnification of four and two stops loss in light intensity. Adding more glass means a drop in quality and quantity of light transmission, the extent of which depends on the quality of the particular tele-converter you’re using.
Placing an auxiliary close-up lens (or close-up “filter”) in front of a macro lens is another option. Inexpensive screw-in or slip-on attachments provide close focusing at a very low cost. Some two-element versions are qualitatively very good while many inexpensive single-element lenses exhibit chromatic aberration and reduced sharpness of the resulting image. Most close-up lenses are marked with a +d number in diopter unit, the power of the lens.
An interesting alternative is the reverse lens technique, which can be accomplished by mounting a lens with focal length (Fr) in reverse, in front of a normally mounted lens of greater focal length (F), using a macro coupler which screws into the front filter threads of both lenses. The maximally obtainable magnification can be calculated with the equation F divided by Fr. Depending on the quality of the reversed mounted lens, a drop in quality and quantity of light transmission may negatively influence the image quality.
Composition
Composition is more difficult for microphotography than for other types of nature photography.
Your subject might be an insect or a spider sitting on a difficult-to-reach place. Plus, as mentioned, you need to approach very carefully. There are no golden rules to help you solve this one. Play around with composition until you get something that works.
In microphotography, you want to simplify your image as much as possible. Fill up as much of your frame as you can with the subject. Have your focus as sharp as possible and don’t be afraid to experiment with different angles to find the one with the most aesthetic appeal. Photos at high magnification have a corresponding shallow depth of field, so precise control over the location of focus is critical. This requires not only artistic decisions about what part of the subject should be tack-sharp, but also technical decisions about how to make the most of this sharpness.
Fortunately, the location of sharpest focus appears much more pronounced in the viewfinder when the subject is under high magnification. However, just because it’s easy to see doesn’t necessarily mean that it’s also easy to position. Even small errors in a camera’s autofocus can be disastrous for an image, so precision adjustments should almost always be done using manual focus. It’s a near universal rule that the subject’s eye(s) should be the location of sharpest focus and should have a well-chosen position within your composition. For maximal sharpness throughout, adjust the angle of your camera so that the plane of sharpest focus aligns with the head/plane of your subject. If you’re off by a fraction of a degree, the complete subject disappears from view.
In microphotography, the background is often so out of focus that it appears as a solid or smoothly varying patch of color. It’s important to choose a background which complements the color and tone of your foreground subject. Fortunately, one can often pick a different background by simply shifting the camera’s vantage point. One should also take care to avoid placing distracting out-of-focus highlights or other objects behind the subject.


Focusing And Flash
Working with large magnifications means that the subject is only a few centimeters in front of the lens. During the daytime insects move from feeding place to feeding place or are hunting. They stop only for very short periods of time at a specific place to forage, which means that there is no time to set up a tripod.
One needs to hand hold the camera to make the photos.
As magnification increases, depth of field decreases rapidly. Due to loss of light and depth of field considerations, it is advisable to use a ring flash or twin light flash when shooting micros. It will allow you to shoot at a reasonable speed, yet enable you to use a small aperture for sufficient depth of field and a fast shutter speed (e.g., 1/200 sec) to capture moving insects. Magnifying the image also magnifies any movement of the camera and the subject, so it becomes far more challenging to make super-sharp images.
Because I am hand holding a relatively heavy and bulky setup, it is not possible to focus using the lens focusing ring, which also determines the magnification.
Rather, I preset the focusing ring based on how much magnification I want. Once the focus is set, I will physically move the lens, mounted on the camera body, back and forth until the facets in the compound eye(s) of my subject are in perfect focus in the viewfinder. This is the tricky part, obviously, as a fraction of a millimeter can significantly affect the focus. For instance, at 5x life-size the depth of field of the Canon MP-E 65mm at f/16 is 0.269mm! For higher magnifications, the situation gets even worse. In order to stabilize the whole setup, I’ll rest my elbow on my knee or both elbows on the ground. As soon as I see perfect focus being achieved, I’ll press the shutter button to take a photo.

Micro And Macro
Magnification describes the relationship between the actual size of the subject and the size of its image on the sensor of the camera. Photographing a 1.18” long blue-tailed damselfly so that its image size is 0.39” on the sensor means that the magnification is 1/3 (1:3) life-size. Dividing the size of the subject’s image on the sensor by the actual size determines the magnification. At 1:1 life-size, the size of the subject on the sensor is as big as it is in real life.
Macrophotography is restricted to magnifications in the order of 1:10 to 1:1 life-size. Microphotography is the extreme form of macrophotography, dedicated to the photography of very small objects.
Some Math
The maximally obtainable magnification can be calculated with the following simple equation: (D (length of the set of extension tubes or the bellows) + F (focal length of the macro lens)) divided by F = magnification.
For example, adding a set of extension tubes with a total length of 60mm to a 60mm macro lens will give maximally a magnification of (60 + 60) divided by 60 = 2.
Gear List
Canon EOS 7D
Canon MP-E 65mm f/2.8 Macro lens
Canon Macro Twin Lite MT-24EX flash
Canon 2x tele-converter for magnifications larger than 5
Author Bio
Huub de Waard is a Dutch nature photographer who specializes in larger than life-size macro photography. All his pictures are single pictures made in his own garden without using a tripod while the insects are busy doing their thing. His equipment consists of a Canon EOS 7D, a Canon MP-E 65mm f/2.8 Macro lens, a Canon Macro Twin Lite MT-24EX flash, and one or more tele-converters. His photography has been published in national and international photography magazines. To see more of de Waard’s work, visit www.huubdewaardmacros.com.
- Log in or register to post comments
