- REVIEWS
Camera Reviews 
More Reviews Mobile Reviews Photography Reviews - GALLERIES
- VIDEOS
- BUYER'S GUIDES
A BETTER Way to Use Lightroom's DEHAZE Tool for Photos that POP! (VIDEO)
If you're familiar with Lightroom's frequently ignored Dehaze tool, there's more to it than adjusting a slider if you want the best possible results. And if you've never used this powerful and easy-to-use tool, now is the time to start.
According to Adobe this simple tool enables you to remove (or add) "atmospheric haze" from an image, including undesired elements like fog, smog or mist. And while doing so you can enhance parameters like color, tone, and exposure. If some atmospheric effects are desired for the look you want, you can also accentuate them as needed.
Instructor Anthony Morganti is one of our go-to sources for straightforward image-editing tutorials, and in the episode below he demonstrates how to properly Dehaze a photo for your specific needs. The technique he reveals is simple enough for Lightroom users of all skill levels, and it take barely three minutes to explain.
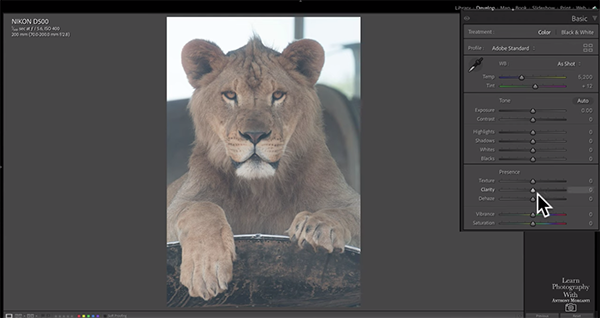
Morganti begins with this important clarification: "When you move the Dehaze slider (either to the left or right), you're greatly affecting the tone and color of the image," even if that's not what you intend. Therefore, if you've already edited a photo for these elements before applying Dehaze, some of your earlier adjustments will be changed or undone—requiring you to go back and make tone and color enhancements again.
Morganti's recommendation, if you don't want to get caught in this time-consuming loop, is to use the Dehaze slider "as early in your workflow as possible, preferably it should be the first thing you do."
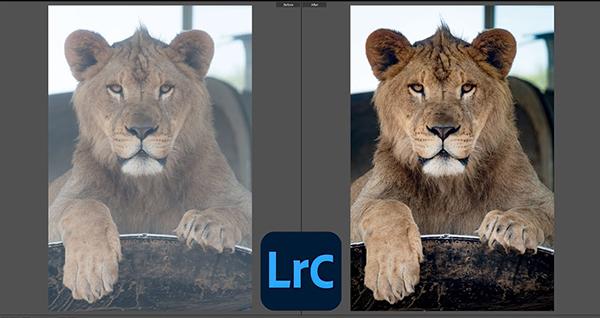
The demonstration image is a tight shot of a lion that's and had lens corrections applied, as well as a crop from horizontal to vertical. It's obvious the photo is really hazy with muted, unappealing color—with an overall flat look.
Morganti illustrates the common problem by moving the Dehaze slider to the right as you might expect, and as he does so contrast greatly increases. That may a good thing, but here’s the rub: the image also become much more saturated, with unrealistic orange tones that adversely affect the edit—as suggested above.
You'll then learn how to employ Morganti's favored approach to eliminate haze, and enhance saturation, vibrance, exposure, without making adjustments more than once. His method is about as simple as it gets. It's all about doing things in the proper order, with a few extra tricks added to the mix.
You can find a wide variety of post-processing lessons on Morganti's very popular YouTube channel, so be sure to take a look.
And don't miss an earlier tutorial we posted from another editing expert, explaining the best way to process sunrise photos in Lightroom for spectacular results.


![]()
Get the Latest Photo Tips, News & Reviews from Shutterbug!
| Camera Reviews Other Reviews | Mobile Reviews Photography Reviews Columns | News | Features | How-To | Resources |
 © 2025 Shutterbug
AVTech Media Americas Inc., USA
All rights reserved