- REVIEWS
Camera Reviews 
More Reviews Mobile Reviews Photography Reviews - GALLERIES
- VIDEOS
- BUYER'S GUIDES
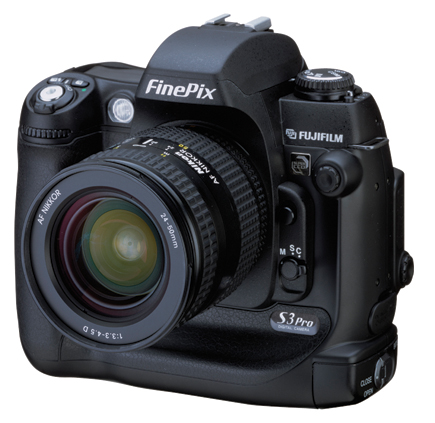
Fujifilm’s FinePix S3 Pro
It Isn’t Just About Pixels Anymore
Photos © 2004, Steve Bedell, All Rights Reserved
Like most photographers, before I try out new equipment on clients, I test it thoroughly. Yeah, right. It's digital so why bother? We can see the picture right off, so let's get shooting! And so it was with this camera. The day after I got it I was booked in the studio all day with sessions, so after a few quick test shots, a gray card, and my "white textured pillow 255 density check," I was off to the races. I took a family portrait, ran downstairs to download it, and watched the images pop up on my monitor. Yikes! I was underexposed! What did I do wrong?
The answer: nothing! Because as you'll see as you read on the files from
this camera look a little different than the files from most other cameras,
including my Fuji FinePix S2 Pro. After opening the files in Photoshop and checking
my histogram and density numbers, I saw they were fine. The only difference
is they looked a little "flat," not quite as contrasty as my other
files. There was something different, a little unique--wait! I know what
it is--they look more like film!
And so it is. Fuji's stated goal was to attempt a more "film-like"
look to the files from this camera. With the expanded dynamic range that the
FinePix S3 Pro offers, it's now possible to obtain greater shadow and
highlight detail at the same time. This sensor now has a wider dynamic range
than transparency film, so can matching and exceeding color negative film be
that far off?
 A |
 B |
|
 C |
||
|
||
While nice to have in the studio, it's even more important in the field.
It will be easier to get detail in both that black tux and white dress. That
previously "blown-out" sky will now have detail. Those pesky "hot
spots" in the background of outdoor portraits will now have detail, as
will that backlit hair on that blonde model. With the earlier information as
a preface, let's back up a little now and look at some of the features
one at a time that make this camera attractive to the target audience--the
portrait and wedding shooter. I would think the same features might also be
attractive to the commercial, landscape, and fashion shooter.
The Body: Since I already own a Fuji FinePix S1 Pro and FinePix S2 Pro, I'll
be referring to them often for comparison, especially the more recent FinePix
S2 Pro. If you've been shooting a FinePix S2 Pro or Nikon model camera
before this, you'll feel right at home. I pretty much knew where everything
was the minute I laid hands on it. I can tell you right off the bat that this
body is better. It's a one-piece polycarbonate job, which means it feels
more "rubbery" and solid. It also has a vertical shutter release,
a first for me, and something I could get used to in a hurry. I wish they carried
the tacky surface to the bottom of the body also. In addition to a PC connection
and a hot shoe, the camera has a built-in flash, becoming more standard every
day in this class of cameras. Many times I'll just put on a 28mm lens
and use the built-in flash if needed when I'm at a family gathering. It's
lightweight and much more convenient than a flash and bracket. The body also
supports USB 2.0 and FireWire for high-speed transfer of images when downloading
from the camera body and both xD-Picture Card and CompactFlash slots for the
media. I did most of the test shooting with a CompactFlash card and loading
through a card reader. Start up is also much improved, being ready to shoot
in 1/2 sec.
 |
|
|
The body continues to use Nikon mount lenses, has a higher resolution LCD
display, and has dumped the funky two battery type system in favor of one set
of four AA Ni-MH batteries. The camera is also fully compatible with Nikon flashes
for dedicated metering capabilities and allows the user to choose between sRGB
and Adobe RGB color space, the latter more applicable for commercial shooters.
|
| |||||||||


![]()
Get the Latest Photo Tips, News & Reviews from Shutterbug!
| Camera Reviews Other Reviews | Mobile Reviews Photography Reviews Columns | News | Features | How-To | Resources |
 © 2026 Shutterbug
AVTech Media Americas Inc., USA
All rights reserved