- REVIEWS
Camera Reviews 
More Reviews Mobile Reviews Photography Reviews - GALLERIES
- VIDEOS
- BUYER'S GUIDES
Photographing Artwork Digitally; Setting, Shooting, And Post-Processing
Capturing the beauty of artwork with a camera has always been a challenge. Sure, it's easy to take a picture of a picture, but to reproduce the full range of colors, textures, and tones that will carry the power of the original, that is a challenge. There is a growing demand for high-quality digital files for juried shows, portfolios, and even for limited edition inkjet prints. In many cases the artists themselves may have a digital camera, but may not have the skill to get the quality image they need for the task at hand, and that's where you come in.
 |
|
|
Digital cameras offer many features that can make your job easier, so let's
begin by reviewing the right way to set your camera up. First, take your camera
out of any Auto mode it may be in. Program and Scene modes are great for average
scenes, but can give inconsistent results under the controlled environment you
will be shooting in. Set the ISO to its lowest setting, and the image size to
the largest that the camera is capable of shooting. The higher ISO speeds will
have more noise (similar to film grain) and capturing the most pixels will give
you flexibility when you post-process the image later. Even if your end result
will not be a large image, starting with a large amount of information will
help you get the best image you can.
Next, choose if you will shoot in a raw, TIFF, or JPEG file format. Raw files
will contain the most information and allow you to choose sharpening, color
balance, contrast, and saturation after you have made the shot with no degradation.
TIFF files are lossless, which is good, but don't contain all the information
that allows raw files to have so much latitude. Cameras capable of creating
TIFF files are not common, but every digital camera made can shoot in the JPEG
format. It yields files that are smaller, but by shooting optimally you can
still get excellent results from them. Ultimately, your choice of capture format
will come down to what your camera is capable of and how comfortable you are
with processing raw files.
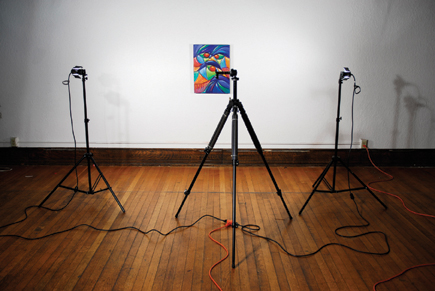
You should shoot artwork with your camera mounted on a sturdy tripod. Camera
movement is the number one killer of image clarity, and even a slight handheld
jiggle will degrade your image. A tripod will also help with aligning your framing
to eliminate any keystoning of flat artwork.
 |
|
|
Unless you are using a D-SLR, you will undoubtedly be shooting with a zoom
lens. Check to see what part of the zoom range is least likely to introduce
barrel or pincushion distortion and keep it set there when you shoot. The quick
way to test is to point your camera at a wall, keeping the top of the wall and
a bit of the ceiling at the very edge of your frame as you slowly zoom from
wide angle to telephoto. As you do this you will see if distortion is introduced
at any focal length setting. Of course, you never want to use digital zoom,
which simply crops your image in camera.
Good lighting is critical to showing all the detail and quality of the artwork.
For flat art such as paintings, prints, and large photographs, two lights will
work well. Some digital cameras cannot sync with external flash units, but will
work well with halogen or standard incandescent lights. Make sure your built-in
flash is turned off--it will only introduce glare and harsh shadows. Hang
your art on a wall and position your lights at a 45Þ angle from the piece,
aiming each light at the edge of the artwork farthest from it. Step back and
look for reflections or sheen. Glossy art can be a real challenge, so try moving
the lights closer, reducing their angle relative to the art. If the art is under
glass you will probably need to take it out. A large black cloth, ideally black
velvet, can work miracles, as no light will be reflected back from it. Hang
it between the camera and the artwork, cut a small hole for the lens and shoot
away.
|
| |||||||||


![]()
Get the Latest Photo Tips, News & Reviews from Shutterbug!
| Camera Reviews Other Reviews | Mobile Reviews Photography Reviews Columns | News | Features | How-To | Resources |
 © 2026 Shutterbug
AVTech Media Americas Inc., USA
All rights reserved