- REVIEWS
Camera Reviews 
More Reviews Mobile Reviews Photography Reviews - GALLERIES
- VIDEOS
- BUYER'S GUIDES
The Whitewater Experience
Wedding And Portrait Class For All Seasons
Fall came late last year to Wisconsin. Either that, or my annual Whitewater class was earlier than it has ever been. Usually, we have autumn color. This time we had sunshine, rain, and a lot of fun (nothing new!). Through it all we learned to photograph in the studio, by window light, outdoors in sunlight and shade, and more. It seemed as if many photographers had been taught to stay out of the sunshine, photographing only in shaded areas. I wondered why. Most of the people with whom I have come in contact with just love the sunshine. They're disappointed when the sun doesn't shine, or when they don't have the opportunity to play in the sun. Why wouldn't they enjoy having their portraits made in a sunny location? So, of course we began the Whitewater Experience this year by going out into the direct sunshine with this group of five sisters and brothers. Where did we pose them? Of course, right in the middle of Michele Gauger's back yard. Well, "back yard" is putting it mildly. She has her home studio situated on quite a few acres of a peninsula between two parts of Whitewater Lake. Not a bad location for a class, huh? |
|||
Selecting Outdoor Backgrounds There it was. Right in front of our eyes. As usual, I began the posing with a fun grouping: a way to get all the kids to relax and see that this was going to be a casual, enjoyable experience. I began with laying the oldest brother on the ground, resting his head on his left hand and tucking his right hand under him. I positioned him so that the sunshine would come from behind him and slightly to the side. The backlighting would be a great separation of the people from the background, adding to the depth of the picture. The sun was almost straight up, so there was a risk of sunshine dabbling onto their faces, but I wasn't too worried about that. It would look natural (Photo 1). |
|||
Then, I just piled everyone on top of each other, the youngest on top. I didn't really go into a lot of posing. I just told them to get their heads touching the one below them and to wrap their arms around each other. That would prevent a lot of arms sticking out all over the place. I selected a 150mm lens for my Hasselblad so that I could contain the background to just the narrow view behind them--essentially cutting out any chance of distracting areas of sky coming into view. A simple green background was all that I wanted. I exposed to get good color in bright sunshine using Kodak Portra 160 film, 1/125 at f/16. Their faces were in almost total shade. There was really nothing bright around them to reflect the light back into their faces. A reflector would have been too bright and cause them to squint. So, what I did was to use my Quantum Radio Slave unit to fire my Quantum flash at full power. I positioned my light to my right, because all the faces were pointed in that direction. The flash was set at full power and was about 10' from them. The sunshine was so bright, I knew that the flash could in no way overpower the natural sunlight. No measurements. Just point and shoot. A Polaroid test print not only proved me to be right on the exposure, but it also gave the kids something to enjoy and gain their confidence. Heck, they were having so much fun, at that point they would have done anything I asked. |
|||
By adding the flash to the ambient light I was able to tone down the background slightly, so that you wouldn't notice all the plants growing up onto their stakes in the background. The background went subdued, but retained its detail--exactly what I was looking to do. The next grouping I did with them began with seating the three younger children on the ground and adding the two older ones behind and between them. I wasn't happy with that composition, because I felt that the two larger bodies seemed to dominate the picture too much. Instead of taking the picture and going on, I scrubbed the composition and began with the older sister seated as the anchor in the center of the group. Then, I added the two younger sisters--one on each side (Photo 2). I had them slip out away from the older girl and lean over to her. That lowered their heads nicely and gave me a way to connect the three of them together, the way I like to do in all of my family groups. I asked the younger of the two brothers to kneel down beside his sister and to rest his chin on her shoulder. That left the opening for the older brother to kneel down on the other side of his sister and complete the grouping. The same strong flash came in from camera-right to open up their faces and subdue the background. |
|||
I then asked the class to find another background for me. I had already selected the next spot, but I wanted to give them the opportunity to think for themselves. No one picked the "nothing" background that I selected here. It was a natural (Photo 3). Lots of depth. Sunlight backlighting the various layers of green. A little bit of the back lake showing, and a fairly nice line between the trees and the sky. Group of five? Three in front, two in the back. As simple as that! Legs apart, straight into the camera. I had done it successfully before. I knew that it would work again. Not a lot of posing. One demonstration of how I wanted them all to stand and it was finished! One flash opening up the deep shadows on their faces and we were done! And So Began BPPI! |
|||
We went inside and set up my painted background (I could have used the natural background inside, but Gauger thought that it was too messy). Anyhow, the light was coming in from our right side. All I had to do was to split light the faces of the older sister and brother, who I sat on posing stools about 6-10' from the entrance way. Then, I put my Westcott Monte Illuminator/silver reflector camera right to pick up the daylight and to wrap it around onto the shadowed side of their faces (Photo 4). The reflector had to be turned mostly toward the outside of the barn door opening so that it would pick up the daylight outside. Then, the daylight simply bounced off of the reflector onto the right side of their faces. The photographers in the class couldn't get over it. They had always thought that the reflector went on the shadowed side. I explained to them that in that position it would bring in light from the opposite direction. I wanted the light to appear very natural, all coming in from the same side. They agreed that it looked great. |
|||
High Key Portraits Outdoors?
I turned their bodies at a 45° angle to the camera to support their profiles. I connected the two together by having the brother put his right arm around his sister, and then brought up his left hand to bring them together still more. The lighting on both of their profiles was coming straight through the translucent background. The hairlight was from the light coming over the top of the Westcott panel. The fill light was partially from the light that was coming around both sides of the panel, but I added my silver reflector inside to help open up the shadowed side of their faces. The reflector was low and pointed up toward the sky so that it would pick up the light from above (Photo 5). The picture would have been more effective had they been wearing white shirts, but the point was shown that it's easy to create high key pictures with daylight. |
|||
Studio Simplicity So, I took everyone into Gauger's studio and set up a simple group of the younger three, the younger girl seated lowest, the middle girl seated to one side, and her brother standing to her left to complete the inverted triangle (Photo 6). This was my regular portrait lighting that I've been showing for ages. One main light, a hairlight, a background light, and a fill light. Again, how easy can it be? When Time Is Short |
|||
One of my best-selling pictures of a bride is when her body is turned away from the light, but her head is turned and tipped back to her higher shoulder (and the light, of course). There is a little more room in the composition on the side toward which she is facing. The shoulders are turned almost directly toward the lens for this 2/3 view of her face, 3/4 length composition. The picture is cropped below her knees (Photo 7). The bouquet is pulled back and lowered to show her slim waistline. The bottom of her gown and her veil are pulled out to give a nice base to the composition. I told the people holding the veil to hold it only on the edges, allowing the folds to show off the veil better. Her eyes are centered in her eye sockets, as seen through the lens of the camera--not as seen from standing in front of the bride. |
|||
A Different Viewpoint There are a few things to the posing of this picture that you may not first realize. The bride's body, of course, is at a 45° angle to the camera. Now, you know where the light is, don't you? It is not at a 45° angle to the camera. Nor is it directly in front of her face. If it were there, the face would be flatly lit. It is in the same location that you would place it if you were facing directly into the bride's face and photographing her full face. So, a simple suggestion is that you stand in front of her face and set up as if you were taking a full face picture. Then, when you come back to camera position, you will have perfect profile lighting. Let's now study in detail the
placement of the profile light: |
|||
The light in the softbox is pointed almost directly at the bride from a height that is slightly higher than her eyes. The exact height is dependent upon how deeply her eyes are set. You want to make sure that the light gets into her eyes. (Don't forget, you can get light into her eyes by either lowering the light or raising her head.) Look for the shadow on the inside bridge of her nose to make sure that the light is properly placed. With the light in that position you will not get any of the main light on the area of her left ear. The eye should be centered in the eye as seen through the lens. In actuality, she probably will be looking slightly out of the left side of her eye. Angle the main light only slightly toward the near side of her face so that some part of that light will hit the reflector. The reflector must be positioned to block the light from flaring into the lens. Stand at the camera (the camera on a Benbo tripod) and look to see if you can see any of the main light. If you can, the lens will also see it. So, have an assistant move the reflector to completely block the light from your view. The fill light should be slightly on the same side of the camera from which the main light is coming. That will prevent any shadows that may come from the fill light from going in the opposite direction from the main light's shadows. All the lighting should appear to be coming from one direction--including the light on the background. Thus, you see the background is slightly brighter in the direction she is facing. |
|||
Notice the cropping. Her profile is near the center of the portrait, rather than being at the left edge of the picture. I don't want to put the outline of her face at the far edge of the portrait. I always allow space in the direction that the subject is looking. The picture is cropped on the bottom below her knees, giving ample base upon which to support her body. Now, take another look again at the pose itself. We're going to maintain everything that we've been studying and practicing up until now. She's looking to her right, so she's leaning to her left. For a feminine pose, you always lean her body in the opposite direction from the way she's facing. The posing table is always under the low shoulder. I've used her train to cover the table, showing off more of the detail than one would expect to see in a seated portrait like this. In addition, she's leaning over her waistline toward the camera. I have found that the easiest way to set this up is to take her head in both of your hands, lift her to her fullest height, lean her slightly to her left and bring her head a little forward toward the lens. You can accomplish all of this in one simple, firm adjustment. |
|||
Notice, too, that you see the flowers from camera position. If she were to look down at her bouquet, she would probably be looking at the back of the bouquet. That doesn't matter. The only thing that does matter is that the viewer of the picture sees the flowers. You're looking at the side of the hand, fingers flowing gently in a downward direction when her hands are at her waistline or below. Look at the entire portrait and study how I've formed a strong base with a pyramid composition. Also, notice how a slightly lower camera height has produced a separation between her chin and her shoulder. Be careful to clear the back side of her profile so that no hair or veil comes down on the far side of her face to interrupt the simple, clean line of her profile. The Bride And Groom Together |
|||
Look at the positioning of their heads in Photo 9. She's in a feminine pose. He's in a basic pose. Together, their heads are parallel and face the main light at the same angle. Thus, the light patterns are identical on both of their faces. She's holding the bouquet down below her waist and slightly to the side, showing off her slim body. If she's heavier, then of course you can bring the bouquet up higher to cover what needs to be hidden. Use Soft Focus Only With
Crisp Lighting On the left you see a portrait made with a Tiffen No. 1 SoftFX drop-in filter (Photo 10). The picture on the right (Photo 11) was made using a Tiffen No. 3 SoftFX filter. All of my portraits are created with at least a No. 1 softening filter. The reason that I can get by with a No. 3--all the way up to a No. 5 (made by combining a No. 2 and a No. 3 filter)--is that I work with my main light going directly through the softbox and that I keep my light fairly close to my subjects. If I were to move the light farther away, or if there were more than a single layer of fabric in front of my light, the light would be much softer. By adding soft focus to the picture it would appear to be almost out of focus. Not good! There would be too many complaints. |
|||
For the pictures with her hands up to her face I placed a posing table in front of her. I raised it up to a height that would permit her hands to reach comfortably up to her face without her having to bend over to bring her hands up to her face. Upright posture is a must. If she's turning and tipping her head to her left shoulder, I'll bring her hands up to the left side of her face. Study the way her hands are positioned. Her wrists are bent inward. You see the sides of her hands, not the backs. Her right hand is resting on the edge of her left hand. She is not holding her wrist. Some people might pose this way when they are just beginning. Which do you like better: the sharper image or the softer one? It doesn't really matter. This is usually a choice that I show the bride. She may sometimes think that she doesn't like soft focus, but when she sees the comparison side by side it's possible that she may change her opinion. Neither one is right nor wrong. It's strictly a matter of taste. |
|||
A Portrait Series Flow I usually begin with a front
profile of the bride (Photo 12). I usually lower the camera slightly for that separation between her chin and her shoulder. In this case her gown came up above her shoulder, so it was difficult to show the complete separation. Then, after doing a profile of the bride I turn her around, leave the lighting exactly as it is and add the groom to the picture (Photo 13). |
|||
There are several guidelines I watch for when setting up this shot. To begin, I set up two posing stools, one directly behind the other. They're a foot or two apart from each other. I sit the groom facing the camera and the bride facing him. They both lean toward each other so that their faces are just about touching. I adjust the stools to have their lips fairly close to one another. This can be accomplished by both changing the height of the stools and by raising and lowering both of their chins to bring his lips just behind hers. A very important aspect of this portrait is to keep the groom at either full face, or have his face turned slightly toward the light. I try not to have his head turned toward her and away from the light. That would light his ear and the side of his face, rather than what you see here. The light on his face is from the reflector that is off to my left and the fill light. I have removed the hairlight from this portrait because it would create highlights on the shadowed side of the groom's face. It's much simpler to do this with just the one main light, the reflector and the fill light. I usually tip the groom's head out away from the bride's profile. This, by the way, usually results in an inverted triangle and a sort of heart shape between their two faces. Sometimes, when you look at the ground glass of your camera you may see too much of the top of the bride's head, or it may appear as if she's tipping her head too much toward the background. You have to look carefully and tell her to possibly tip her head slightly toward the background or toward the camera. That way, you see the side of her face without any distortion. |
|||
It's just a matter of seconds to change that picture to the next one. There is absolutely no change in the lighting in the next portrait. All you need to do is to have the groom open up his shoulder slightly and turn his head to profile. The lights are already set. I usually focus right in between the two of them. With my lens set at f/16, both profiles are sharp (Photo 14). What I look for in this portrait is to keep their heads fairly close together and to try to get their noses parallel to one another. For some reason or other this usually results in a very pleasing double profile. What a simple change from the previous picture, but what an interesting picture this can be! If someone is wearing glasses, as the groom is wearing here, I try to raise or lower his chin just enough to see part of the eye behind the stem of the glasses. Profiles Lit In Opposite
Directions |
|||
The final touches are simple. Bring his back arm around to the bride to connect the two bodies. I often like to bring his front hand to her face, as you see in Photo 15. The final touch is simply to tilt the camera toward the groom. This raises him in the picture and helps to create the 45° angle of this composition. Finally, while the couple is still facing each other, it's so simple to turn off all the lights except the background light. Then, I opened the f/stop of my camera 2 or 3 f/stops, overexposing the dark background and turning it almost white. Simple. Easy. Fast. What a picture to end a wedding album! The champagne is nothing more than a glass of water with a drop of coffee, coke, or whatever is available. The light bounces off the background and comes back through the transparent glass. Did you ever think it was so easy? Have you tried it yet? Once you do, you'll do something similar at every wedding (Photo 16). Working With A Full-Figured
Bride |
|||
The thing that I want to stress to you in this picture is the lighting. When you're lighting a 2/3 view of a face and a profile at the same time, you have to compromise. This, however, is a very beautiful compromise. What I did was to light his profile with the main light. This created almost a split light on her face, but I was able to bring that small patch of highlight onto her left cheek. This lighting is commonly referred to as Rembrandt lighting. The reflector and fill light, both coming from camera left, opened up the left side of her face perfectly. I love the mood in both of their expressions, don't you? Can't you also see how flattering this could be for full-figured people? Window Light Photography,
Updated! First, let's look at what she's wearing in Photo 18. It was perfect! Green, long sleeved V-neck, close to her neck--everything flattering. Absolutely no distractions. How could you want to distract from that lovely face? |
|||
I used the window light to split light her face. Then, I added West-cott's Monte Illuminator (silver/black reflector) camera right--on the same side as the direction of light. The reflector was pointed toward the window to pick up the daylight. Then, I angled it slowly back toward her face until it picked up the window light and bounced it back onto the shadowed side of her face. In essence the reflector became my main light. It was the same as using twin mains. Shortly afterward, we went outside on Gauger's patio for our daily buffet lunch. I noticed the light on our model mom's face. It was perfect profile lighting. Where did it come from out in the middle of nowhere? She was sitting under an umbrella that covered most of the table. Behind her the sun was hitting the side of the house. "It don't get no better than this!" I pointed this out to everyone. All I had to do was to break out my 350mm lens on my Hasselblad for this picture. The background is the side of the house. When you do a close-up with a telephoto lens the background just about disappears, as you can see in Photo 19. |
|||
I kept her shoulders at a 45 angle to the camera, looked through the lens of my camera and stole this perfect profile of her. With her blonde hair and fair complexion this high key portrait of her was perfect! That was, until she turned her face to look at me. Wow! All natural light! Highlights coming from behind on both sides of her. "Now!" I told everyone. "It really don't get no better than this!" No reflectors. Nothing! Just looking and seeing great light, great expression, and a great lady (Photo 20). After that portrait everyone in the class began looking around and truly discovering great light on faces all over the place. Each time they found great portrait lighting I made them look around to see where it was coming from so that they would be able to look for similar conditions again in the future. (A lot of the great directional lighting was coming through open branches of the surrounding trees.) That's how I learned to see light and its sources€virtually controlling light in its raw form. What fun! |
|||
Pictorials With Children
Are Timeless! A mother with her two children were next. I remembered them from last year and what a problem I had with the little girl. This year the kids were all prepped and they were looking forward to the portrait session--more than I was. (Just kidding!) I took some pictures of the two of them together and individually. They were cooperative, but quite "squirmy" at the same time. The photographers in class loved seeing me work to contain the children within the frame of my viewfinder. Finally, I gave up and invited the mother to participate. I figured that in this way we could get some interesting pictures that they would treasure for a lifetime. I was right. |
|||
In Photo 21 the book was the
anchor. Then, of course, Photo 22 was sort of setup. I love to get people playing to each other. Rubbing noses is always a fun thing to go for. I certainly caught a special moment in time here, don't you think? By bringing the main light close to the axis of the lens I can get two faces going in opposite directions, as I did here. You've got to admit that this image will remain special for the two of them for a long time. Talk about bringing happiness to everyone€this is one of those images that we'll all treasure for a lifetime. |
|||
Pictorials Yes, But The
People Remain The Focus Then I got the idea of just letting the horse remain in the background and photographing the bride and groom in the foreground. Gauger threw some food on the ground. The horse remained anchored there--just where I wanted it. I then posed the couple in the shade a little bit from the horse. I then had two alternatives. I could have exposed for the couple in the shade and let the background go light and overexposed. But the horse was an integral part of the picture. Since the horse was definitely a second focal point of the portrait I wanted good detail in the sunny background. So I exposed for the sunshine, 1/125 at f/16, and used a single Quantum flash to bring the light on the subjects up to f/16. That brought the foreground and the background together and made the entire scene print perfectly with even exposure throughout. |
|||
One important thing that I want to point out is the way the bride is seated. Most photographers, when posing a woman seated like this, allow her to lean sideways and rest her weight on her left arm. Instead of doing that I set her up and leaned her forward (over her waistline) the same way I would do for any and all other portraits. Notice how she's leaning forward, toward her knees, and compare how good she looks to how it would appear if she were leaning away from her husband. He, of course, is kneeling beside her to keep his head above hers. I never seat two people on the ground for a picture. One of the people is always higher than the other. This may not have come to your attention had I not stressed that fact here. The next time you pose a couple similarly, watch out for this! And try to stay away from horses, too. Just kidding. Actually, I loved the shoot, the challenge and Photo 23. Immediately after the previous picture I took a look at this location for the next portrait. I have a few places picked at Gauger's "estate" that I know will always net us great pictures. The light wasn't right yet, however. You need to have late afternoon sun to backlight the people here. Either that, or a flash to backlight them. I just opted to come back later in the day. It was worth it. |
|||
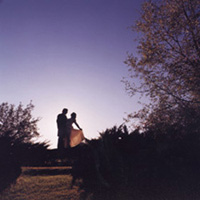
This picture was made as the sun was sinking slowly in the west. The exposure was made from a bank on the opposite side of this little inlet. I used my 350mm lens on automatic exposure mode to pick up this image. I was really impressed, to say the least. My Hasselblad actually reads the exposure right on the plane of the film. It don't get no better than that! You can see in Photo 24 why we needed that backlight, can't you? Notice, too, how I've turned her body to a 45° angle to support her profile. It's made with all natural light used to its best advantage. Notice, too, the way I've placed them off-center composition with the backlit trees on the right were all planned. I don't really think about the rules of composition when I'm doing things like this. After all these years, some things come naturally. After that first exposure Gauger picked a tree branch and held it up in front of my lens for Photo 26. Do you like it better with or without the extra tree branch? Most of the people who saw both Polaroids were equally divided between the two. Personally, I like it better without the extra tree branch. I think that it detracts from the bride and groom. Chocolate or vanilla? All a matter of taste. Oh, yes, did I forget to tell you? I did use a filter to change the color of the sky. It's a Tiffen light blue filter just held in front of my 40mm lens. Really does the trick, doesn't it? You can actually use just about any colored filter to enhance the color of the sky. I like this one in particular because it looks so natural. Finally, here's the "crew" in Photo 27. These are the people who participated in the first Whitewater Experience in the new millennium! Will you be with us for the second? Or, maybe, you can't wait? Join me soon in one of my other classes. Or, you can always study lots more in my web site: www.zuga.net. A Must-Do! A Word About My Equipment Another reason I like the Photogenic system is that the flash heads are small, practically weightless, and fit easily into the small softboxes that I like to use. I work with my two main lights only 3-4' from my subjects. By mounting the lights on Westcott boom arm stands I can place them anywhere I need them to be without having to worry that the stand will get into the pictures. I don't know how I ever worked without them. I direct my lights straight through the softbox rather than bouncing them into the softbox. Using a direct light (surrounded by a round silver reflector) through a small softbox, I get a crisp light that falls off gradually toward the bottom of my subjects. As a result I don't need any vignetters to darken the bottom of my portraits. The falloff of light toward the bottom darkens the image gradually. It's a natural "burning-in" of the edges. In addition, I get round catchlights, which I prefer much more than square ones that would ordinarily form from a square softboxes. I keep duplicate lights on each side of my subjects. Thus, I never have to move the light from one side to the other. No matter in which direction I choose to face my subject, a main light is already in place. After I decide which will be my main light, the other one becomes the hairlight. The two lights behind my subjects are 1/3 the power of my main lights. They're used to light the background and the bride's veil. Because they're used much closer to the veil and the background than my main lights, they have to be weaker to maintain the same exposure throughout the picture. At the distance that I use my lights from my subjects I get a reading of f/16. That's the aperture I set on my lens. The background light usually reads f/11 on my background, so the background appears slightly darker than it is actually painted. My newest background is from Denny Mfg. Co. I have named it Zuga Green. I worked with Denny to develop this as a takeoff on what I have been using up until now. It has no hot spot in the center. Because of that I can light the background to be a little bit brighter on whichever side I wish. This eliminates having to move the background one way or another to achieve the lighter area in front of the highlighted side of my subjects. The reason I use a predominantly green background is because green is the complimentary color to red. Thus, flesh tones are rendered most favorably, regardless of the complexion or skin coloration of my subjects. A warm-toned background, on the other hand, would compete for attention with the face and distract from my main subjects. I much prefer painted backgrounds to muslins, because I feel that most of the muslins I've seen have folds and wrinkles that attract attention to the backgrounds themselves. If the background is noticeable in the portrait it is probably not right for most purposes. The background should be quiet there, doing nothing but creating a feeling of depth to the picture. Occasionally, I will use a background that is more scenic, but that is in rare and special instances. It can be very nice when used sporadically. |


![]()
Get the Latest Photo Tips, News & Reviews from Shutterbug!
| Camera Reviews Other Reviews | Mobile Reviews Photography Reviews Columns | News | Features | How-To | Resources |
 © 2026 Shutterbug
AVTech Media Americas Inc., USA
All rights reserved