- REVIEWS
Camera Reviews 
More Reviews Mobile Reviews Photography Reviews - GALLERIES
- VIDEOS
- BUYER'S GUIDES
Lesson Of The Month
Whiteout
|
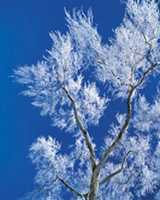
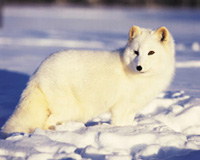
My favorite season for nature photography is winter. The air is crystal clear, trees often stark, graphic forms against a background of dazzling whiteness, and the profound quiet and solitude of a frigid day in the wild can be an overwhelming natural high. When everything in nature has turned white, the photographic challenges are considerable. Keeping your fingers functional in the intense cold is critical, both for safety reasons and to enable you to work the controls on the camera and tripod. Cold also affects electronics. The batteries that power electronic cameras may malfunction when the mercury drops too low. Another problem is that the front element of each lens must be protected from wind-driven snow and ice particles. The most challenging aspect of shooting in winter, however, is exposure. The brilliant whiteness that shrouds all of nature fools light meters into underexposing both slides and negatives. Overcoming this problem requires careful analysis of each shot and applying some very basic photographic principles. How To Handle Exposure Suppose you take a light reading of the scene and open the lens aperture (or adjust the shutter speed) by one or two f/stops to compensate. The underexposed landscape is brightened and the snow is rendered as white. This sounds great, but do all snowy landscapes reflect the same amount of light? Is snow under an overcast sky as bright as snow reflecting full sunlight in a blue sky? Is patchy snow at sunrise more or less reflective than a complete whiteout where a blizzard is blowing snow horizontally? (See #2.) It is obvious that it's impossible to make a general exposure compensation rule that applies to all situations. So, how do you accurately expose for a winter landscape? There are two methods to use that will guarantee perfect exposures every time. |
|||
Method #1: Use your in-camera or handheld reflective meter to read a middle toned or medium gray subject: a gray camera bag, a pair of jeans, a tree trunk, or perhaps a rock outcropping. Any middle toned object will work (regardless of color) as long as it's receiving the same light as the scene before you. Once you've determined this reading, manually set the lens aperture and shutter speed and don't use the Automatic Exposure mode to make the shot. What if there are no medium gray objects nearby? Try this: take a Kodak gray card to a fabric store and buy a small piece of material that approximates the tonality of the card. Sew this onto your camera bag and now you'll always have a medium gray object from which you can take an accurate reading. Method #2: An incident meter reads the light falling onto a scene as opposed to light reflecting off of it. The incident meter isn't fooled by white snow because it determines the amount of light falling onto the scene from the sky, irrespective of the reflectivity of the subject. The technique is simple. Point the white hemispheric ball on the meter toward the camera lens, push a button, and the correct reading is visible on the crystal display readout. However, the light falling onto the meter must be the same as the light falling onto the scene that you're photographing. If you're in the shade and the landscape is lit by the sun, the reading will be inaccurate. |
|||
Keeping Warm The best solution is to carry either two hand warmers (one for each pocket) or several chemical heat packets. The hand warmers are powered by fuel sticks that last about three hours. They provide a tremendous amount of heat and will keep the pockets in your parka toasty when you need to revitalize your fingers. The chemical packets can be inserted into your gloves (or boots) for continuous warmth. Both of these items will prevent frostbite and will ensure you have manual dexterity for the operation of your camera. Protecting Your Camera's
Electronics And Optics When I'm not shooting, I open two or three snaps on my down parka and place the camera against my body. I primarily shoot with a Mamiya RZ67, which is a sizable camera. Nevertheless, I hold it against me and the heat generated by my body keeps the battery warm enough to work. If I know that I'll be carrying the camera on a tripod for long stretches, where it would be awkward to constantly take it on and off, I'll duct tape a couple of the chemical heat packets to the bottom of the camera where the battery is located. To protect the front lens elements from blowing snow and ice, I habitually use lens shades. In addition, a skylight filter acts as a first line of defense in protecting the vulnerable lens should snow or sleet freeze on the glass (#4). |
|||
Winter Compositions Don't forget to use low angled sunrise or sunset lighting to enhance the rich texture of a fresh snowfall or to backlight ice on frozen reeds in a pond. Winter landscapes are dramatized by golden light in the early morning and late afternoon. Snowflakes often catch the light, adding sparkle to your picture. Long shadows offer a graphic element as they stretch out on the pristine white snow. Enjoy winter photography this year. Use these simple guidelines, and the challenges of shooting in white conditions and frigid temperatures will pay off many times over. This lesson will be posted in the free public section of the Web Photo School at: www.webphotoschool.com. You will be able to enlarge the photos from thumbnails. If you would like to continue your digital step by step education lessons on editing, printing, and e-mailing your photos it will be on the private section of the Web Photo School. To enroll for WPS just go to http://shutterbug.webphotoschool.com. Technical Equipment |


![]()
Get the Latest Photo Tips, News & Reviews from Shutterbug!
| Camera Reviews Other Reviews | Mobile Reviews Photography Reviews Columns | News | Features | How-To | Resources |
 © 2026 Shutterbug
AVTech Media Americas Inc., USA
All rights reserved