- REVIEWS
Camera Reviews 
More Reviews Mobile Reviews Photography Reviews - GALLERIES
- VIDEOS
- BUYER'S GUIDES
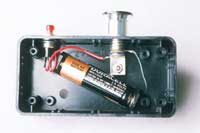
Do-It-Yourself
Build A Redeye Reduction Light
While on-camera flash is certainly
convenient, and sometimes the only way to capture candid people shots,
its downside is the effect known as redeye. This demonic glow in the subject's
eyes is the result of nearly point source and on-axis light entering the
pupils, already dilated by the low ambient light under which flash pictures
are usually taken, and reflecting off the retinas. The lens of the eye
then magnifies the many blood vessels to record an image that, while great
for ophthalmic study, is hardly suitable for wedding and party photography. Parts List Radio Shack numbers are listed,
but equivalent parts from other manufacturers may be used. |


![]()
Get the Latest Photo Tips, News & Reviews from Shutterbug!
| Camera Reviews Other Reviews | Mobile Reviews Photography Reviews Columns | News | Features | How-To | Resources |
 © 2026 Shutterbug
AVTech Media Americas Inc., USA
All rights reserved