- REVIEWS
Camera Reviews 
More Reviews Mobile Reviews Photography Reviews - GALLERIES
- VIDEOS
- BUYER'S GUIDES
All About Light
Eight Simple Tricks For Unique Effects
Photography is all about capturing the effects of light on people, places, and things. Pro photographers are usually entrusted by their clients to find the beautiful light and capture it, or create that light where needed. For photographers like me, where assignments often happen in my darkened studio or in the bowels of some high tech corporate headquarters, it's usually a case of making my own light. As you develop a series of tools and techniques for creating your own great lighting, you begin to find things that work. The natural reaction by nearly all photographers is to get settled on a certain combination of camera, film, etc. It's way too easy to fall into a real rut. While I'm a big proponent of the "if it ain't broke, don't fix it" school, leaving your lighting technique alone for years at a time will surely result in stale, stagnant images and an eventual lack of work. |
|||
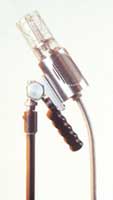
While looking at the work of other photographers is always a good way to get inspired, it's hard not to just out and out copy what you see. Since I'm one of those "gear heads" I like to find new and exciting equipment that can help me create different looks. If you've added a fisheye lens or a 1000mm mirror lens to your arsenal, then you know what I'm talking about. Since most of my pictures are used for advertising purposes and are assigned by clients, I can't get away with a lot of free-form experimenting. What I have been able to do is think long and hard about the type of lighting that I have been creating. The big softbox served me well for many years, but now I'm starting to use different types of lighting and more ingenious ways of supplementing my existing lighting. Here's what I've been up to lately: Pencil Lights. For years I never really knew what these slender flash units were for (Photo 1). Why bother with a pencil light when you can just use a regular old flash head? The more I've been shooting interiors, the more I've resorted to several pencil lights on every shoot. |
|||
While a traditional light head usually has a circular flash tube, a 250w quartz modeling lamp, a cooling fan, and a reflector, the pencil light is a really thin slender light head designed to squeeze behind even the smallest object. I love sticking these things inside lamp shades and running the cable behind the lamp itself. I can stick one or two of these behind posts, under desks, or behind computer monitors. My Balcar units can even be converted into normal light heads and take reflectors, softboxes, and the like. Slaved Vivitars. You've read about my Vivitar 283 and 285s in past articles, so it's no surprise that I bring a box full of these handy flash units on every job (Photo 2). I have converted almost all of my Vivitars into mini studio flashes, with solid aluminum plates tapped with 1/4"x20 threads, pro household synch connections, and potent gel cell battery packs. I keep Wein Super Slaves plugged into the household connection on each flash so they will synch from just about anywhere, and the 285s feature the handy 1/1 to 1/16 power controls. For under $100 each these things are just indispensable. |
|||
Slave Everything. I'm not a big fan of cords, especially synch cords (Photo 3). While I always carry a few spares with me, I like to trigger my flash units via radio remote or IR trigger and slave eyes. If you want to truly go cordless, you'll need to get some good slaves, not the little suction cup jobs intended for amateur use. I have a box full of Wein Super Slaves, which have always served me well and last for about a hundred years without dying. My favorite slave for triggering my main flash generator has always been the Super Slave from Perfected Photo Products in Northridge, California. This boxy slave takes a 9v battery, which makes it capable of synching with just about any flash in the world, regardless of trigger voltage. The great advantage of being wireless is the freedom to wander around unrestricted. While shooting with flash units in general limits your creative options, being chained to the power pack with a synch cord is extremely limiting. By having the freedom to move around the set, I can almost forget about my lighting for a minute and concentrate on the image instead. |
|||
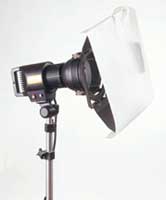
Softening Up. After years of firing all of my lights through Chimera and Photoflex softboxes, I've started to go for more direct lighting (Photo 4). Maybe it's just a reflection of the times, or maybe it's a return to the good old days of Hollywood type lighting, but focusing Fresnels, polished aluminum scoops, and theatrical spotlights have made a remarkable comeback. While I've added a lot of direct lighting to my studio setup, sometimes the really hard light is just a bit too hard. To soften things up just a bit I'll often bounce a direct light off of a silver or white card or add a mild diffusion material. While commercial diffusion materials like Rosco Tufflux make excellent diffusers, they're often just a little too soft. I like to add a sheet of artists Velum to the front of my direct light sources. This will soften the light up a bit without losing the specular quality of the direct light. (Just beware of hot halogen modeling lamps--paper burns!) |
|||
Monolights Rule. As I've mentioned in a few other articles, I've become a convert to monolights in a big way (Photo 5). On location there is nothing like having your power source bolted right to your flash head. Run a 110v power cord and you're all set. Shutterbug is filled with ads from manufacturers of monolights, so it's hard to recommend any one brand. I use Balcar Monoblocs, which accept all of the accessories from my studio Balcar system. The Monoblocs have the added benefit of operating as flash generators to drive another flash head. Two Monoblocs and two Balcar heads can usually light a typical location assignment. For your own photography, you'll probably find that a couple of smallish 200 ws units and one decent 500-800 ws unit will cover just about anything. When trying to mix flash light with ambient, you'll usually find that very small monolights will be more than adequate. In the studio, especially when using medium or large format, power is king. I like to work with 3200 ws into each softbox, so it's usually packs and heads. I light the background for studio portraits with monolights, however, and with faster film even 150 ws units will be more than adequate. |
|||
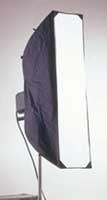
Thin Is In. Sometimes you want soft lighting, but you want the ability to control where that light falls (Photo 6). There are two ways to do this. The hard way is to affix large "barn doors" to your softbox. It's hard because a large softbox will have very large barn doors. The result is a huge and unwieldy assembly that is difficult to maneuver in the studio. I think the easy way is to use softboxes designed for directional lighting. I like to use strip lights, long thin softboxes that throw a narrow beam of soft light. When it comes to tabletop photography, a strip light with a recessed front, like some of the Chimera boxes offer nice soft overhead lighting that falls off to jet black in a matter of a few feet. The photo of the three watches is a perfect example of using a strip light to create the classic background fade. I hung a medium Chimera strip light above the watches, and two small strip lights on each side of the watches. The result is smooth seamless lighting that falls off to a satisfying black background (Photo 7). |
|||
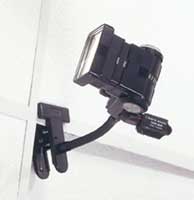
Putting The Light Where You Need It. Sometimes even the pencil light is just too cumbersome, and the customized Vivtar won't fit mounted on a light stand. My solution lately has been to use these little gooseneck clamp assemblies (Photo 8) from Slik distributed by ToCAD of America. While I've done well with the ubiquitous Bogen Super Clamps over the years, these light weight clamp and neck assemblies allow me to stick slaved Vivitars nearly anywhere on a location shoot. Now I can stick light behind door frames, in ceiling fixtures, and behind office furniture. Keeping Your Light In Check. No matter what type of lighting you favor, you'll need to keep light from spilling onto some areas of your scene. While I favor large gobos and black scrims in the studio, on location I often need to cheat back the light without taking up a lot of space. I've recently started using these neat little reflector clamps with attached flexible stalks (Photo 9). By clamping a reflector card or piece of black cardboard to the end of the stalk, which has a handy alligator clip, I can shave just a little bit of light off of the edge of the light pattern. When coupled with a really direct light source like a big Fresnel light, the technique works great. |
|||
A nice way to simulate afternoon sunlight coming through a window is to aim a few flash heads with large 12" silver reflectors through a window, while positioning a large "cookie" between the light source and the window. (A cookie is a piece of scrim that has some areas cut out, usually in a random pattern that looks like light filtered through tree branches.) With these flexible stalks I can use smaller cookies and position them just where I want them without adding another light stand to the mix. By combining a series of standard studio lighting techniques with a bunch of cute little lighting tricks, I've been able to keep my lighting techniques relatively fresh. While many of my clients aren't looking for the latest cutting-edge techniques, doing the same old thing isn't the way to go either. |


![]()
Get the Latest Photo Tips, News & Reviews from Shutterbug!
| Camera Reviews Other Reviews | Mobile Reviews Photography Reviews Columns | News | Features | How-To | Resources |
 © 2026 Shutterbug
AVTech Media Americas Inc., USA
All rights reserved