Lesson Of The Month Using LitePanels On Location For Fashion Shots
Ben Clay/Web Photo School, November, 2003

The lighting in most of the
outdoor model shots you see in catalogs, magazine ads, and even movies
is not always entirely natural. Because sunlight can be very high in
contrast, it can be more of a detriment to the looks of your subject
than an asset. However, if you know a few ways to modify the light of
the sun with diffusers and reflectors, you can reduce the contrast and
create a beautifully natural look for your subjects.
Here, we employed the use of several LitePanels to improve the lighting
conditions in this open grassy field. And even though there was a slight
haze in the sky that day, you will see how important the use of these
light modifiers proved to be.
The Right Location
Driving out to our intended location the morning of the shoot, I noticed
a field off to the right strewn with hay bales and thought it might
be an interesting place to work. The farmer who owned the field happened
to be nearby and I asked him if we could shoot in it, to which he replied
in a thick Maine accent, “Them hay bales ain’t gonna be
’round much longah, so you might as well get on in theya and shoot
away. Knock y’self out!” (Sorry if this accent doesn’t
translate well in writing!)
Anyhow, I thanked him and went to unpack our camera and lighting gear.
My assistant, Ana, and I walked around the field until we found a good
spot. Soon thereafter our model, Paige, showed up and I had her stand
in a spot where I could make out some hay bales behind her.
I mounted an Olympus E-20N digital camera to a lightweight tripod vertically
and angled it slightly to throw the horizon line off. I then set the
exposure mode to Manual, the focusing mode to MF, the ISO to its lowest
setting (80), the resolution to SHQ, and the white balance to 5500K
to match the color temperature of the sun.
I set the aperture to f/2.4 so that the background would be slightly
out of focus, set the shutter speed to 1/500 sec to accommodate for
exposure, and took shot #1.
The result shot shows that even though the sky was somewhat hazy and
diffused, the sun still caused a significant amount of contrast across
Paige’s face. While this level of contrast is not as bad as it
would have been in full sun, there were still some things we could do
to improve the lighting.
|
|
LitePanel #1
First, we went about setting up a 77x77” LitePanel frame. We attached
two Main & T Clamps onto two LiteStands and mounted the sides of the
LitePanel frame to the clamps. Once the frame was supported by the LiteStands,
we angled it about 30Þ to allow for maximum coverage, tightened
down the Main & T Clamps to prevent the frame from rotating, and used
the LiteStands to elevate the frame to the right height (#2).
|
|
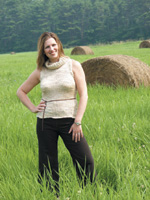
While Ana made sure the LitePanel
diffused Paige from head to toe, I slowed the shutter speed to 1/320 sec
to accommodate for a slightly lower light level. Once everything was in
position, I took another shot (#3).
The result shows a much more diffused result. The light falls gradually
across Paige’s face and the overall tone is much more even. Notice
how similar the tonal values of her arms are compared to those of the
first result shot.
|
|
LitePanel #2
Reviewing the shot, I realized I wanted to add a “rim” light
to Paige’s right side to create a little more separation between
her and the background. So Ana set up a 39x72” LitePanel frame with
crossbar, attached a soft gold/white fabric to it, and positioned the
frame to bounce sunlight into the right side of Paige.
Once the LitePanel was in position, I asked Paige to try a few different
poses. Oftentimes, it is more flattering for a model if she faces her
body away from the camera instead of head-on, and then turns her head
toward the camera. I re-checked focus and took another shot (#4).
Notice how the second LitePanel has created a very nice rim light that
articulates Paige’s outline and creates a more defined sense of
shape. It also creates a great hairlight. Her poses, too, are more dynamic
than before, as they suggest movement.
|
|
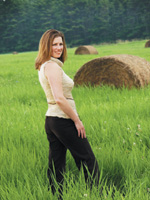
Finally, I wanted to add a
third LitePanel to brighten up the right side of Paige’s face, but
first we needed to secure the second LitePanel into position. Ana took
another Main & T Clamp and attached it to the collar of a LiteStand,
and then attached the other end of the clamp to the top bar of the LitePanel.
She then adjusted the height of the LiteStand to make sure the reflective
angle was right and then went to set up the third LitePanel frame (#5).
|
|
LitePanel #3
Once the second LitePanel was secured, Ana then set up a 39x39”
LitePanel frame, attached a soft gold/white fabric and crossbar, and stood
midway between the camera and the second LitePanel. She then angled the
LitePanel so that the soft gold side would bounce sunlight into the shadowed
side of Paige’s face.
Once everything was in position, I asked Paige for some more poses, and
without any changes to the camera settings, I took another shot (#6).
The result shows a bright, warm light that fills in the shadows on the
right side of Paige’s face nicely. As you can see, the LitePanels
help to render dimensional, natural-looking lighting without appearing
as though the scene is artificially lit.
Technical Equipment
Camera/Media: Olympus E-20N digital camera; lithium polymer
battery pack; Olympus 512MB CompactFlash card; tripod
Lighting: Photoflex 77x77” LitePanel frame and
crossbar; 77x77” white translucent fabric; 39x72” LitePanel
frame and crossbar; 39x72” soft gold/white fabric; 39x39”
LitePanel frame and crossbar; 39x39” soft gold/white fabric; 3 Main
& T Clamps; 3 LS-2322 LiteStands
If you would like to continue
your digital step by step education lessons on editing, printing, and
e-mailing your photos it will be on the private section of the Web Photo
School. To enroll for WPS just go to www.shutterbug.net and click on WPS
Free Lessons.
|
|