- REVIEWS
Camera Reviews 
More Reviews Mobile Reviews Photography Reviews - GALLERIES
- VIDEOS
- BUYER'S GUIDES
Lesson Of The Month
Creating Brushed Metal Reflections
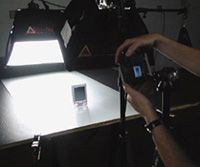
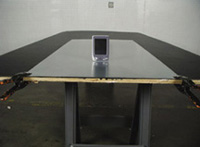
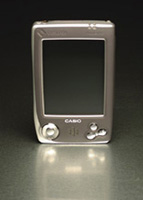
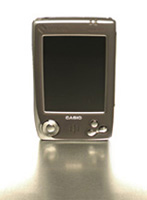
In the wide world of product advertising, photographic trends and techniques can define the look of an ad. Alternatively, certain designs can influence how products are photographed. Sometimes it's difficult to know which was developed first, the design or the shooting style. In some cases, it's a combination of the two working together. This is certainly true of one of the more popular styles these days: clean-looking shots where the subject is grounded with some sort of drop shadow or reflection, surrounded by a pure white foreground and background. Often times, these images are built and/ or assisted by photo-editing programs like Adobe Photoshop or Adobe Photoshop Elements to ensure that the white background/foreground is 100 percent white, and that drop shadows and reflections are smooth, unobtrusive, and gradually fade away. The first thing we like to do when creating lessons here at Web Photo School is to take a typical on-camera flash shot of our subject for comparison's sake. On-camera flash can work well in low-light situations or to serve as a fill light outdoors, but rarely does this type of lighting lend itself to studio photography; it tends to render objects as flat and dimensionless. And when used on reflective objects like this Casio handheld, the results can be rather blinding (#1 below)! Our first step was to create a surface that was both reflective and slightly textured. The day of the shoot, we drove to the local hardware store and bought a small sheet of aluminum for about $15. Back in the studio, we set a sheet of plywood on two sawhorses, clamped the sheet of aluminum to the plywood, and positioned the handheld a third of the way down the sheet (#2). Next, we set up our first light source, a small (16x24") Photoflex Starlite Kit. We attached the SilverDome softbox to the connector, attached the connector to the Starlite head, and secured the head to a Litestand. We positioned the light at a 3/4 angle overhead for a few reasons. We wanted to light the handheld so that it would appear three-dimensional but still have soft, even lighting. By positioning our diffused light source at a slightly different angle than that of the camera, we were able to achieve both. Notice how the angle of the SilverDome also prevents the screen from getting blown out as in #1, while creating a nice textured reflection in the aluminum (#3 and #4). Now that we had established the main light on our subject, we focused on lighting the background. We set up another small Photoflex Starlite Kit and attached a Photoflex Boom to the Starlite to be able to position it over the table. The small SilverDome worked well to illuminate the background evenly. To ensure that the background would go completely white, we bumped up light output by using a 1000w bulb in this rear softbox (#5 and #6). Looking at the result on the camera's LCD, we noticed that while the background looked good, the top of the handheld was overexposed due to the angle of reflection from the rear softbox. To bring this area back into a better exposure range, we decided to flag off this direct light. We attached a 12" Photoflex black/silver Litedisc to a Photoflex Litedisc holder, secured it to a Photoflex Litestand, and positioned it just over the top of the handheld. Since we didn't want to interfere with the light from our main light, we made sure the Litedisc was far enough back so as not to block it. Our result shot shows a much better exposure for the top end, with the front edge reflecting the main light (#7 and #8). Next we focused on the details of the reflections.We wanted to create a repeating pattern in the reflection of the main dial as well as brighten the smaller buttons to the right. We attached two 12" silver/white Litediscs to Litedisc holders and Litestands, and positioned them on either side of the handheld. We adjusted their positions until the reflections looked good (#9 and #10). Our final result on the set would later allow us to enhance the shot in Adobe Photoshop by fading out the foreground reflection using Paintbrushes and Gradients, and dropping in the screen from another exposure without any lights on (#11 and #12). Technical Equipment This lesson will be posted in the free public section of the Web Photo School at: www.webphotoschool.com. You will be able to enlarge the photos from thumbnails. If you would like to continue your digital step by step education lessons on editing, printing, and e-mailing your photos it will be on the private section of the Web Photo School. To enroll for WPS just go to www.shutterbug.webphotoschool.com. |
||||
|
|
|
|||


![]()
Get the Latest Photo Tips, News & Reviews from Shutterbug!
| Camera Reviews Other Reviews | Mobile Reviews Photography Reviews Columns | News | Features | How-To | Resources |
 © 2026 Shutterbug
AVTech Media Americas Inc., USA
All rights reserved