- REVIEWS
Camera Reviews 
More Reviews Mobile Reviews Photography Reviews - GALLERIES
- VIDEOS
- BUYER'S GUIDES
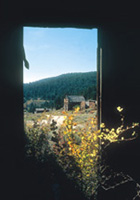
Anything But Front Light
Use Side And Backlighting To Enhance Your Travel Photos
I'm always amazed when non-photographer friends and neighbors show me their vacation pictures. Endless, bland, front-lit building facades, along with seemingly interminable shots of the kids and relatives squinting into the sun. A hundred years ago this was recommended practice, as the family box camera, with its slow lens and slow film, needed all the help it could get (in the form of blasty front lighting) in order to deliver a successful handheld snapshot. At the consumer level, at least, the esthetics of interesting lighting had to take a back seat to the available equipment and materials of the day. |
|||
Today, however, with contemporary cameras offering fast optics, various programmed metering schemes and auto fill flash, coupled with fast, sharp films, there's simply little excuse, other than lack of awareness, for dull pictures due to flat lighting. There are, of course, unavoidable
circumstances (e.g., guided tours) over which you have no control, such
as tourist attractions encountered at an unflattering time of day, when
you have no time or viewpoint options. Another seemingly "total loss"
situation in terms of interesting lighting is the occasional cloudy or
foggy day. But, as you will see, while these circumstances present unique
challenges of their own, they often have their own set of creative lighting
solutions. The key is awareness. |
|||
The Shadow Knows You therefore need to be as aware of shadows as you are of light when assessing the photographic possibilities of a scene; after all, light and shadow are equal partners in the world of photography. A major step upward on this learning curve is to shed your lighting awareness "blinders." This means not becoming so mesmerized by intriguing new vistas, whether landscape or cityscape, that you are oblivious to other, alternatively illuminated, related subjects that exist all around you in every direction. As you look around 360 degrees, unless you're standing in a pancake-flat landscape at high noon, the lighting direction changes. This provides the opportunity of capturing a variety of kindred photos to achieve a more in-depth coverage of a locale or subject. |
|||
Not only should you strive to seek varied subject/lighting candidates all about you, you should also try to recognize compositions requiring a variety of lens focal lengths. By telling your photographic story in long, medium, and close-up croppings, combined with differing lighting directions, you will maintain your viewers' interest in the manner favored by major travel-oriented publications. In every instance, though, each photo of the series needs to stand on its own as a successful image; merely turning 90 degrees between each of four wide angle shots won't do it--you have to always be seeing a location, not just covering it. Subjects illuminated by extreme sidelighting require fast action on your part. Don't waste time looking for something "better." By the time you decide there isn't anything better, the sun may well have moved on, leaving the subject either entirely in shadow, or in increasingly more open frontal lighting, depending on the sun's direction of travel in relation to your subject. Zoom lenses are a plus here, as they avoid time wasted looking for and changing lenses. Exposure Considerations | |||
Backlighting is a bit more tricky. The possible variables are greater and can have a greater effect on the final photograph. While experience (and some note-taking at the novice stage) is the best teacher, here's the basic decision you have to make and then execute technically with your camera: how light or dark do you want the shadow side (the side you're shooting into) of your subject to be in relation to the (usually) much brighter surrounding background area? This gets even more ticklish if the source of the backlighting (e.g., the sun) is actually in the image frame/metering field. Fortunately, with most backlit situations, the light source is either out of the image area, or obscured by the subject. Relative close-ups can be handled nicely via built-in, TTL fill flash. For longer shots, it will depend on how important the bright surround area is. If it is of little consequence, meter just the shadow area; my "insurance" brackets in this case would be 1/2 and 1 f/stop under (with slide film) the metered first shot. If the bright area needs to remain reasonably detailed, then take an averaging reading of a 50/50 bright/shadow mix; my insurance brackets here would be 1/2 and 1 f/stop over the initial metered frame. In practice, this is much simpler and quicker than this narrative would indicate. With a little experience, your response will become nearly automatic. Besides, you generally have considerably more time to deal with backlit situations. If you find yourself with no meter, a dead meter, or simply no time to use one, the outdoor rule of thumb for side and backlighting is to open up one stop for sidelighting (over the correct exposure for a front-lit scene), and two stops for backlighting. The "sunny-16" rule (f/16 with your film's ISO rating as the shutter speed, under bright sun conditions) will get you close to a front-lit exposure combo. Time permitting, bracket as experience dictates. To Photograph Or Not€ This treatment works well on cloudy or foggy days, too. While overcast lighting is flat, all but the most leaden conditions still offer subtle modeling of shapes. Including the shadowed back side of foreground portico columns, for instance, adds a touch of the third dimension to an otherwise monochromatically lit scene beyond. So next time you're traveling, camera in hand, I hope you'll look at new places with an eye toward depicting them in the most interesting light. By maintaining a constant vigilance to the lighting possibilities all around you and in every direction, you will find that your ability to construct an entertaining visual essay of any photo/travel outing will grow by leaps and bounds. Indeed, when you experience the difference expressive lighting can make, your first priority as you preview a scene through your viewfinder will be--"anything but front light!" Quick Guide To Travel Lighting Awareness
|


![]()
Get the Latest Photo Tips, News & Reviews from Shutterbug!
| Camera Reviews Other Reviews | Mobile Reviews Photography Reviews Columns | News | Features | How-To | Resources |
 © 2026 Shutterbug
AVTech Media Americas Inc., USA
All rights reserved