Site Links
|
 |
 |
 |
TTL Flash Shedding New Light On Close Ups And Macro
By Jack Neubart October, 2002
| |
A
ring flash immediately comes to mind when considering
artificial lighting with close-ups and macro. This Canon
MR-14EX features a bi-tube configuration, with ratio
control between the flash tubes. The ring rotates around
the lens axis, letting you emphasize specific subject
features. This flash can also serve as a wireless transmitter,
should I decide to illuminate the background with a
wireless receiving flash.
|
|
Any time of year presents
us with budding opportunities to shoot close-ups. We can find flowers
any time of year, indoors--and possibly even outside. And we’re
not just limited to plants. Anything within range of a macro lens or
any other lens with close-focusing capability is fair game. We just
have to know how to master the tools at our disposal, and lighting is
a big part of that.
In the past, I would favor
available light, since that meant I wouldn’t have to deal with
flash guide numbers and calculations in my close-up work, especially
when working with multiple strobes. Of course, that also inclined me
toward shooting at or near maximum aperture and using selective focus
(a shallow field of sharpness), often surrounded by a soft blur of color
in the out of focus areas. But eventually I wanted more, and when I
started using 35mm SLRs (and even medium format) with TTL auto-flash
capability, a real solution was at hand with dedicated TTL flash units.
Now I could use flash to shoot at or near minimum aperture and get dramatically
sharp results.
But my world of close-up TTL flash photography had a few caveats in
store. Even now, I was still concerned with movement, but not exactly
in terms of camera shake, more in terms of focusing error. For instance,
when focusing on a butterfly perched on a blossom, I still had to deal
with the slightest breeze that might throw the subject out of focus.
|
| |
The
flexible arms on this Novoflex macro bracket (code name:
UNIMARM) make it relatively easy to adjust the position
of each flash head, in this case the Novoflex Auto-Duo-Flash,
without the need to continuously loosen/tighten joints on
an articulated arm. |
|
Then there is
also the matter of exposure error resulting from light and dark subject
tones or surroundings. I would have to use flash exposure compensation
where necessary, adding standard/ambient exposure compensation when using
flash as fill. I might also use auto-flash-bracketing (not available with
all cameras/flashes).
Even with TTL capability, there
was yet one more problem--the flash unit itself, as I’d discovered
along a hiking trail on a Caribbean island. I found myself lying on my
stomach under a hot tropical sun, with beads of sweat rolling down my
face and hands, all in an effort to capture a tiny and very skittish American
chameleon. I’d brought along a TTL shoe mount flash and off-camera
cable, since I couldn’t leave the flash on-camera: The lens (and
lens shade) might have blocked some or all of the light and thrown the
subject in shadow, even if I’d employed the negative tilt feature
on the flash. So, instead, one hand grasped the flash, while the other
held the camera--both precariously and uncomfortably. A better alternative
to this approach was needed.
|
| |
|
Ring flash and twin-light systems require a power module,
which houses the batteries. Individual flash tubes or heads
may be on/off switchable. Here we see the two tubes of this
Canon MR-14EX bi-tube ring flash set for a 1:4 (left to
right) output ratio, to give the subject some modeling.
|
|
Macro Setup Alternatives
We may be willing to put up with the heft of a shoe mount in hand, in
exchange for more power (for smaller f/stops and greater depth of field)
and faster recycling (restless subjects don’t wait for a flash to
power up)--at least for a short while. But what if you had some way to
use this strobe in close-up photography that would render it more effective
and make it easier to use, especially when you have to employ two flash
units together? You definitely don’t have enough hands to juggle
all this.
One possibility involves the
use of a macro bracket. This consists of a base (which attaches to the
camera’s tripod socket) and two extensions, usually in the form
of articulated or flexible arms with individual ball heads, to support
up to two flash units (one on either side). Various system components
may come as options, beginning with the rudimentary base and arms. Admittedly,
this is not a compact alternative. In order to use my existing wireless
system, I’ve used battery-loaded shoe mount strobes with the macro
bracket, with the entire assembly mounted on a tripod. With suitable diffusion
on each side, this would make a very convenient copy stand setup.
|
| |
|
When a ringlight is used on axis with animals or people
it has the same effect as an on-camera shoe mount flash,
producing redeye, or in the case of my cat, glowing green
eyes.
Photos
© 2002, Jack Neubart, All Rights Reserved |
|
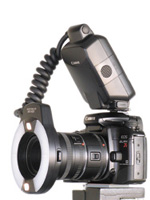
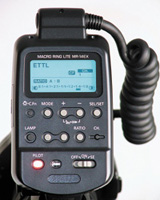
There are also twin-flash macro
systems. These consist of a pair of identical mini strobe heads (sans
batteries), connected to a shoe-mounted control module (with batteries).
In contrast to battery-laden shoe mounts, this mini-assemblage lightens
the load considerably when used with a macro bracket.
Another option exists. While
the control module still sits in the hot shoe, the twin mini-heads may
come with and attach to a mounting collar (or ring) that fits on the front
of the lens, doing away with the need for a bracket entirely. With a collar,
the twin-light system is very compact and lightweight--and easy to hand
hold. A veritable powerhouse outdoors.
Whichever configuration you
choose, twin-light systems offer a good degree of independent movement
of each flash head, for optimum positioning, thereby enabling you to tackle
a wide variety of subjects most efficiently. Output may be controlled
individually on the flash heads and/or in the control module. What’s
more (provided they are slotted at the front) these mini-heads may even
accept drop-in plastic or gel filters (for color effects) or diffusion
panels (for a softer light). Compact heads, however, do not generate the
same amount of light as a standard-size strobe, and may have limited features.
|
| |
|
Catchlights in the eyes (averted to avoid the green-eye
effect) clearly reflect the use of a ring flash here.
|
|
Twin-head systems obviously
have much to offer. But if you don’t want to deal with putting these
various pieces together, and especially if you want an easier and faster
to use and even more compact alternative, consider the ring flash.
Which Ringlight Rings True?
The typical ring flash consists of two key components. As with twin-light
systems, there is, first, a control module (also serving as the battery
housing) seated in the camera hot shoe. Second is the flash tube housing,
which mounts to the front of the lens (via a ring/adapter or directly).
Module and flash attach by a cable permanently, or they may be detachable.
(Within a product line and where components are sold separately, the same
control module may be used with either a ringlight or a twin flash.) The
ring flash housing has the freedom to rotate fully around the lens axis.
|
| |
|
The macro twin light (in this case, the Canon MT-24EX) provides
a combination of flexibility and portability unmatched by
any macro lighting system. Focusing lamps (shown on) help
with subjects in low light. |
|
The basic concept behind a
ringlight is that it consists of a fully circular flash tube behind heavy
diffusion, thereby bathing the subject in a soft, even wash of light.
This is a form of seemingly shadowless lighting. I say “seemingly
shadowless” because, under some circumstances, a faint shadow may
be noticeable within the subject, whereas a more discernible shadow may
fall on a light-toned backdrop.
Sometimes ringlighting is too
flat, perhaps leading to lackluster pictures. Hence a ringlight which
actually uses anything but a continuously circular flash tube. The housing
may still be circular, but the ring of light actually consists of two
semicircular flash tubes. This bi-tube configuration may go one step further,
with each flash tube instead being linear, not curved, with as few as
two opposing tubes--and perhaps as many as four flash tubes in all, comprising
what then amounts to a full circle--in a quasi-rectangular housing.
As a result, each flash tube
may act as an independent flash unit, being turned on or off, albeit not
independently movable. Select systems even provide for ratioed light output
between the two (or more) tubes. Why would you want to switch tubes on
or off or control their output? For better modeling. Beyond that, you
may be better able to deal with obstructions that might block the light
from one side and create objectionable shadows by reducing or eliminating
output from that side. With most systems, ringlight and twin flash alike,
when one tube/head is shut off, additional power is shunted to the remaining
tube(s)/head.
|
| |
|
A ring flash might have produced a glaring hot spot in the
pool of water that formed toward the lower half of this
bromeliad. A macro twin light provided more flexible options
and a better guaranty against hot spots. (Lens: 100mm macro;
near lifesize.) |
|
For a ring flash to work its
magic, the subject should be the same size as or smaller than the diameter
of the ring, but that’s not a mandate, since the flash can also
be used more conventionally off the lens. Owing to the ring flash head’s
close proximity to the subject, it should be possible to stop down to
very small apertures to enhance depth of field. And because it mounts
directly to the front of the lens, and has a generally small diameter,
a ringlight lets you squeeze in between tree branches and other tight
spaces to provide good illumination of subjects that are otherwise hard
to cover with another light source.
The one drawback to a ring
flash may also be one of its strongest assets. Ringlights are not very
powerful, so that even in bright light, backgrounds are subdued when the
right combination of small f/stop and 1/125 sec or faster sync speed is
used (other combinations may also work). In other words, the opportunity
to create dramatic backdrops with close-up and macro subjects presents
itself at almost every turn. This may also apply to macro twin-light systems,
provided both heads are aimed at the subject, not beyond.
Some twin-light systems and
many ringlights come with an additional feature built-in, something not
found on the typical hot shoe flash. This element is a focusing lamp (or
set of lamps) that makes it easier to see a subject in subdued lighting
or through slow optics.
|
| |
|
I tried this shot of tiny seashells in the sand with three
different sets of flash units attached to a Novoflex macro
bracket with flexible arms. First was the Novoflex Auto-Duo-Flash;
second was wireless, with a combination of a Sigma EF-500
Super and Canon 420EX, followed by a pair of 420EX units
in the final variation. While mini-heads are a bit easier
to work with, the wireless solution let me take advantage
of the modeling flash function of the Sigma and Canon units.
(Lens: 100mm macro.) |
|
So these days, shooting close-ups
with flash has become second nature, thanks to TTL control. Bring on those
skittish chameleons. I’m fully prepared to photograph them this
time--in a flash.
Macro Flash Tips
What follows are general guidelines. Every situation is a judgment call.
You may have to adapt equipment to the needs at hand by modifying techniques
or approaching the subject in a more innovative fashion. Or you may simply
want to take a more creative tack.
• Three-dimensional subjects with an obstructed view. Use
a ring flash, since it penetrates barriers and opens up areas that might
otherwise be thrown into shadow (such as a bug among the foliage or the
interior of a flower). Ring flash configurations that fully encircle the
subject may be preferable if you wish to blanket the subject area in light.
Where part of a curving leaf obstructs the light, use a bi-tube/multi-tube
ringlight and shut off or tone down the light on the offending side. Working
with a more contrasty light also adds snap and enlivens colors with any
subject photographed by a ring flash.
• Three-dimensional subjects with an unobstructed view. If
the subject is very small, use a bi-tube or multi-tube ring flash or a
twin-flash system (ratio light output for a modeled effect, where possible).
For subjects that are larger and/or farther away, (with the appropriate
lens and, if necessary, the proper lens attachments for close-up/macro),
use a dual-flash system on a macro bracket. Try to avoid casting double
shadows.
• Artwork and flat objects. Because of the potential for
glaring hot spots, non-movable flash systems (namely, ringlight and on-camera
flash) should be avoided. Use an on-lens twin flash (for postage stamps,
coins, other things this size) or a bracket-mounted dual-flash system
(for larger subjects) in a copy stand-like setup (each head at a 45Þ
angle relative to subject), equidistant on both sides. The lighting should
be diffused to ensure that it’s as even as possible.
• Glossy and mirror-surfaced subjects. Some sheen adds sparkle
to a shot and conveys a sense of the subject’s nature; other times
it may be objectionable--this is as much an artistic as a technical call.
As with artwork, a two-flash system is needed. If you suspect serious
surface reflections, use a light tent. An alternate approach simply calls
for diffusing each flash to prevent those glaring hot spots. I may use
one or two (or more) layers of a white handkerchief or those thin, semitranslucent
white foam sheets that are used in packaging, sometimes resorting to commercial
diffusers--or a combination of these. Bounce flash also works, but the
excessive loss of light may result in larger f/stops and less depth of
field. Cross-polarization (one polarizer on the lens, another on each
flash head) may help to eliminate reflections where absolutely necessary,
with a resulting substantial light loss. You can buy sheets of polarizing
film (for use on flash, not the lens) at photo-supply outlets. (Caution:
flash tubes get hot, and anything covering them should be inspected regularly
to prevent it from melting or igniting. Provide breathing room, and avoid
placing plastics or any flammable material directly against the flash
face.)
• Zoo subjects behind glass, terrariums, and display cases.
Either a twin-tube on-lens macro flash (for very small subjects at/near
the front) or a dual-flash bracketed system (for larger and more distant
subjects), with flash tubes angled toward subject, to prevent/limit reflections
off the back of a case. Keep the flash heads against the glass, if possible,
to prevent flare, and use a lens shade. Restrict light reach to subject
by using small f/stops. Lights should be diffused when aimed at shiny
surfaces. For small displays, it may help to use a 50mm macro lens or
a close-focusing 28mm or 35mm optic; a 100mm macro (or thereabouts) for
larger displays--all depending on subject distance and size. With small
terrariums, especially those with a glass/acrylic lid, you may want to
try positioning a “sun” light above, with a second light from
front or side as fill. Watch for obstructions, such as plants, rocks,
and ornaments, which might block the light and cast shadows. The lens
should be held flush against the glass, where possible, to prevent distortion,
as well as to avoid catching reflections in the picture.
• Aquariums. Either a twin-tube on-lens macro flash or preferably
something with more flexibility and reach, namely a dual-flash bracketed
system (with flash tubes equidistant for moving subjects). To prevent
or largely alleviate backscatter (myriad hot reflections) that results
when light directly hits floating particles in the water, angle flash
heads toward subject, not squarely, and position them against or as close
to the glass as possible, and use a lens shade against flare. Try to avoid
low-lighting angles, as unnatural, in favor of a more naturalistic light
from overhead somewhat. Increase depth of field and restrict light reach
to subject by using small f/stops. Lights should be diffused to prevent
glaring hot spots off shiny scales. Anything from a 90mm or 100mm macro
to a 28mm lens with or without close-up attachment will work nicely, depending
on size of aquarium. Hold the lens flush against the glass to improve
image quality.
|
 |
|
 |
|
|
 |
 |
 |
|