- REVIEWS
Camera Reviews 
More Reviews Mobile Reviews Photography Reviews - GALLERIES
- VIDEOS
- BUYER'S GUIDES
Lesson Of The Month
Dressed For The Occasion
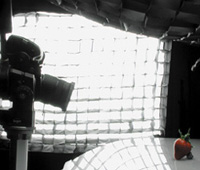
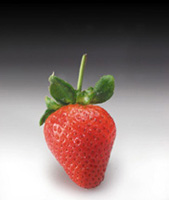
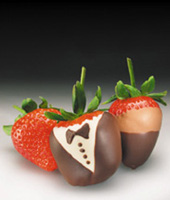
| Photographing food is often more difficult than it looks. Making something appear fresh, cold, or hot can be an arduous task, particularly when you are simultaneously tending to your camera and lighting. If your budget allows, hire a stylist to help you build the shot. You can focus on your composition and lighting while they work their magic. However, if you are shooting alone, you can still come away with good results. Armed with a few simple techniques, you can produce your own mouth-watering images. Building The Shot Note: Because we didn't want our prize strawberry to melt or to appear "unfresh" in the final shot, we used a substitute while developing the shot. We wanted the strawberry to stand upright to appear almost floating, so we propped it up with some "ghee," a 50/50 mixture of modeling clay and kneaded eraser (#4). Then we brought in a medium Photo-flex Starlite kit with grids to the left in order to "fill" in the side of the strawberry and give it some dimension. We took another shot and reviewed the results on the back of the camera's LCD. Notice how the grids from the second softbox still prevent the light from spilling onto the background (#5 and #6). With this relatively simple lighting setup in place, we were ready to bring in the talent. We took out the substitute and gingerly positioned this tuxedoed strawberry using the same ghee as before. Once it was in place, we checked focus in the camera and took a shot (#7). Our result looked good, but something was missing from the shot. The background transitioned well from white to black with room for text, and the strawberry was softly lit while maintaining a sense of texture and dimension. We realized that while the chocolate tuxedo was a nice touch, we had lost the dramatic red in the strawberry. We needed color! So we brought in two more strawberries and positioned them just behind the first one. Because the lighting was already in place, it only took a few minutes to compose the shot (#8). After the photo shoot, we downloaded the images to the computer and reviewed them on screen. To dress the shot up for advertising purposes, we added a headline and a border using Adobe Photoshop (Final image). From start to finish, this shot took about two hours. Technical Equipment |
|
|
|
|


![]()
Get the Latest Photo Tips, News & Reviews from Shutterbug!
| Camera Reviews Other Reviews | Mobile Reviews Photography Reviews Columns | News | Features | How-To | Resources |
 © 2026 Shutterbug
AVTech Media Americas Inc., USA
All rights reserved