- REVIEWS
Camera Reviews 
More Reviews Mobile Reviews Photography Reviews - GALLERIES
- VIDEOS
- BUYER'S GUIDES
Lesson Of The Month
Simple Setups For Small Business
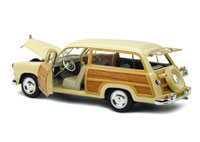
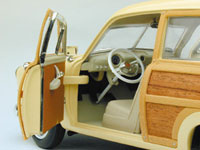
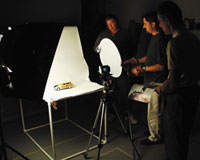
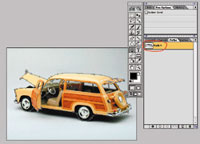
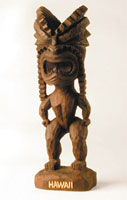
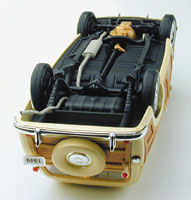
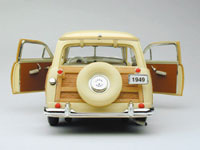
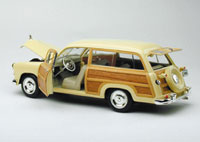
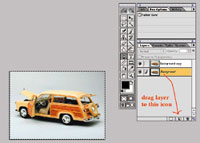
| Until recently, most small business owners would never have entertained the idea of producing their own images of their product for advertising purposes. Easy to use digital cameras, image- editing software, and basic lighting equipment and techniques have all changed this notion. At Web Photo School, www.webphotoschool.com we have set out to demonstrate just how practical this process can be simply by approaching local businesses who are in this very position (and there are a lot of them). Surfwarez.com is based out of Monterey, California, and is run by James Frangella and Daniel Clark. They sell many different types of surfing paraphernalia, including this beautifully crafted replica of Ford's 1949 Woodie station wagon (Figure 1 below). When they started their web site, they hired a photographer to shoot all the products. They found the process to be somewhat slow and considerably expensive. Every time they got a new product in, they had to schedule a time for it to be shot, and often the end result, although professionally done, did not turn out as they had initially envisioned. Soon afterward, they purchased an inexpensive digital camera and began to take shots on their own. But lacking the experience of a photographer, they had little idea of how to go about lighting their products. We asked them to come to our studio with a few of their products so that we could demonstrate simple lighting techniques and a basic workflow for their situation. The following week, they came in with an assortment of items and I explained what the different components were and how they were used. Months earlier, we built a shooting table using PVC, foamcore, and a roll of white background paper, and decided to use it for these shots (Figure 2). Frangella pointed out that the Woodie's hood, doors, and rear window all opened to reveal interior parts of the car. So we placed the Woodie on the table and opened the hood. I positioned a medium SilverDome to the left of the set to throw light into the hood, and set up a white Litedisc on the right to bounce the softbox's light into the right side of the car. I set the camera on a tripod, positioned it at a 3/4 angle looking down into the car's engine, and took a shot. Since the digital camera we were using displayed the captured image on its LCD screen, it was easy to dial in and confirm the correct exposure (Figure 3). Using the same lighting setup, we placed the car on its hood to reveal the underside and took another shot. Taking multiple shots of the same object like this would later allow Frangella and Clark to reveal all the car's features on their web site with more detail (Figure 4). Next, I lowered the camera's angle and took a few more detail shots. Each time I moved the car, I would check to see how the reflections and shadows affected the composition. I kept the overall positioning of the softbox and reflector, but made minor adjustments to them for each angle we positioned the car. For a couple of shots, I flipped the reflector over to its silver side to increase its level of reflection (Figures 5, 6, 7, and 8). Finally, we positioned the car so that it would reveal the majority of its features as our overall shot (Figures 9 and 10). Later that afternoon, I opened up this image in Photoshop and using the Pen tool, drew a path around the car and sections of windows (Figure 11).v Once the path was saved, I duplicated the layer and chose Select All (Command-A) for the bottom layer (Figure 12). Making sure the background was set to white (and that my path was deselected), I hit the Delete key. This made the bottom layer the same color I had set the background, in this case white. Next I selected the top layer and loaded the selection of the path (Figure 13). Now the top layer was just the selection of the car. Under Selection, I chose Inverse and hit delete (Figure 14). Under Selection, I chose Deselect. I selected the bottom layer and chose a soft-edged brush in the Paintbrush palette. I set the brush's opacity to 20 percent and, using several clean strokes, painted just under the car where a shadow would be (Figure 15). I later sent this image to them as an example of what they could do for their web site images down the road if they wanted (Figure 16). Since we had our lighting all set up, we decided to shoot some other items. We placed a small Woodie key chain on the table in the same direction as the first car, moved the camera in closer and took a shot (Figure 17). Next, we placed a wooden Hawaiian sculpture in the set. Frangella remarked that in previous shots, they had had a hard time bringing out the details and texture of the wood. To address this problem, I swung the softbox around to the left until the light was cast along the texture of the wood. Since this left the right side of the statue completely dark, I positioned the silver Litedisc in closer to fill in with a reflection of higher contrast. The contrast from this reflector helped to bring out more of the texture (Figures 18 and 19). When Frangella and Clark left, they were already planning how they would set up their own lighting studio once they got back. A couple of days later, I received an e-mail from Frangella thanking us for the lighting instruction. He told me that he and Clark had built a similar light table and they were already getting great results. I spoke with Frangella at the time this lesson was being written and he told me that since he started adding these and other images to his site, that his business was riding a major wave. For the best in surfing paraphernalia, check out www.surfwarez.com. This lesson will be posted in the free public section of the Web Photo School at: www. webphotoschool.com You will be able to enlarge the photos from thumbnails. If you would like to continue your digital step by step education lessons on editing, printing, and e-mailing your photos it will be on the private section of the Web Photo School. Shutterbug has negotiated with WPS to offer our readers a special 33 percent discount rate of $30 per year. To enroll at this discount just go to: http://shutterbug. webphotoschool.com and fill out the Shutterbug questionnaire which will help us to publish lessons for you in the future. Technical Equipment |
|
|
|
.
|


![]()
Get the Latest Photo Tips, News & Reviews from Shutterbug!
| Camera Reviews Other Reviews | Mobile Reviews Photography Reviews Columns | News | Features | How-To | Resources |
 © 2026 Shutterbug
AVTech Media Americas Inc., USA
All rights reserved