- REVIEWS
Camera Reviews 
More Reviews Mobile Reviews Photography Reviews - GALLERIES
- VIDEOS
- BUYER'S GUIDES
Lesson Of The Month
Shooting Your Own Family Portrait
If you're like most
photographers, you probably prefer to spend most of your time behind
the camera rather than in front of it. I am no exception. Inevitably,
however, there are times when smiling for the camera is unavoidable.
For instance, my wife and I recently had our first child, and ever since,
our family and friends have been clamoring for a family portrait. Now
you do have the option of paying someone else to take your family portrait,
but again, if you're like most photographers, you'll probably
opt to do it yourself. Make The Time Background Considerations |
|||
Next came the decision on what
type of lighting to use. I wanted to keep the lighting simple and natural
looking, but mostly I wanted to make sure that our son, Aidan, would be
okay with the lights. Had I decided to use a flash system, he (as with
most children) would most likely have been overwhelmed with the strong
bursts of light, causing the photo shoot to end abruptly. Instead, I decided
to use a Photoflex Medium Starlite Kit mainly because it is a continuous
light source--no flashes to contend with. |
|||
I set an Olympus E-20N digital camera on a tripod set to eye level and filled the frame with the quilted background. I then set the exposure and focus modes to manual, set the ISO to its lowest setting (80), set the resolution to TIFF, and finally created a custom white balance setting to match the color temperature of the Starlite Kit (3200K). Since I wanted the background to be slightly out of focus, I set the aperture to f/2.0 to create a limited depth of field and set the shutter speed to 1/80 sec to compensate for exposure. |
|||
Once everything was set, I asked my wife, Heather, to bring in Aidan so that they could both stand in for a test shot. I had Heather stand about a foot and a half from the face of the softbox so that when she held Aidan in the crook of her arm, they were both in the frame. Since he was a little sleepy, I just took a couple of test shots and then Heather carried him back to his crib so that he could get back to important business: sleep (#3 & #4). |
|||
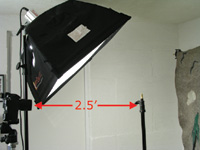
I checked the results in the camera and was happy with the positioning, lighting, and exposure. Before they left, I noted where Heather was standing and marked the spot on the floor with black masking tape. For the next shot, I wanted to have all three of us be in the frame, and since I wouldn't be looking through the camera, I wanted to make sure that everyone would be in focus. To double-check the focus point, I placed a LiteStand over the "X" and raised it to eye level (#5). |
|||
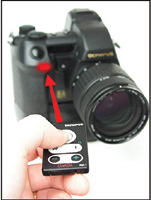
Next, I set the camera so that I could release the shutter with the remote control unit (included with the camera). To set the E-20N to remote capture, first press and hold down the Drive button and turn the Sub dial until the remote control icon appears in the control panel. This may work in similar fashion with your camera, but check your instruction book for details. When you want to take a picture, point the remote at the front of the camera and you will see a red light below the shutter button start to blink red. The shutter will then release after 2 seconds (#6). |
|||
I was all set to take our portrait remotely. Now all we needed was a small window of opportunity with the little one. And so, after his nap, a feeding, and a diaper change, Aidan was ready for pictures. We brought him in, stood over the "X" on the floor, and I took several shots of us looking into the camera. And even though Aidan never once looked into the lens of the camera, he was captivated by the continuous, warm light of the softbox just above the camera. Here is our favorite take of the bunch (#7). |
|||
Afterward, I opened the image
up in Adobe Photoshop and applied a traditional "burning"
technique to the image. I'm particularly taken with portraits where
the edges of the frame have been darkened, or "burned in,"
as it often helps to bring the subjects forward from the background. It
can also help to give the shot a little more dimension. Using a soft-edged
brush, I painted over the perimeter of the frame with the Burn tool set
to the Midtones range at 20 percent until the effect was where I wanted
it (#8). |
|||
Of course, later in the afternoon,
while Heather was out running an errand, Aidan awoke from another nap
and was particularly wide-eyed and alert. Since the set was still up,
I slowly picked him up and brought him back into the shooting space. I
powered up the camera, grabbed the remote unit and discreetly took a few
more shots(#9). If you would like to continue your digital step by step education lessons on editing, printing, and e-mailing your photos it will be on the private section of the Web Photo School. To enroll for WPS just go to www.shutterbug.net and click on WPS Free Lessons. |


![]()
Get the Latest Photo Tips, News & Reviews from Shutterbug!
| Camera Reviews Other Reviews | Mobile Reviews Photography Reviews Columns | News | Features | How-To | Resources |
 © 2026 Shutterbug
AVTech Media Americas Inc., USA
All rights reserved