- REVIEWS
Camera Reviews 
More Reviews Mobile Reviews Photography Reviews - GALLERIES
- VIDEOS
- BUYER'S GUIDES
Lesson Of The Month
Shooting A Basic Head Shot
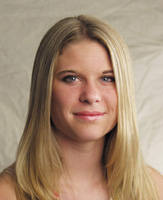
Recently, I was at a local dance studio taking a headshot for one of their dancers, Crystal. While headshots can be fairly straightforward, it is always good to keep different lighting approaches in mind. Here, I ran through some fairly fundamental techniques to demonstrate some varied results. Once we arrived at the studio, we set up the lighting equipment in one of the dance rooms that wasn't being used. For the background we clipped a sheet of tan muslin cloth to a Photoflex Boom and secured it to a Photoflex LiteStand. We then set up a Photoflex Small Starlite Kit and positioned it off to the right of Crystal to serve as the main light source (#1). |
|||
Since Crystal wanted to have a high-resolution 8x10" headshot that she could submit for auditions, I set the digital camera I was using (an Olympus E-20N) to capture images at its largest size and highest quality. I dialed the Image Quality to TIFF and the Image Resolution to 2560x1920 pixels. While these settings would afford high-quality print images, they would also take up a lot of CompactFlash card space. Consequently, I used a high-capacity CompactFlash card (160MB) for this session. Since I wanted sharp focus mostly on Crystal's eyes and not so much on the background, I needed to open the aperture relatively wide to create selective focus. I set the aperture to f/4.0 and then dialed the shutter speed to 1/125 sec to accommodate a good exposure. I checked focus, waited for Crystal to blink and took a shot (#2). |
|||
This image shows a natural-looking result that gives an effect similar to that of a window light. The light is even and diffused, and wraps around the face gradually. Notice the soft shadows cast from Crystal's nose and cheek. Next, we decided to fill in the shadow a little using a Photoflex 32" MultiDisc with the Soft Gold side showing. My assistant, Jarred, attached the MultiDisc to a LiteDisc Holder and LiteStand and positioned it so that the light from the Starlite Kit would be reflected into the shadow side of her face (#3). |
|||
I kept the same camera settings and took another exposure. Notice now how the shadows are much less pronounced. By filling in the shadows, we have minimized the contrast, and yet there is still a sense of dimension to the shot (#4). Next, we decided to change the lighting somewhat. I wanted to light up the background and pull up the texture of the muslin background, so we set up an Extra Small Starlite Kit and positioned it low between Crystal and the muslin. |
|||
For the moment, Jarred pulled the MultiDisc out of the set while I focused on the main light source. I replaced the Small Starlite Kit with a Medium Starlite Kit to create an even softer light. (Remember, the larger the light source, the softer the light.) This helped to minimize the shadows even more. I then swung the Small Starlite Kit around to the side about 90ž to light up the right side of Crystal's hair. Once everything was in place, I took #5 and #6. |
|||
Again the result shows a nice transition from light to dark on Crystal while the background light helps to create separation from the muslin fabric. |
|||
Once again, Jarred brought in the MultiDisc and used it to fill in the shadows and lighten the left side of her hair. Once everything was in place, I took several exposures from which she could choose following the photo shoot (#7 and #8). Remember, there is no "correct" way to light someone. It is important to experiment with different lighting scenarios on the set to find the one that works best for your subject. |
|||
This lesson will be posted in the free public section of the Web Photo School at: www.webphotoschool.com. You will be able to enlarge the photos from thumbnails. If you would like to continue your digital step by step education lessons on editing, printing, and e-mailing your photos it will be on the private section of the Web Photo School. To enroll for WPS just go to www.shutterbug.net and click on WPS Free Lessons. |
|||
Technical Equipment |


![]()
Get the Latest Photo Tips, News & Reviews from Shutterbug!
| Camera Reviews Other Reviews | Mobile Reviews Photography Reviews Columns | News | Features | How-To | Resources |
 © 2026 Shutterbug
AVTech Media Americas Inc., USA
All rights reserved