- REVIEWS
Camera Reviews 
More Reviews Mobile Reviews Photography Reviews - GALLERIES
- VIDEOS
- BUYER'S GUIDES
How To
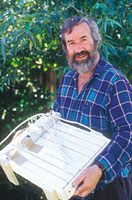
Build A Contact Printing Light Source
In the February 1999 story "Pro Tips For Platinum Printing," I mentioned there were two possible Ultraviolet (UV) light sources that could be used for platinum and other alternative contact printing processes. In that issue, landscape photographer Bill Craig not only explained how he used the sun to expose his platinum contact prints, but pointed out the potential problems with exposure consistency. One of the best ways to avoid inconsistent exposure times when contact printing is to build your own UV light source, which Craig has subsequently done. This time, I'll show you how he did it. The good news is that you don't have to be an electrician to make your own UV light source. All of the construction materials used for this project can be found at any well-equipped hardware or home improvement store. While the final cost is not inexpensive, platinum printers and other traditional darkroom workers will discover that the results are well worth it. The "Materials List" contains the items needed to construct the light source. Putting A Little Light On The Subject. Like almost all of the supplies used to construct this light source, eight 18" long under cabinet fluorescent light fixtures were purchased at a local hardware store. Before using the light fixtures, you should remove any light tubes that may already be installed. When a UV fluorescent tube is later installed in the light fixture, it should open on three of its four sides in order to allow light to spread evenly. In order to do this, you must first remove the plastic lips from the light housing that are designed to reflect light down onto a kitchen counter. So that the UV light tube won't be shaded after it's installed, you must cut off all of the fixture's plastic reflectors. Craig used a hacksaw, but tin shears or a Dremel hobby tool with a small saw blade attached will work, too. After you've cut the reflectors off, the only plastic you'll see will be the ends of the fixture--where the tubes are held in place--and the back of the fixture itself. Don't cut the back of the fixture because that's where all of the wiring is located. After trimming the first fixture, place a fluorescent tube into it to make sure it still works. Turn the switch "on" and leave it in that position because after the light box is assembled you won't be able to reach each light's switch. Follow the same procedure for the other seven fixtures. |
|||
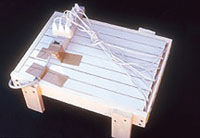
After preparing the light fixtures, the next step is to construct a wooden housing using 1x3 lumber. Start by laying the fixtures--sans light tubes--on their back with all of the cords placed on the same end. At this point, there should be eight light fixtures laying side by side. With the light fixtures in this position, you should begin to see a resemblance to the finished project. The next step is to measure the wood needed to construct the light source frame. Depending on your carpentry skills and available tools, you can get as clever as you want (such as cutting beveled corners, etc.) but Craig opted for the simplest way. He measured the two ends of the fixtures, cut the wood to that size, and then used them to determine how long to cut the side pieces. At this point, Craig noticed he needed to cut a notch in the end piece where the fixture's cords would be located and used a wood chisel to cut the notch into the frame's end piece. This part of the construction doesn't have to look like This Old House's Norm Abrams did the work; it simply has to provide space around the perimeter of the eight light fixtures to have the end piece flush when assembling the frame. Using 11/2" wallboard screws, fasten the four pieces of wood together around the eight light fixtures. To make assembly easier, it's a good idea to first drill small pilot holes. Make sure that the wood frame is snug around the light fixtures. To accomplish this, Craig allowed the end with the fixture's wires to hang over his workbench so that all of the fixtures were flat and he was able to get a tight fit. After completing the wood frame, you'll notice that although the fixtures are close-fitting within that frame, they may still fall out if you try to pick it up. |
|||
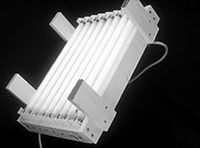
The next step is to drill holes through the wooden end pieces by putting a 1" screw into the end of the frame into the end of each of the eight fixtures. Craig used 1" screws because the wood, although called 1x3, is only 3/4" thick and the screws are 1" long, providing 1/4" bite into the fixtures. He didn't want the screws to go into the wiring. With the frame still on its back, drill holes in the center of the end pieces--about 11/4" from the bottom. Craig drilled the holes until he felt the drill pass through the wood. Be careful that you don't drill into the light fixture's plastic housing. To make sure this didn't happen, Craig placed a small piece of masking tape on the drill bit to show him how deep to drill. Drill a hole for each of the fixtures on the end where the power cords are located. Craig would drill one hole and put the screw in, then drill the next hole and put that screw in, until he had all of the screws in one end. This made it easier to turn the frame in order to repeat this operation at the opposite end. After completing this part of the project, the box should have one screw into each fixture on each end. Adding Legs. The next step is to make a set of legs for the completed frame. While the frame is on its back, use leftover 1x3 board and cut four 6" lengths. Give special attention to the length of these cuts. While it may seem obvious, these four pieces of wood will be used as legs and should be of equal length. After cutting the four pieces, double check to see that the lengths are equal. Turn the nearly completed light box so it's on its back and the cords are hanging over the edge of your workbench or other work surface. Next, attach the legs to the frame. Using the surface of the workbench as a base and allowing the legs to set on it while drilling through the leg into the frame, Craig used two drywall screws to fasten each leg. With the surface of the workbench as a measuring point, the legs should be at the same point relative to one another. After the legs are attached and the box is turned over they should be level and the height of the light source should be about 3" above your contact printing frame. When the box is turned over, the fluorescent fixtures will be facing the workbench and the backs of the fixtures should be facing up and flush with the top of the wood frame. At this point, the frame is complete except for attaching a power strip to supply power to each light fixture. Craig placed a small screw in the wood frame and used masking tape to secure the power strip. Since he could only find a power strip with six outlets, he inserted a triple AC adapter in one slot to provide power for the remaining light fixtures. The final step is inserting the UV lights into the fixtures. To purchase these lights, you may need to go to a specialty shop, such as Light Bulb Supply in Denver, Colorado, or a similar shop in your town. The 18" long lights are made by General Electric and are model number GE F15 T8 BL. You can look in your local yellow pages or search the World Wide Web for local or mail-order sources. Putting The Light Source To Work. After the light source is finished, you will finally have consistency in the coverage and intensity of the light used to make contact prints. When all eight lights are plugged into the power strip, its power cord can be plugged into a darkroom timer, providing further consistency for exposure times. Building your own UV light source isn't that difficult and can be a simple task for even the most tool-challenged among us. For more information, contact Light Bulb Supply Co., 2010 Delgany St., Denver, CO 80202; (800) 292-2852, (303) 295-1800; fax: (303) 295-1831; www.lightbulbsupplyco.com. UV Light Box Materials List All costs are based on shopping at hardware stores in the Denver metropolitan area. Cost in your area may vary. |


![]()
Get the Latest Photo Tips, News & Reviews from Shutterbug!
| Camera Reviews Other Reviews | Mobile Reviews Photography Reviews Columns | News | Features | How-To | Resources |
 © 2025 Shutterbug
AVTech Media Americas Inc., USA
All rights reserved