- REVIEWS
Camera Reviews 
More Reviews Mobile Reviews Photography Reviews - GALLERIES
- VIDEOS
- BUYER'S GUIDES
Lesson Of The Month
Photographing Expensive Jewelry With Inexpensive Equipment
|
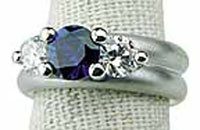
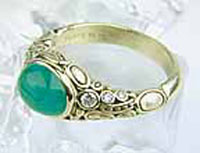
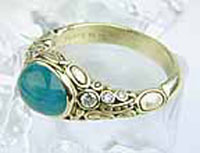
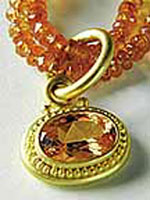
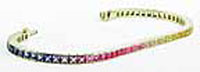
Photographing jewelry can be particularly challenging for a number of reasons: 1. Since most jewelry is highly reflective, the size and placement of light modifiers is crucial. 2. To appreciate the attention to detail of jewelry, it is imperative to use a macro lens or fit your regular lens with a close-up lens. 3. Certain fabric dyes and natural colors fluoresce under the light from electronic flash and this can cause colors to be rendered incorrectly, whether capture is on film or digital. In jewelry this is sometimes seen with the green of emeralds. Until recently, the cost of purchasing equipment coupled with the lack of knowledge in how to photograph jewelry has prevented most people from doing it themselves. Large format cameras with long lenses, expensive electronic flash and other lighting equipment, and fundamental approaches to lighting have been the major obstacles. With improvements in camera technology and cost, affordable alternatives to daylight-balanced lighting systems, and Internet access to photographic techniques, taking pictures of jewelry is no longer exclusive to specialists. To illustrate this point, we decided to approach a local jeweler here in Santa Cruz who sells beautiful jewelry and fine glass works. On my initial visit, I discovered they had a web site which I later checked out. The site was very well designed, but one thing I noticed was that the quality of images varied from excellent to adequate. When I brought this up to the owners (Joy and Doug) on a later visit, they explained that all the slides, prints, and scans were supplied by the artists themselves. While most of the images were great, there were some that did not do justice to the effects the actual pieces gave in person. In addition, there were many pieces with no accompanying images that they could put on their site. Joy mentioned that it was not in their budget to hire a professional photographer to shoot all of their jewelry, and therefore they had to take what they could get. I suggested we might have a possible solution for them, and we set up an appointment for them to come to our studio to take some shots with an inexpensive camera and lighting setup. The following week they brought a variety of pieces, including a stunning blown glass sculpture of a jellyfish. Just before they arrived, I set up a homemade PVC shooting table that we had built a few weeks before, and attached a roll of white seamless paper to it. I then set up two medium sized softboxes, positioned them on either side of the table, and affixed a small digital camera to a lightweight tripod. Once they were in the studio, we put the items on a small table near the set, and I explained what the different components were (Figure 1). The first items we placed on the set were three rings on cloth finger displays. A general rule of thumb is to surround jewelry with broad light sources to render even reflections all around. To demonstrate the effect of the softbox, I turned off the left one and positioned the right one closer and at a 45 angle to the rings. Bringing the face of a softbox closer to a reflective object increases its area of reflection. It is therefore advantageous to bring the light source in as close as possible. I set the aperture to f/11 (its smallest aperture setting) and dialed in the shutter speed (prompted by the camera) to 1/3 of a sec. After taking the shot the camera's LCD screen displayed the captured image to confirm the correct exposure (Figures 2 and 3). This shot revealed the overall dynamic of the series, but was unable to illustrate the fine details of the rings. This particular camera is made to fit a relatively inexpensive optional close-up lens, which is exactly what we decided to use next. I wanted to illuminate both sides of the ring where the diamonds were set, so I turned on the left-hand softbox and moved it in so that it abutted the right. I attached the close-up lens and zooming all the way out, focused on the left-hand ring and took a shot with the same camera settings. If you look closely you can make out the reflections of the softboxes in the four silver balls holding the stone (Figures 4 and 5). Backgrounds can help to enhance the particular qualities of a piece of jewelry. For the next shot, we pulled out some fake ice cubes and rested this emerald ring atop one (Figure 6). I adjusted the softboxes 90 to the camera to better reflect light into the emerald and diamonds, and took a shot with the same camera settings. Since emeralds can be difficult in rendering accurate color because of their tendency to fluoresce, we decided to look at the captured image on the computer screen. I turned the camera off, removed the SmartMedia card and inserted it into the card reader attached to the computer. We brought the ring over and compared the color from the ring to the color of the image of the ring. As expected, the ring appeared more cyan than it should (Figure 7). Since the rest of the ring was accurate in color, I decided to create a selection of the emerald and correct its hue. In Photoshop, I selected the Pen tool and drew a path around the stone. I made a selection of the path, and from the menu bar I chose Image>Adjust>Color Balance. I dragged the middle slider toward green until the color matched the real thing (Figure 8). Next, we decided to shoot a necklace with accompanying earrings. We took the close-up lens off and positioned the camera so that it was overhead. The biggest challenge here was in the positioning and flow of the pieces. Looking at the LCD frame of the camera, we worked to make the shot work on two levels: We needed to illustrate that it was a necklace without having to show the entire piece. We also wanted to arrange the pieces so that they were in relation to each other and that they made an interesting composition. Once the placement was set, Doug watched through the camera while I adjusted the position of the softboxes until the light seemed right to him. This was a much faster process than it would have been with a traditional camera as we could see the changes immediately from the camera's LCD. Keeping f/11, I adjusted the shutter speed to 1/2 sec and took a shot (Figure 9). Next, I attached the close-up lens and took a detail shot (Figure 10). Using the same lighting setup we replaced the necklace with a rainbow-colored bracelet. I lowered the camera's angle and again took an overall shot and a close-up (Figures 11, 12, and 13). I knew our final piece, a blown glass sculpture of a jellyfish, was going to be a bit of a challenge. The color of the jellyfish was almost electric, while the surface of the piece reflected everything in the room. To help increase the color saturation, I placed a black cloth over the table for the background. I put the jellyfish back on the table, positioned a single softbox up and off to the right, adjusted the shutter speed to 1 sec, and took a shot (Figures 14 and 15). I didn't mind the overhead reflection of the softbox as it helped to illustrate that it was spherical and not flat. However, the reflection was refracted in three other areas of the glass and it was a little too distracting. Placing the softbox overhead would have reduced the refraction, but then the reflection would be directly on top and start to lose its resemblance to a window light. I decided instead to take another tact. I wanted to make it appear as though light was emanating from within the jellyfish, and so I needed to eliminate all outside reflections. I removed the softbox from the light and placed the light directly overhead. To pre- vent lens flare from the light, I positioned a 10" black Litedisc on a Litedisc holder in between the light and the camera (Figure 16). There was still a reflection in the glass, but it was much smaller than before. To throw the background out of focus, I opened up the aperture to f/4 at 1/8 of a sec and took a shot (Figure 17). Finally, to get rid of the light's reflection, I once again returned to Photoshop. I clicked on the Rubber Stamp tool and chose a soft-edged brush to clone out the reflection (Figure 18). Doug left the studio that day with great enthusiasm. He was already figuring out how he was going to set up his own mini photography studio. You can visit Doug and Joy's fine web site at: www.vaultgallery.com. This lesson will be posted in the free public section of the Web Photo School at: www.webphotoschool.com You will be able to enlarge the photos from thumbnails. If you would like to continue your digital step by step education lessons on editing, printing, and e-mailing your photos it will be on the private section of the Web Photo School. Shutterbug has negotiated with WPS to offer our readers a special 33 percent discount rate of $30 per year. To enroll at this discount just go to: http://shutter bug.webphotoschool.com and fill out the Shutterbug questionnaire which will help us to publish lessons for you in the future. Technical Equipment |
|
|
Photo Not Available Figure 11.
|
.
|


![]()
Get the Latest Photo Tips, News & Reviews from Shutterbug!
| Camera Reviews Other Reviews | Mobile Reviews Photography Reviews Columns | News | Features | How-To | Resources |
 © 2026 Shutterbug
AVTech Media Americas Inc., USA
All rights reserved