Site Links
|
 |
 |
 |
Lesson Of The Month 
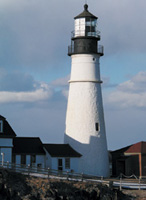
Improving Your Scenic Shots
By Ben Clay/Web Photo School July, 2003
Lesson Of The Month
| |
1
Photos © 2002, Ben Clay, All Rights Reserved
|
|
The panoramic shot above
is of a lighthouse at Fort Williams State Park in Cape Elizabeth, Maine.
Henry Longfellow used to walk out here from Portland for inspiration
with his poetry and needless to say, it is a very popular spot among
tourists. While photographs of lighthouses tend to fall into the “popular
among tourists” category of photography and are often seen as
being “clichés” (particularly in New England), it
is still possible to create unique-looking images from such highly photographed
scenes. By taking the time to figure out the shot you want and knowing
what methods to use to get it, you will invariably create results that
stand apart from those of the “point-and-click” crowd.
One of the key elements when shooting outdoors is the condition of the
sky. An overcast day can be great for minimizing contrast in highlights
and shadows, but it can also make for a rather bland sky. And while
a cloudless, sunny day can render vibrant colors and sharp detail in
high contrast, clear, continuously toned skies can also be relatively
boring in many photographic situations. On this particular day, the
sky was filled with large, cumulus rain clouds, which typically make
for more interesting backdrops. Photographers tend to keep an eye out
for days like these.
|
|
Setting Up
Once I arrived at the lighthouse, I brought my camera bag and tripod to
a patch of ground just south of the lighthouse. I mounted an Olympus C-5050
Zoom digital camera to a Manfrotto tripod and positioned the camera vertically
to frame the lighthouse (#1).
Since I was a fair distance away, I zoomed all the way in to fill as much
of the lighthouse in the shot as possible. I set the White Balance to
Daylight, the resolution to SHQ, the shooting mode to Program, and the
metering mode to ESP. I then took a shot (#2).
As you can see from the result, the exposure rendered from this automatic
shooting mode was dead-on. The ESP exposure mode in this camera is particularly
adept at rendering good exposures in normal lighting situations. Keep
in mind though that there are times, as in shooting in backlit situations,
when you will want to control your exposure manually. The simplest way
to adjust your aperture and shutter speed settings is within the Manual
mode.
|
|
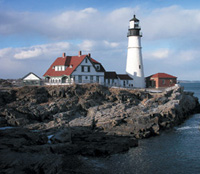
After reviewing the shot in
the LCD of the camera, I realized I wanted to be able to come in a little
tighter on the lighthouse. But since I was already at the end of my zoom
setting, and the fact that there was a fence and body of water between
the lighthouse and me, I was hard pressed to increase the size of the
lighthouse with this setup. Fortunately, I had an Olympus Tele Conversion
lens attachment with me. Within 30 seconds, I attached the lens, reframed
the shot, and took another exposure (#3).
Now the lighthouse fills the frame and you can even make out the details
of its upper walkway. As you can see, this accessory lens is invaluable
for location shots like these. And since it’s so lightweight, it’s
easy to carry along with the rest of your camera gear.
|
|
Panoramic Mode
Next, I wanted to create a simple panoramic image to include the lighthouse,
the rocky shore, and the ocean. The C-5050 Zoom has a panoramic shooting
mode and comes bundled with Camedia software, which allows you to automatically
stitch these images together.
Regardless of the technique you use to stitch images together, it is crucial
to first capture images in such a way that they will line up evenly next
to each other. And the best tool for ensuring this is a tripod. For these
types of shots, I recommend using a tripod that has a level both on the
base and on the head of the tripod. By adjusting both of these levels,
you will be able to keep the horizon line even throughout each image.
Here, I first made minor adjustments to the tripod legs. While checking
the top air bubble, I adjusted the legs of the tripod until the base was
precisely level. Once the legs were set, I used the tripod head to position
the camera back to a horizontal position and set the tripod head so that
it, too, was level.
|
|
I then loosened the knob that
controls the base rotation and set the rotation point to 0Þ. This
would be the starting point for the first of three shots. I made sure
the camera was set to Panorama mode and then took my first shot (#4).
When you are shooting in the Panorama mode, you will see gridlines on
either side of the frame indicating where you should line up the next
shot. I then spun the camera to that point, which happened to be about
30Þ to the left of my original position, and took another shot (#5).
Finally, I spun the camera another 30Þ and took shot (#6).
|
|
Later that afternoon, I transferred
the images from the SmartMedia card to a computer via an Olympus USB Dual
Slot Media Reader and started up the Camedia Master software that came
with the camera.
Using the Camedia software that came with the camera, I was able to stitch
the images together to create a panoramic composite (Final image).
Because of the resolution of the camera and the grouping of three images
together, this image would easily print out at 12x36”. Large format
prints made from a compact digital camera? Times sure have changed since
Longfellow looked out on these waters.
|
|
If you would like to continue
your digital step by step education lessons on editing, printing, and
e-mailing your photos it will be on the private section of the Web Photo
School. To enroll for WPS just go to www.shutterbug.net and click on WPS
Free Lessons.
Technical Equipment
Camera/Media: Olympus C-5050 Zoom digital camera; Olympus
1.45x Tele Conversion lens; Olympus 128MB SmartMedia card; Olympus USB
Dual Slot Media Reader; Manfrotto 3001PRO tripod with a 3275 head; Apple
G4 iMac computer; Camedia software
|
 |
|
 |
|
|
 |
 |
 |
|