- REVIEWS
Camera Reviews 
More Reviews Mobile Reviews Photography Reviews - GALLERIES
- VIDEOS
- BUYER'S GUIDES
Lesson Of The Month
A Basic Child Portrait On Location
As any portrait photographer knows, taking pictures of children can be a lot of fun, but also very difficult. Usually, most kids don't want to smile or sit still for the camera, particularly in front of people they don't know. Capturing a genuine smile can be a real challenge, particularly when your model doesn't feel like smiling. To demonstrate some valuable tips and techniques for photographing children, we went on location to photograph this young dancer, Vanessa, at a local dance studio. |
|||
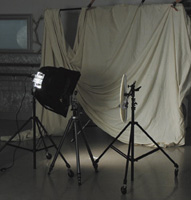
Upon arriving at the studio, we figured out where we were going to shoot and unpacked the equipment. We started with the background. Against the back wall, we attached a Photoflex Three-Section Boom to a Photoflex Boom Stand and secured it so that the boom was parallel to the ground. Then, a sheet of beige muslin was clamped to it with A-clamps. To create a sweeping background we draped the muslin to create folds in the fabric. Next, we set up all the lighting equipment. We assembled a small Photoflex Starlite Kit and positioned it to the left of the set. Then we attached a 22" Photoflex Multidisc to a Photoflex Litedisc Holder and Litestand and set it off to the right of the set (#1). |
|||
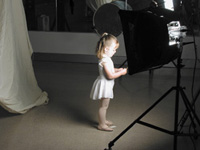
We mounted an Olympus 3040 digital camera to a tripod, positioned it vertically, and set the White Balance to Tungsten. When Vanessa was ready, her mother brought her out to the set. With white gaffer's tape, we made an "X" on the floor and had Vanessa stand on it to keep within the camera frame. Vanessa was visibly shy, so her mother and dance teacher both talked playfully with her to ease the awkwardness. We also put on some of her favorite dance music, and this seemed to help a lot. We rolled the Multidisc out of the way for the time being and focused on positioning the main light. We angled the softbox so that the light would fall across Vanessa's face at a 3/4 angle as well as light up the muslin background. Since we wanted the background to be slightly out of focus, we set the aperture to f/2.2. We set the shutter speed to 1/125 of a sec, checked focus and took #2 and #3. |
|||
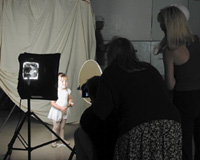
The result shows a nice soft light across Vanessa's face and background. However, the right side of her face is fairly dark in shadow. We brought the Multidisc (set to the Soft-Gold side) closer to the right side of her face to bounce warm light into the shadows. Once the Litedisc was in place, Vanessa's mother and dance teacher acted silly to try and get Vanessa to smile (#4). In the next shot (#5) we have brightened the shadow side while still maintaining a three-dimensional quality to her face. However, reviewing the image on the LCD, the background seemed a little flat. We wanted more transition from dark to light to give the shot a more dynamic quality. |
|||
In order to control the spread of light, we attached a set of Photoflex Louvers to the softbox and kept the softbox at the same angle. Keeping the same camera settings, we took another shot. You can make out the Louvers in the mirror of the setup shot (#6). In the #7 shot, the Louvers have cut most of the light falling on the background, while maintaining the same amount of diffused light on Vanessa's face. Even though the background has a slight gradation in tone, it comes across as a little too dark. Because of this cut in light, there isn't enough separation between her hair and the background. |
|||
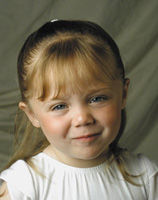
To split the difference, we rolled the softbox slightly closer toward the center and angled it to hit more of the background. We also pulled the Litedisc back a little, to minimize the amount of fill. These minor lighting adjustments made a big difference in the feel of the shot. While Vanessa's mother and dance teacher coached her into smiling, we took several shots to make sure we captured at least one good one (the Final Image). Although Vanessa was very shy on the set, she did a wonderful job of modeling for this lesson. Part of the reason we were able shoot for as long as we did (20 minutes) was because of the lighting we were using. Since the Starlite Kit is a continual light source, there were no frightening flashes for Vanessa to deal with (as there are with strobes). And because the shutter on the digital camera we used was so quiet, she was mostly unaware that we were taking pictures of her. |
|||
This lesson will be posted in the free public section of the Web Photo School at: www.webphotoschool.com. You will be able to enlarge the photos from thumbnails. If you would like to continue your digital step by step education lessons on editing, printing, and e-mailing your photos it will be on the private section of the Web Photo School. |
|||
Technical Equipment |


![]()
Get the Latest Photo Tips, News & Reviews from Shutterbug!
| Camera Reviews Other Reviews | Mobile Reviews Photography Reviews Columns | News | Features | How-To | Resources |
 © 2026 Shutterbug
AVTech Media Americas Inc., USA
All rights reserved