- REVIEWS
Camera Reviews 
More Reviews Mobile Reviews Photography Reviews - GALLERIES
- VIDEOS
- BUYER'S GUIDES
Lesson Of The Month
Transformation With Portrait Lighting
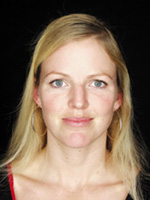
In the world of fashion and high-end portrait photography, lighting is the key to professional-looking images. Having the ability to control the light that falls on your subject allows you many different ways of expressing an idea photographically. It can also greatly transform the way your subject comes across in a photograph. The images here illustrate the differences between hard and soft lighting, positioning of light sources, and the importance of developing the shot. To demonstrate, we arranged a portrait shoot in the Web Photo School studio with a local model and a hair and makeup stylist. Once everyone arrived, we discussed the objectives of the shoot. The first thing I wanted to do was show the difference between a small and large light source, so first I took a shot of our model with the camera's built-in flash (Figure 1). |
|||
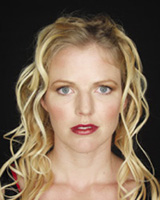
Next, I positioned a 7' Photo-flex OctoDome directly behind me (maintaining the same direction of light as the first shot) and adjusted the camera settings. I set the aperture to f/4 and the shutter speed to 1/125 of a sec and adjusted the power on the Pro-foto mono-head until I arrived at a good exposure. As with most digital cameras, the Olympus E-10 has a playback mode where you can check your image immediately after taking it. This is a tremendous advantage in securing the proper exposure, focus and composition, particularly when you are working fast. I took a few shots and reviewed them on the camera's LCD screen (Figures 2 and 3). Although the light hitting our subject is traveling in the same direction in both shots, the difference between the two shots is dramatic. Notice how her skin in the first shot appears shiny and uneven compared to the second. Similarly, the eyes and hair are dark and flat in the first, whereas they are bright and dimensional in the comparison. These differences can be attributed to a basic rule of lighting: the larger the light source, the softer the light. (And the closer the light source is to the subject, the larger it becomes.) Soft lighting is typically more flattering than hard lighting. |
|||
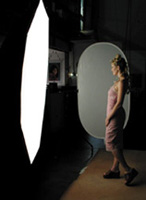
The dynamic range of a camera (still or motion) is much narrower than that of the human eye and because of this it is often necessary to "smooth out" the skin and "stylize" the hair to make the subject appear more natural. In addition, it is important to remember that viewing a two-dimensional object (photograph) is quite different from viewing a scene in real life: every section of a photograph is subject to scrutiny because it supports the overall structure of the image. It is therefore advantageous, if not necessary, to have a stylist on board to help shepherd these elements. Whether it's a fashion, product, food, or architectural shoot, the biggest unsung hero is the stylist. While the photographer is working to capture a certain look or mood, it is the stylist's job to make sure the details of the shot (hair, makeup, clothing, props) are all working. A good stylist can really help to bring the shot to the next level. You can find stylists in the yellow pages, at hair salons, at theater departments of high schools and colleges, and even on the web (Figure 4). |
|||
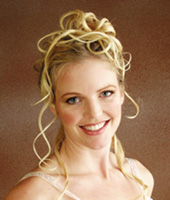
Once makeup was applied, our model came back out to the same spot on the set and we took some more shots at the same f/stop and shutter speed (Figure 5). When you compare her skin in this shot to the one previous, it is even smoother, and her hair, eyes, and lips have all been accentuated and clearly defined. After studying the shots we all agreed the hair, although styled beautifully, was a little too distracting. So our stylist went about modifying her look. While they worked on the hair, my assistant stood in for the model while I adjusted the lighting setup. I had her move in a little closer to the background paper and I swung the OctoDome around to the side for a more dimensional look. Once the model was back on the set, we all agreed that her hair looked much better. I had her turn her body to the side a little to make the pose more interesting and not so "square-on." Since the distance between the model and the softbox didn't change, I kept the same f/stop and shutter speed, and took some more shots (Figures 6 and 7). |
|||
The results showed a great tonal range in the model's face while also keeping a smooth "wraparound" lighting effect. It is important to remember that a smaller light source set at this angle could cause unflattering shadows across the face and make the overall shot high in contrast. Some people look great under these conditions; it largely depends on the architecture of their face. But if you use a large light source, as we did here, these shadows will be greatly softened and more of the face will be illuminated. To brighten and warm up the left side of our model's face, we brought in an oval Soft Gold Litedisc reflector to the left side to serve as a warm fill. As I took shots, my assistant adjusted the placement of the Litedisc until the contrast ratio looked good (Figures 8 and 9). The advantages to being able to control the size and direction of the light as well as having a makeup artist on set are enormous. Afterward, I showed a friend of mine the very first shot next to this last one, and he said, "That's not the same person€is it?" Technical Equipment |
|||
|


![]()
Get the Latest Photo Tips, News & Reviews from Shutterbug!
| Camera Reviews Other Reviews | Mobile Reviews Photography Reviews Columns | News | Features | How-To | Resources |
 © 2026 Shutterbug
AVTech Media Americas Inc., USA
All rights reserved