Ever Wonder...
How RA 4 Paper Works
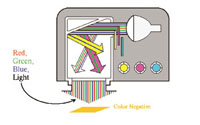
Making prints from color negatives in a home darkroom is not nearly as difficult as most folks seem to think it is. You just need to have a little understanding of the equipment and materials you are using. After that, everything else sort of falls into place. Let's talk about the enlarger first. No. 1 is a diagram of a dichroic enlarger. All dichroic enlargers operate the same way. There is one light bulb and it is usually a quartz-halogen type that produces a white light in the range of about 3400žK. There are always three adjustable filters that are colored cyan, magenta, and yellow. They are connected to knobs on the front of the enlarger that allow you to move the filters in and out of the beam of light from the bulb. Not all of the light from the bulb is filtered. Depending on how much filtration has been selected on the dials, there is always a little "raw" white light that spills past the filters and reaches the printing paper. Raw white light is composed of red, green, and blue wavelengths. When these colors are blended together, we call it "white" light. |
|||
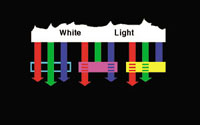
Look at #2. It shows what is going on inside the dichroic enlarger. Most of the raw white light passes through the three colored filters. Since it is normal to not use any cyan filtration when printing color negatives, I have shown that filter as a simple cyan-colored outline, indicating that a lot of the raw white light is passing through the area where the filter would normally be. Notice, however, in #2, that the magenta filter tends to stop all of the green-colored light and a little of the blue-colored light. And, notice also that the yellow filter tends to stop all of the blue-colored light and a little of the green-colored light. Because the dichroic filters (cyan, magenta, and yellow) actually stop some wavelengths of red, green, and blue light from passing, they are said to be "subtracting" light from what reaches the printing paper. That is why dichroic enlargers are also known as subtractive enlargers. RGB Light Control The amount of red light could also be controlled by dialing in some cyan filtration. But, if we did that, we would also be reducing the total brightness of the exposure, which is referred to as having neutral density in the filter pack. So, instead of creating neutral density, we control the amount of red light by adjusting the total time of the exposure. In case you are wondering why they even bother to put a cyan filter on a dichroic enlarger, well, it is to aid in printing slides onto positive printing paper. Let's review. All dichroic enlargers are designed to control the amount of red, green, and blue light that reaches the printing paper. Now, here is why we need to do that. |
|||
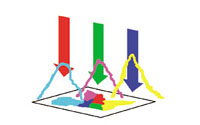
Color Paper Structure When we print color negatives we use a special type of color printing paper that is referred to as negative paper or RA-4 paper. RA-4 is a term invented by Kodak, but it is commonly used throughout the industry to describe color negative printing paper. RA-4 produces cyan, magenta, and yellow dye. By overlapping those three dyes, it is possible to produce all the colors of the rainbow. But, you need to clearly understand that there is no such thing as red, green, or blue dye. Notice that #3 shows what happens when colored light (red, green, and blue) from the enlarger strikes the three dye layers (cyan, magenta, and yellow) in the paper. When red-colored light strikes the paper it stimulates the production of cyan dye. The more red light, the more cyan dye is produced. When green-colored light strikes the paper it stimulates the production of magenta dye. The more red light, the more magenta dye is produced. When blue-colored light strikes the paper it stimulates the production of yellow dye. The more red light, the more yellow dye is produced. When they overlap, they create all the colors of the rainbow. For example, magenta and yellow dye produce the color red. Yellow and cyan dye produce the color green. And, cyan and magenta dye produce the color blue. Color Play These three pairs are like teeter-totters. For example, if you do something to increase the red in a picture then automatically, everything that is colored cyan will be reduced. Red and cyan are a pair. Whatever increases one of those colors in a picture automatically decreases the other color, and by an equal amount. Imagine that you made a test print and it looked too red in color. You would then need to add some cyan to the print (or subtract some of the red). In order to add cyan, you need to stimulate the production of more cyan dye in the emulsion. And, in order to do that, you need to use more red-colored light from the enlarger. In order to get more red-colored light out of the enlarger, you need to use less cyan filtration. The other colors work the same way. Since all color paper is sensitive to colored light, it is usually necessary to work with it in total darkness. However, there is a slight exception to that. When color negative paper is manufactured, it is made in such a way that its sensitivity to red, green, and blue colored light is tweaked up at those specific (RGB) wavelengths. As a result of the tweaking process, the paper is slightly less sensitive to colors of light that are not exactly pure red, green, or blue. It just so happens that the color yellow falls about halfway between the wavelengths of cyan and magenta. Also, the color yellow stimulates the human eye fairly well, so that we are able to see things that are illuminated by it a little easier than if they were illuminated by other colors of light. |
|||
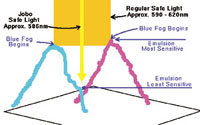
Notice that #4 shows how yellow-colored light falls about halfway between the sensitive peaks of the cyan and magenta dye layers. Now, there are many shades of yellow. But, if you use a very narrow, specific, wavelength of yellow, it is possible to use a fairly bright amount of it before it will begin to stimulate the dye emulsion in color negative printing paper. Years ago, we used to use yellow filters over regular (white) lights to make a safelight for color printing. But, in those days, the yellow filters that were available were sort of crude and passed all sorts of different wavelengths of yellow. As a result, we had to use a very dim level of the "safe" light or we would fog the printing paper. Later, when Light Emitting Diodes (LED) were invented someone discovered that there were special yellow LEDs that emitted such a narrow wavelength of yellow-colored light that we could use a much brighter amount of it and still not fog the paper. As a result of that little bit of knowledge, the folks at Jobo were able to manufacture a super bright safe light for use with colored negative printing paper. Unfortunately, the yellow LED safelights do not work with color positive printing paper. They work fine when printing color negatives. But, they do not work at all when printing slides. The reason is complicated and beyond the scope of this article. If you need help with your color printing problems, you can send an e-mail to me care of Shutterbug at: editorial@shutterbug.net, or write to me care of Shutterbug. |
