- REVIEWS
Camera Reviews 
More Reviews Mobile Reviews Photography Reviews - GALLERIES
- VIDEOS
- BUYER'S GUIDES
Are LCD Flat Panel Displays Ready For The Digital Darkroom?
How To Choose And Use The Newest LCDs
 |
|
|
Even today, after LCD prices have
dropped precipitously as sales have increased, the main thrust in development
and marketing is to leverage the attractiveness of the higher brightness and
contrast of the LCD display. However, one of the main concerns of photographers
is to make prints that match photographs as they are displayed on screen, and
the very brightness and contrast of LCD displays makes this match less viable
because the range of values displayed is so much greater than the reflective
range of values in a print.
So, my assignment in researching and writing this article is more than to produce
a typical user report on the newest and best LCD displays. It is to discover
how to best configure and use LCD displays to support the functions photographers
perform.
The Displays, Systems, And Environment Involved In The Test & Evaluation
First of all, I needed to acquire samples of new 20.1" LCD flat panel
displays. So, I contacted Apple, Sony, and LaCie. These are brands that I felt
would be representative of high-quality performance. Sony sent a new model SDM-S204
display, with which they are targeting the engineering and desktop publishing
markets. LaCie sent their new Photon 20 Vision II display that is marketed to
design, publishing, and photography users. Just as I was about to start this
project Apple announced newly designed models of their Apple Cinema Displays
in 20, 23, and 30" sizes. Unfortunately, these new displays are not expected
to be available until September 2004, so Apple was not included in my test and
evaluation.
The systems used to install and use these two new LCDs include a new Apple Mac
G5 dual processor model with an ATI Radeon video card, two Apple Mac G4s, one
of which is a year old and the other 2 years old, as well as an IBM NetVista
2.4GHz with an ATI Radeon video card running Windows XP Pro. The CRTs that are
normally used with these systems include two Sony 21" models, a CPD-G520P
less than a year old and a CPD-E540 just a few months older, as well as a Mitsubishi
Diamondtron monitor that's a little over 2 years old. These systems and
monitors are fully color managed and the displays are calibrated with the latest
ColorVision Spyder and PhotoCAL or OptiCAL software.
 |
|
|
To accomplish color-critical digital
photography work with a computer the "light" environment in your
workroom is extremely important. Your monitor/ display(s) should be entirely
free from contaminating direct illumination that could mix with the light of
the image on screen and skew accurate perception of the values displayed. In
my workroom, all of the room (ambient) illumination is provided by lamps located
behind the face surfaces of the displays.
The light level in the room is adjusted so the area of view I see surrounding
the monitor has the same brightness value as the screen itself. The light sources
include 5000Þ Kelvin fluorescents as well as quartz halogen lamps with
dichroic daylight filters, so the ambient light in the room does not differ
significantly with the color temperature of the displays. The walls and ceiling
of my workroom are a neutral off-white, and there is one large window facing
north that is partially shuttered. It should be noted that working in a room
significantly illuminated by daylight can have an adverse variable effect on
doing work with digital photographs because daylight can vary in color temperature
drastically during the course of a day.
 |
|
|
Working With The LCD Displays
To Provide A Basis For Evaluation
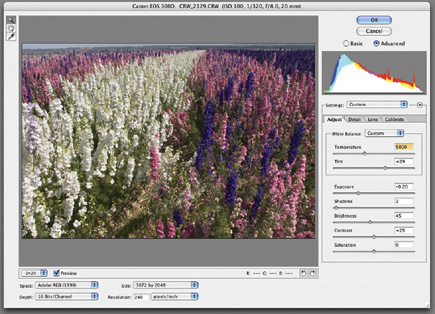
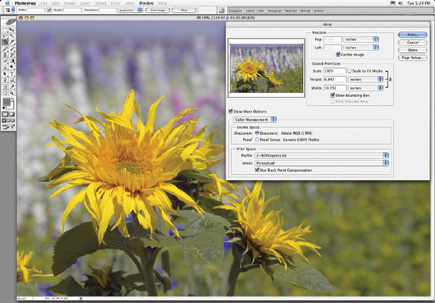
My basic approach was to replace one of my CRTs with one of the new LCDs and
then do all the digital photography tasks that I normally perform every day,
like acquiring and color correcting raw digital camera files, scanning film,
retouching and cleaning images of defects, and then tweaking and printing from
Photoshop. I began with the Sony SDM-S204. After connecting it and making initial
adjustments to obtain a smooth picture using the Sony software, I found first
off from opening a previously color corrected photographic image that at default
settings the brightness of the Sony was so high that the detail in the highlights
of the images was washed out--the image looked like an overexposed color
slide.
|
| |||||||||


![]()
Get the Latest Photo Tips, News & Reviews from Shutterbug!
| Camera Reviews Other Reviews | Mobile Reviews Photography Reviews Columns | News | Features | How-To | Resources |
 © 2026 Shutterbug
AVTech Media Americas Inc., USA
All rights reserved