- REVIEWS
Camera Reviews 
More Reviews Mobile Reviews Photography Reviews - GALLERIES
- VIDEOS
- BUYER'S GUIDES
How-To Create That Fabulous, Funky Fisheye Look; Give Your Photos A Dramatic Twist With Wacky, Bulging Perspective
When I was a student, fisheye lenses cost a small fortune (some still do). What to do? I drilled a hole in the center of a lens cap and glued a brass door peephole from a hardware store to it. Snapping the lens cap/fisheye lens over a 50mm or wider angle standard lens, I got a small 180º circular fisheye image in the center of the black frame. Quality was not great, but the effect was spectacular. Digital Fisheye 1. Open your photo, #1, shot
with a Canon 10D digital SLR, in Adobe Photoshop, Elements 2, or other
image-editing program. Make a copy (Image>Duplicate) and experiment
with the copy. |
||||||
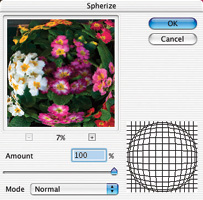
3. Now, the fun begins. From the Menu, choose Filter>Distort>Spherize, #2. Try an amount of 100 percent and a mode setting of Normal. If you don't like the effect, try re-cropping your original photo before applying the filter. For a shot of a person or a pet, experiment with cropping so that the head is in the middle or to one side. |
||||||
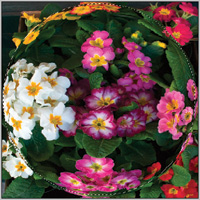
4. As soon as you click OK, the spherize distortion will be applied, #3. Note that the center of the image bulges out while the edges stay normal. You may like the effect just as it is now. Or you might also try running the filter two or more times, depending on how twisted you are. |
||||||
5. Now, to emulate a true camera
fisheye lens image, the edges need to be black. To accomplish this, choose
the elliptical marquee tool from the toolbox. To select a circle the same
size as the circular fisheye distortion inside your photo, hold down the
shift key and drag diagonally across the image with the tool, #4. Holding
the shift key changes the elliptical marquee to draw a circle. This may
take a few tries to get the size right. |
||||||
7. Fill the selection with black by choosing Edit>Fill, and choosing black (usually the foreground color), #5. Now, this is the real fisheye look. However, you may want to tweak it a bit more. |
||||||
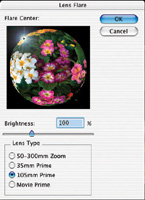
8. To add even more realism (or surrealism) to the effect, consider injecting some lens flare. Choose Filter>Render>Lens flare. I have to admit that this is a filter that I thought I'd never use, but it's perfect for the ultimate fisheye look. That's the Lens Flare dialog box in #6. For this image, I chose a brightness of 100 percent and a 105mm prime lens setting. I dragged the flare inside the preview box to position it where it best fit into the composition. Experiment with different settings to see what is available and what works best with a particular image. |
||||||
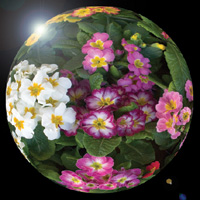
9. After clicking OK, the filter rendered this flare to create the ultimate effect #7. |
||||||
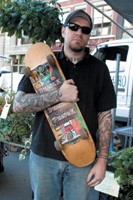
10. In my example of the skateboarder,
I first re-sized the 6x9" image to 6x6" using the Image>Image
size command with "Constrain proportions" unchecked, and "Re-sample
image" checked #8 and #9. All the steps were the same as mentioned,
except for the Lens Flare filter, where I chose "Movie prime"
as the Lens type, and set the brightness slider to 76 percent. Contact |


![]()
Get the Latest Photo Tips, News & Reviews from Shutterbug!
| Camera Reviews Other Reviews | Mobile Reviews Photography Reviews Columns | News | Features | How-To | Resources |
 © 2026 Shutterbug
AVTech Media Americas Inc., USA
All rights reserved