- REVIEWS
Camera Reviews 
More Reviews Mobile Reviews Photography Reviews - GALLERIES
- VIDEOS
- BUYER'S GUIDES
Portrait Tips
People are among the most popular photo subjects. This month's lesson presents some easy ways to produce better people shots.
 1. Don't Just Sit There...
Static portraits—with the subject just slouched there, or stiffly posed, are not terribly appealing. It generally pays to play director as well as photographer when you're photographing people. Don't just hide behind the camera; interact with your subject. Tell a joke, have a conversation, do something silly, or even tell the subject what to do. The results will be be much more interesting portraits, and the session will be a lot more fun for you and your subject. Photo by Ron Leach
 2. Use the Right Lens
The right lens for a portrait is the one that provides the desired framing at a distance that provides the desired perspective. For a natural-appearing "head shot," this would be a short telephoto (85–135mm range for a 35mm camera), at a distance of around 31/2–5 feet from the subject. Use a wider lens, and you have to move closer to frame a head shot, and moving closer will expand perspective and elongate the subject's features. Use a longer lens, and you'll have to move farther away to get the right framing, and moving farther away will compress perspective and "squash" the subject's features.
Of course, the "right" framing and the "right" perspective are up to you, the photographer. Try different focal lengths at different distances, and see which combinations you like best. For example, for waist-up and full-length portraits, wider lenses can be used, keeping in mind the relationship between distance and perspective. Photo by Lynne Eodice
Top: A short telephoto lens at a distance of 31/2–5 feet from the subject produces an effective head shot. Bottom: For a full-length portrait, switch to a shorter focal length.
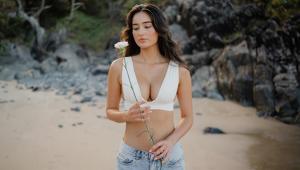
 3. Props & Backgrounds
Great portraits have been made using just face and light. But you can add interest and variety by using props and backgrounds as integral parts of the image. Props can serve as compositional elements and something to take camera-shy subjects' minds off being photographed. You can use the background to say something about the subject—an environmental portrait—or use a wide aperture to throw a distracting background completely of of focus and thus minimize the distracting elements if you can't eliminate them through camera position. You can also use commercially available portable backgrounds indoors and out, or make your own from posterboard or cloth. The thing to keep in mind is that everything in the picture is part of the picture—don't forget about the background as you concentrate on the subject. Photo by Lynne Eodice
 4. Lighting Up Their Lives
In the glory days of Hollywood, photographers almost as well-known as their celebrity subjects used direct "hard" light to produce dramatic portraits. Hard light is dramatic, but it also is not very forgiving of errors in positioning by the photographer, and imperfections in the subject's complexion. Soft light, as produced by umbrella reflectors or open shade outdoors, is far more forgiving on both counts, and thus a better choice for the beginning portrait shooter (and subjects with less-than-perfect complexions).
The simplest studio portrait lighting setup involves two lights: a main light, which determines the "look" of the lighting; and a less-intense fill light, which softens the shadows. You can start with the main light 45° above and 45° to one side of the camera (try both sides to see which looks best with your particular subject), and move the light lower or higher, and closer to the camera or more to the side to suit your subject. Then place the fill light (or a fill reflector) next to the camera to soften the shadows.
Studio flash is popular with portraitists today, because it is daylight-balanced, its brief duration minimizes subject "blinking" problems, it's not uncomfortably hot like tungsten lights, you can easily set ratios between main and fill lights, and the modeling lamps let you preview the lighting. With hot-shoe flash units, you can't see what the lighting looks like until you see the photo—there's no light until the flash unit fires, and then it's there for only a brief fraction of a second. Tungsten lights let you see the lighting and cost less than studio flash systems, but are hot, require longer exposure times (increasing the likelihood of getting a shot with the subject blinking), and require tungsten-balanced color films (or corrective filtration, which furthers extends exposure times). Many terrific portraits have been made with both types of lighting, so take your pick.
One of many popular portrait-lighting variations is the over/under: Position a soft main light (a photographic umbrella reflector will soften the light beautifully) just above the camera lens, and a fill reflector right below the camera lens—you can even have the subject hold the fill reflector in his or her lap. This produces a more "glamorous" effect than the 45°/45° lighting.
Of course, Mother Nature provides some gorgeous portrait lighting, too. In late afternoon, when the sun is low in the sky, it comes from an attractive angle and is less intense, so it doesn't make subjects squint. (Avoid harsh midday sun for portraits!) You can have the subject face directly into the setting sun, or turn at an angle to produce a lighting ratio (you can use a silver, gold or white fill reflector to lighten the shadow portion of the face). Open shade, and thinly overcast skies also produce nice soft portrait lighting outdoors.
Yet another good source of natural portrait lighting is a large picture window. Position your subject near the window, and use a large white posterboard as a fill reflector, and you can do anything from formal to glamour effects.
There are lots of good books on portrait lighting (check out the book section of your local camera store, or the photo section of your local bookshop), but also look through books of work by those famous Hollywood photographers like George Hurrell for ideas and inspiration.
Top: A soft main light right above the camera lens, and a white or silver fill reflector in the model's lap produces a pleasant "glamour" lighting. Photo by Mike Stensvold Bottom: Late-afternoon sun provides an attractive source of light for portraits. Photo by Jay Jorgensen
 5. Camera Height
Camera-to-subject distance isn't the only camera-position consideration in portrait work. There's also the matter of how high the camera should be. Generally, the best height is the subject's eye-level. This is especially important for shots of children and pets, which are usually photographed looking down on them because the photographers are generally adults who are somewhat taller. Shooting down on a subject diminishes it—OK if that's what you intend, but not the most effective way to do a portrait of the subject. And shooting up at the subject generally does not produce an attractive head shot. Start with the camera at the subject's eye level, then try a little higher and a little lower, and see what happens in the viewfinder. Photo by Lynne Eodice
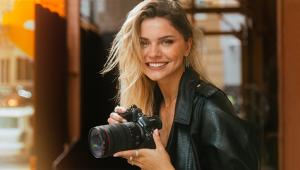
 6. Try Something Different
Portraits don't all have to be formal head or head-and-shoulders shots. A portrait should represent your subject, and tell the viewer something about that person. Or not! Try something different—shoot a portrait that doesn't show the face, photograph the shadow instead of the subject, frame a dancer's feet and unique shoes, catch the subject at work or play instead of aware of the camera, look for unusual lighting and shadows. Photo by Lynne Eodice


![]()
Get the Latest Photo Tips, News & Reviews from Shutterbug!
| Camera Reviews Other Reviews | Mobile Reviews Photography Reviews Columns | News | Features | How-To | Resources |
 © 2026 Shutterbug
AVTech Media Americas Inc., USA
All rights reserved