- REVIEWS
Camera Reviews 
More Reviews Mobile Reviews Photography Reviews - GALLERIES
- VIDEOS
- BUYER'S GUIDES
Extend The Limits Of Film Scanning; LaserSoft’s SilverFast Multi-Exposure Increases Effective Dynamic Range
In the summer of 2007 I received news about a new version of SilverFast scanning software that included additional and improved features, most significantly for this report something dubbed Multi-Exposure. This is a strategy involving two scan passes: one with normal exposure and a second with amplified exposure applied just to the shadow regions of the film image; then these two images are blended into one. The purpose is to enhance the amount of shadow information. Having worked with various scanners trying to obtain the best possible digital images from slide and transparency films, especially Kodachrome, I was eager to explore this new feature LaserSoft had added to some versions of SilverFast.
 |
|
|
I downloaded the new version update for my Konica Minolta DiMAGE Scan Elite
5400 II scanner and dug out some of my most challenging, contrasty, dark shadow
Kodachrome slides that had eluded my ability to get good scanned images in the
past. To activate Multi-Exposure you click on a "sun symbol" icon
in the middle of the vertical selection portion of the Preview frame. After
that I adjusted the parameters and scanned a number of Kodachrome slides to
48-bit output files. This bit depth will support making some post-scan adjustments
without losing any image data.
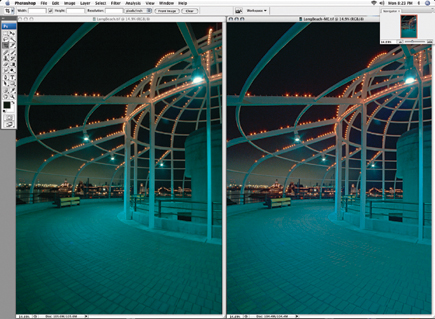
All was going fine and Multi-Exposure was performing as advertised--capturing
more and better image information in the darker areas of the images. Then I
zoomed in on one of the files and saw something strange--a ghost image
just slightly off-register with the main image. Uh-oh! What kind of problem
do we have here? So I looked at the eight scans I'd made and three of
them had this out-of-register artifact.
 |
|
|
Obviously there was some change occurring between the first and second scan
pass. It did not take much thought to come up with the likely gremlin, having
had experience with "film popping," a common occurrence with slide
projectors and enlargers. The film actually "pops" because the generated
heat allows the surface tension between the emulsion and back of the film to
relax and any curve in the film simply flattens out, which changes the focus
plane.
I then sent a detailed e-mail and a JPEG blowup of one of the scans with this
double-image artifact to my contact at the LaserSoft office in Florida. I eventually
received a phone call from Karl-Heinz Zahorsky, president and founder of LaserSoft
Imaging, and it was agreed I would look for a solution for the film popping.
LaserSoft offered to loan me a Nikon CoolScan 5000 ED to try, as they claimed
that scanner had not produced the problem I had encountered. I then undertook
a more involved and extensive experiment to solve the film-popping problem and
thoroughly evaluate the advantages Multi-Exposure could provide.
 |
|
|
Solving The Film-Popping Problem
The most immediate and obvious solution is the same many of us used for doing
slide shows--mounting the film in glass slide mounts so the film is both
shielded from the heat and is held flat between two glass surfaces. Of course,
the possibility the glass would have an adverse effect on scan image output
quality came to mind, particularly with glass slide mounts that employed
Anti-Newton ring glass.
Another possible solution came to mind from my recent experience with the Epson
Perfection V750-M Pro scanner, using fluid mounting of the slide film between
two pieces of glass. This would provide the flat, stable position of the film
plane for multiple scanner passes. The fluid effectively eliminates the surface
refractions of the film surfaces as well as the inside glass surfaces, plus
provides other optical advantages to scanning quality. As far as I knew, I'd
never read of anyone attempting fluid mounting film with 35mm dedicated scanners,
so I expected the procedure to require a lot of jerry-rigging. That caused me
to leave this part of the work to the end of my project. You can read my notes
on it in the accompanying sidebar below.
 |
|
|
I received the loaner Nikon CoolScan 5000 ED and LaserSoft SilverFast software.
I selected a stack of mounted slides with rather dark shadow areas that had
previously defied printable results. I began scanning with Multi-Exposure turned
on and output the scans to 48-bit TIFF files. I color corrected and adjusted
the output parameters based on the appearance of the Preview image in SilverFast.
And with a few Multi-Exposure scans I also added another SilverFast utility
with the icon name AA/CO, which is a previously designed adjustment tool designed
to bring more detail out of shadow areas in film images. Shortly I had a large
folder of 48-bit image files with one of each slide processed with and without
Multi-Exposure.
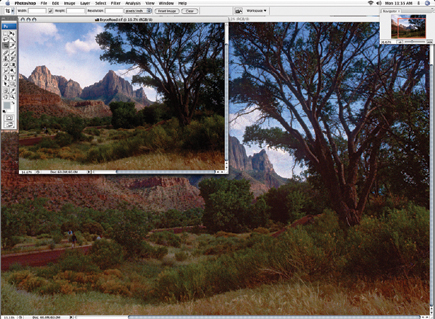
The superficial appearance of images with and without Multi-Exposure is about
the same. However, with any of the more advanced image editors, like Photoshop
CS3, Elements 5.0, or SilverFast HDR, you can use tools like Photoshop's
Shadow/Highlight to further open and reveal more information in the darker areas
of the image. That's when you'll immediately find the limits of
a straight scan vs. the greater depth of information in the Multi-Exposure scan.
Utilizing this feature permits shadows to be opened up without any less image
quality or more artifacts, when compared to the rest of the image. However,
on the few images where I combined SilverFast's AA/CO and Multi-Exposure,
the AA/CO adjustment effect was either insufficient or too strong, so I would
not recommend using AA/CO combined with Multi-Exposure. That's not to
denigrate the power of this tool; if a post-scan adjustment is done with AA/CO
it is predictable, and advantageous.
 |
|
|
The Popping Problem--Multi-Exposure Scanning With Glass Slide
Mounts
Microtek, Konica Minolta, and Canon dedicated 35mm scanners all use a CCF tube
light source that generates more heat than the LED light source used in Nikon
CoolScan models. One solution is to place your slides in glass slide mounts;
both Gepe and Wess Plastic brands work equally well. Much to my surprise, I
found the plain glass mounts made by Gepe produced no better scan quality than
Anti-Newton ring glass mounts. This also applies to Kodachrome film, which I
used for this test in large part because the short exposure latitude and high
D-max of Kodachrome is more likely to produce images with dark shadows. So,
if Multi-Exposure also works well with Kodachrome, its value is potentially
much larger.
|
| |||||||||


![]()
Get the Latest Photo Tips, News & Reviews from Shutterbug!
| Camera Reviews Other Reviews | Mobile Reviews Photography Reviews Columns | News | Features | How-To | Resources |
 © 2026 Shutterbug
AVTech Media Americas Inc., USA
All rights reserved