- REVIEWS
Camera Reviews 
More Reviews Mobile Reviews Photography Reviews - GALLERIES
- VIDEOS
- BUYER'S GUIDES
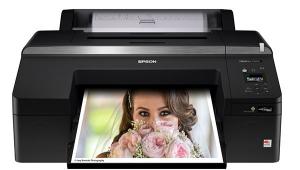
Canon’s PIXMA Pro9000; A Speedy Color Inkjet Printer
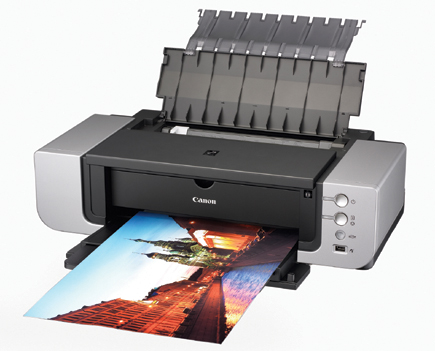
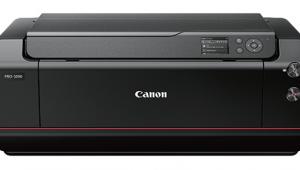
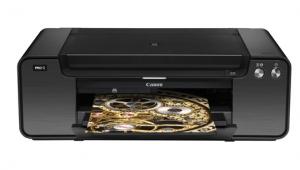
Priced at about $499, the Canon PIXMA Pro9000 is a 13x19" printer that produces beautiful color prints on a wide variety of media. And it's one of the fastest color printers I've worked with, especially for working with fine art papers via its front-feed system. It can also work with thinner papers via its top-feed system, but those who will spend that amount on a 13x19" model will probably do so to work with some of the luxurious papers offered by Canon, as well as other third-party vendors. While black and white fans might not get all they want from this dye-based ink printer, it certainly produces quality color prints that are claimed to last over 100 years.
 |
|
|
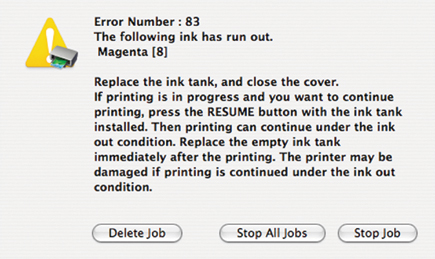
Setup and software installation is quite easy following the Canon-supplied quick-start guide. First off, the printer is quite manageable at about 30 lbs and 26" wide. Styling, as seen in the illustration, is quite functional, which is fine. What might be new for some printmakers is the need to install the print heads, but this is quite a bit less intimidating than it might first sound. All you need do is remove them from the foil pack and slot them in as instructed. Next come the eight inks (photo black, cyan, magenta, yellow, photo cyan, photo magenta, red, and green) which slot in easily enough. Inks are $14.25 each on the Canon website, making a full reload at $114. The first run is a calibration chart, which you do with lightweight bond paper via the top feeder, and then you're ready to print. Software installation is standard, so there's not much to say on that, except it's essential to get the proper profiles for Canon's fine art media. And, as always, check the Canon website for any updates, as with all printers and media.
 |
|
|
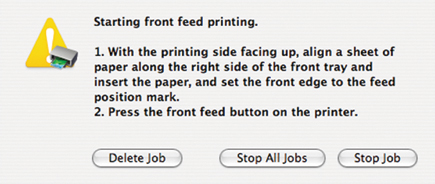
Given that we will focus on so-called "art" papers here, it's worth going over their setup and prep. Like some smaller footprint, desktop "fine art" printers, you have to load the thicker sheets via the front-load system, one at a time. This clearly eliminates any hope of doing an edition run and then walking away from the printer, but the procedure is fairly straightforward.
 |
|
|
There are three buttons on the face of the printer--topmost is the larger power button; at the bottom is the single sheet feed button. Press the bottom button and it begins to flash--this tells you that the "gate" for sheet feeding is getting set. Once it stops churning a bit you slot the paper through, printing surface up, until you align the front edge with a mark on the tray. You then press the button again and the sheet feeds through and gets properly placed in the printer, ready to print.
 |
|
 |
|
|
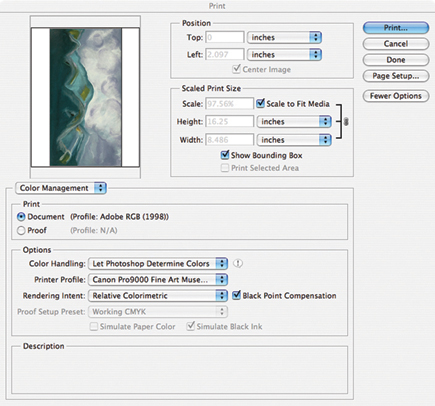
This assumes you have the image ready to print, sized and all, on your monitor. I use a MacBook Pro so all the screen shots you see are from that laptop; PC interfaces are different, but perform the same tasks. For this test I used CS2, and I also tried it with CS3 beta, which worked just fine.
 |
|
|
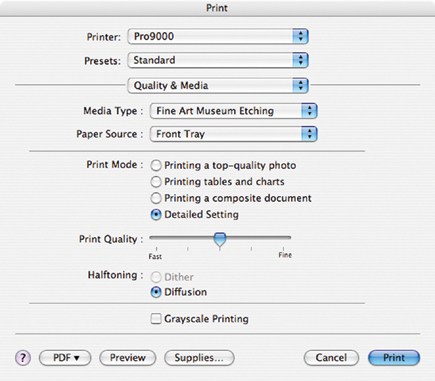
The first stage of making a print is to open Print with Preview. There you choose the paper size (in my case 13x19) and the paper profile. Note that there may be more than one profile for your paper, so read the instruction book, or check Canon's website for the right one, as the printer will simply not print if it senses the wrong choice has been made. This is not dissimilar to other printers I've worked with recently, and now every printer review I do has the same advice: RTIB! (Read The Instruction Book.) Doing so before you print the first few times will save you frustration and having to reload the paper and deal with that foolish bouncing print status box at the bottom of the screen.
 |
|
|
The fine art papers I worked with for this test were Canon brand "Museum Etching," "Photo Rag," "Premium Matte," and a semigloss "Photo Paper Plus." Each had its own profile when the Page Setup screen is evoked. You can save each profile to eliminate having to do a setup each time you print.
|
| |||||||||


![]()
Get the Latest Photo Tips, News & Reviews from Shutterbug!
| Camera Reviews Other Reviews | Mobile Reviews Photography Reviews Columns | News | Features | How-To | Resources |
 © 2026 Shutterbug
AVTech Media Americas Inc., USA
All rights reserved