- REVIEWS
Camera Reviews 
More Reviews Mobile Reviews Photography Reviews - GALLERIES
- VIDEOS
- BUYER'S GUIDES
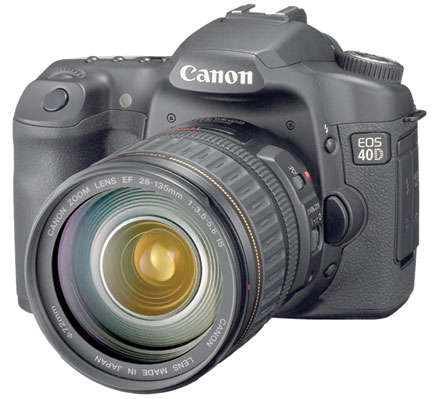
Canon EOS 40D; Redefining The Common Wisdom About D-SLR Photography
Common wisdom is what the collective mind creates to make sense of the world. It is a pool of "givens" based on experience and assumptions about how things work. While many aspects of the new Canon EOS 40D are evolutionary rather than a startling breakthrough, in other ways it creates a "new normal" that goes against some common wisdom we might share about digital imaging. We'll look at some of those in this review.
 |
 |
The Canon 40D is a 10.1 (effective) megapixel D-SLR with a Canon-developed
CMOS APS-C sensor (1.6x focal length factor). It also sports the DIGIC III image-processing
engine, which accounts for its newfound speed (up to 6.5 frames per second (fps))
and sensitivity. While those who have worked with the 30D will see the resemblance,
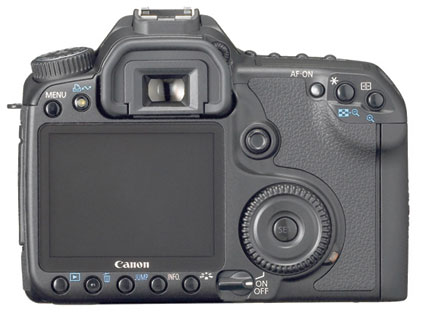
a new 3" LCD on the back and buttons arrayed to the corners to accommodate
it is the first big change. But the 40D also draws elements from the junior
EOS Digital Rebel XTi and even the new senior flagship model, the EOS-1D Mark
III. What is new for an advanced amateur model, in Canon's line-up, is
14-bit A/D conversion (which when saved in or when transferred to Photoshop
is a 16-bit TIFF), 6.5 fps shooting rate, Live View functionality, the aforementioned
3" monitor, an sRAW format, an Auto ISO function, the new DIGIC III processor,
in camera tonal curve adjustments for highlight control, and a new Picture Style
selection button. On the face of it these new features do not seem to shake
common wisdom's foundations. But let's dig a bit deeper.
Sensor And Processor
Some might be surprised at the almost modest 10.1-megapixel resolution, given
that there are numerous digicams with
12-megapixel counts out there. But the 40D outputs same in the ultimately malleable
raw format and, perhaps as important, at 14 bit. This might signal some return
to sanity in the megapixel derby, in that bit depth (degree and amount of information
recorded) now seems to have as much, if not more, to contribute to image quality
than megapixels alone, witnessed by some of the sad output of those high-megapixel
digicams at even modestly high ISO settings. It is the combination and balance
of the two--bit depth and resolution of the sensor of this size--that
makes for the image quality this camera delivers. So much for common wisdom
theorem #1, that more megapixels alone guarantee the best image results.
Low Light |
|
 |
|
|
A lot of the processing power and speed of the 40D emanates from the Canon-developed CMOS sensor. Canon recognized the potential of CMOS, where many processes are done on the chip itself, rather than with CCD, where all information is transferred prior to processing, early on. The sensor can be gained up to ISO 1600 without resorting to a Menu item for an available ISO 3200. Canon tells us that this is actually the Rebel XTi sensor revised with a new micro lens arrangement for more efficient light collection and decreased noise at higher speeds. In truth, pixel size on the 30D (8.2 megapixels) is larger than on the 40D's 10.1-megapixel sensor--they both share the same size chip. But the key here is light-gathering efficiency, not just pixel size. There go theorems #2 and #3, which proclaim that (#2) CCD is king in terms of image quality due to lower noise (indeed we may be seeing the sun setting on CCD) and (#3) that pixel size/sensor size is a key element in differentiating quality between one camera to another. In many ways the improvements in image processing have as much to do with this as anything else.
Auto ISO
Other makers have gone the CMOS route and most use micro lenses in front of
the sensor for increasing light-gathering efficiency, but the 40D plainly states
the case for their design by making ISO 400 the "new normal" for
the sensor's sensitivity. Yes, the "base" speed is ISO 100,
but in their new Auto ISO mode the base speed even in AV, TV, and other "creative"
exposure modes is in a range of ISO 400-800 (!), and will only drop to ISO 100
if overexposure might occur. And in Manual mode, Auto ISO is firmly set at 400.
Of course you can opt out and set your own ISO from 100-1600 (and 3200 via the
Menu), but being bold enough to almost encourage users to begin at ISO 400 is
a break in the wall of theorem #4, which states that you always, always start
out at ISO 100 for the best image quality and do everything you can to shoot
at the lowest ISO possible to reduce noise and, with higher sensitivities, contrast
and color rendition. It almost feels like when ISO 400 film started looking
like ISO 200, then ISO 100 a short time after that. The new DIGIC III processor
does its fair share of heavy lifting in the noise department, to be sure. Noise
reduction filtration is applied at every speed, albeit the degree being based
on how high you go.
1/8000 Sec Shutter Speed |
|
 |
|
|
Image Formats
There are now 20 (count them) resolution options in the Image Recording Menu
(groan). True, many of them are raw+JPEG choices, but for me this is way too
many and I will leave differentiating between all the Large, Medium, and Small/Fine,
Normal JPEGs to those with more patience for this overkill. But something new
in the mix is sRAW, or "small" raw. You can do everything with an
sRAW format file that you can with a big old raw file, except here you get an
approximately 7.5MB file as opposed to a 31MB file. And of course sRAW is 14
bit, which you can save as 16-bit TIFF. I guess this is for those who like to
save memory on their card and who don't normally output larger than 5x7.
It might save you a step or two in re-sizing the larger raw file later. While
this makes me somewhat puzzled and in some ways uncomfortable, I guess we can
chalk this up to debunking theorem #5, that you shoot raw for the best image
quality and largest printing size. Here there's a raw wrinkle that is
curious.
|
| |||||||||


![]()
Get the Latest Photo Tips, News & Reviews from Shutterbug!
| Camera Reviews Other Reviews | Mobile Reviews Photography Reviews Columns | News | Features | How-To | Resources |
 © 2026 Shutterbug
AVTech Media Americas Inc., USA
All rights reserved