Do It Yourself
Panoramic View Cameras
|
Our project this month is a procedure for turning a 4x5, 5x7, or 8x10 view camera into a panoramic model that makes two or three images on a single sheet of film. Specialty cameras that produce these expansive views are available, but they are costly and generally useable only for panoramic photography. This project is fairly inexpensive and, as no internal changes are made, allows the modified camera to be returned to regular, full-format use at any time. The use of standard-size sheet film gives a wide range of emulsion choices, eliminates the tedium of hand-cutting raw film to fit "mongrel" holders, and does away with the surcharge sometimes placed on odd-sized film by processing labs. |
|||
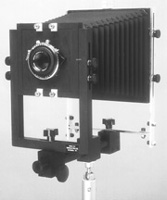
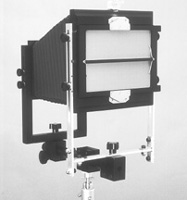
From The Ground Up The basic idea is to mask half of the film sheet with a cutaway dark slide, align the center of the uncovered area with the lens axis and make an exposure. When the slide is flipped over to shield the exposed area and uncover the fresh half, and the camera back slides up or down to place this surface behind the lens, then another image can be made. Exposing part of a large format film with masks in the camera or holder is not new, but using a masking slide for panoramics poses a unique problem. Few cameras have adequate rear rise or fall--ignore front perspective control movements for the moment--to displace the film the required distance. |
|||
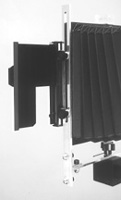
Adding lock screws, made by setting 1/4x20 threaded studs into the camera back, and slotted vertical standards, machined from aluminum flat stock, provides this travel. Mechan-ical details will be dictated by the camera being modified, but screw placement and slot length must produce at least the amount of movement shown in the Center-to-Center diagram. It is also important that the slots be straight and parallel so that the film plane remains at right angles to the optical axis. Bellows Flex Perspective control movements not present on the existing camera can often be incorporated into the new rear standards. My prototype has only rear swing, but a pivot arrangement would add base tilt and a slot in the bottom bar would provide shift. The level of sophistication is up to you, but I highly recommend making a full-size drawing of the camera and all proposed parts first to check for mechanical interference. Keep in mind that more bellows flexibility will be needed with added movements. |
|||
Film Holder Selection Mark the slide and drill a small hole where the two lines intersect to eliminate a crack-prone square corner. Score the fiber material deeply with a sharp knife guided by a straightedge, then gently flex it back and forth while watching the opposite side for a stress line. When this line becomes visible, flatten the slide, score along the new line and continue to flex until separation. Smooth the edge with fine sandpaper. Spare slides for 4x5, 5x7, and 8x10 holders are available from pro equipment dealers. Although it may seem that normal front rise and fall could be used to accomplish the center-to-center shift, remember that even slight lens displacement significantly alters the perspective of the scene. With the sliding action located at the rear of the camera, the top-to-bottom change moves only fresh film into position and makes both exposures from the same point of view. Movement can be made in other ways, such as by mounting the rear of the camera far off-center and turning a four-way or rotating back 180 between exposures, so think about your modification. |


