- REVIEWS
Camera Reviews 
More Reviews Mobile Reviews Photography Reviews - GALLERIES
- VIDEOS
- BUYER'S GUIDES
PhotoVision’s One Shot Digital Calibration Targets; White Balance And Exposure, Right In The Camera
Remember the old Kodak 18 percent Gray Card that we used as a neutral target
to determine exposure, without undue influence from bright and dark tones? I
still have a bunch of those lying around. There were several problems with the
card; holding it the wrong way might cause a glaring hot spot. Second, it was
cardboard, not built to last. Third, it didn't travel well--at least
not in a handy size (and swatch pads are too small to be practical, the way
I see it).
Now, fast forward to the digital age. Digital camera manufacturers originally
recommended using a white surface when making Custom WB (White Balance) settings
(some mistakenly still do). Over time, we began seeing the wisdom of returning
to the ubiquitous gray card to customize white balance because we still needed
the target to be correctly exposed: a neutral gray card delivers that exposure;
a white surface bounces back too much light, often producing an underexposed
reference image. Yet, a return to the gray card brings us back to its shortcomings.
What we need is something more durable and more utilitarian. That something
turns out to be one of the handiest, low-tech tools I've ever come across:
the PhotoVision One Shot Digital Calibration Target. It was designed by photographer/lecturer
Ed Pierce and is manufactured by Westcott, a company with a renowned reputation
for lighting accessories.
Sisters |
|
 |
|
 |
|
|
Why We Need A Calibration Target
I used to think, shoot raw with your D-SLR, set white balance to Auto WB, and
take care of color balance during raw conversion or in Photoshop. And things
were going along nicely until it dawned on me: what exactly was that color I
was seeing back then? I lacked a reference point, so I trusted to memory. Memory,
as cognitive theory teaches us, can play tricks.
Every color has shades, and while it may not be necessary to pinpoint a shade
exactly in every situation there are clearly times when we want--no, when
we need--to get the color right at the moment of exposure, as in a portrait
or when shooting a commercial product on a tabletop set. Companies go to great
lengths to create a corporate or product identity that extends from the design
of a logo to the colors expressed in that logo. We know the Target logo from
its bright red target, but if that red were a rust red or maroon, it would just
be an image of an ordinary target, not a company logo. Same with faces--especially
people half a world away that we may never see again. We may not pay this close
attention to color on our TV sets, but we had better do so in our digital images.
Granted, having your computer monitor calibrated correctly is a great help when
it comes to evaluating the color balance. But before you even get to this point,
wouldn't it be nice to know that you had the color right from the get-go?
Tree Bark |
||
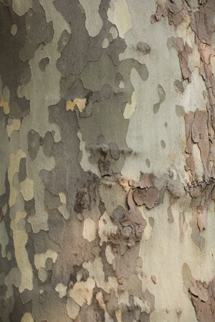 |
 |
|
Custom
White Balance |
Auto
White Balance |
|
|
||
Beyond that, there is the matter of exposure. I'll admit, I use my Canon
EOS 5D's evaluative metering system extensively. And even when I bypass
it and go to incident metering with my Sekonic L-558 meter (or any other flash
meter) for ambient-light or flash readings, I still have only one thing: a base
exposure reading. Even when I use the camera's live histogram to examine
exposure levels, black and white points have no reference anchors to which I
can key important shadow and highlight values to ensure they don't get
blocked up or blown out.
|
| |||||||||


![]()
Get the Latest Photo Tips, News & Reviews from Shutterbug!
| Camera Reviews Other Reviews | Mobile Reviews Photography Reviews Columns | News | Features | How-To | Resources |
 © 2025 Shutterbug
AVTech Media Americas Inc., USA
All rights reserved