- REVIEWS
Camera Reviews 
More Reviews Mobile Reviews Photography Reviews - GALLERIES
- VIDEOS
- BUYER'S GUIDES
The Darkroom
Large Format Darkroom; Mix And Match For Fun And Ease
Large format is fun: magical tonality,
and detail in the print that goes on and on. Better still, it's easy.
If you already have a darkroom, you probably have everything you need to make
large format contact prints, and as noted below, even enlargers aren't
necessarily a great problem. If you don't have a darkroom, large format
is (believe it or not) one of the easiest ways to get started.
Of course you can indulge in all kinds of refinements if you want, even unto
the Zone System, but you don't need to worry about these at first: even
sloppy large format technique will give better results than the vast majority
of 35mm or rollfilm photography. That's why it survived so long in press
photography!
 |
|
|
The main choice is between 4x5", where you really need an enlarger, and larger formats, where contact printing is fine. Up to about a 3x enlargement--12x15" off 4x5" or 15x21" off 5x7"--you get almost contact print quality, while contact prints as small as 5x7" can have a jewel-like quality that is extremely difficult to achieve any other way. Edward Weston, remember, was a great devotee of 5x7". Really big formats, above 8x10", are much harder to handle in the dark: the film is huge and floppy and slithery, all at once.
Enlarge Or Scan
Enlargers may be less of a problem than you might expect. Many professionals
today either buy in darkroom services, or are going digital. This means lots
of large format darkroom equipment going cheap or even free. Many 4x5"
enlargers take up little more space than a medium format enlarger, and I actually
use a 5x7" enlarger: you can often find these for the same sort of money
as 4x5". They are pretty big but should still fit in any but the smallest
darkrooms, unlike 8x10" and bigger: one 11x14" enlarger offered
free to a good home was two stories high, "buyer" collects. A well-made
large format enlarger can be used for smaller formats, too. I used to print
35mm with my 5x7" MPP enlarger using a De Vere color head.
Another possibility is scanning. Even a low-resolution scanner is perfectly
adequate, because the negatives are so big. A 600dpi scan allows a 2x enlargement
to the standard photomechanical resolution of 300dpi, or 3x to the usual ink
jet standard of 200dpi. From an 8x10" negative this is 16x20" (300dpi)
or 24x30" (ink jet). Few people need bigger; even fewer own ink jet printers
bigger than "super A3" (call it 11x17").
 |
 |
||
|
|
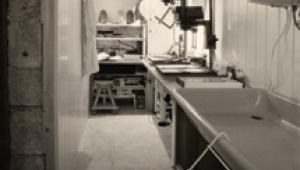
Loading And Development
The first step with large format in the darkroom is loading the film. You don't
need much space for this--my loading space is 3x2 ft--but it must
be bone dry and dust free. Because you are working in complete darkness (except
with Ilford's Ortho Plus, where you can use a deep red safelight), you
need to lay everything out the same way every time so you don't have to
grope around in the dark. The film, of course, has a notch code on the top right
for orientation.
Now for development. You can use trays, drums, tubes, daylight developing tanks,
or a deep tank. As with film loading, you need to be meticulous regardless of
the method you use.
Tray development is simple, requiring no great expenditure except a box of latex
gloves: using tongs invites scratches, and using bare fingers invites dermatitis.
It is the only practicable route for films above 8x10".
Fill the trays and lay them out in sequence. The timer must be easy to use in
the dark. Temperature is important, too. Unlike prints, which are developed
to completion, film must be developed for the right time at the right temperature.
You therefore need a water bath; or a tray heater; or a warm darkroom; or a
lot of developer, so it won't cool down too fast. Otherwise, developing
large format film is pretty much the same as developing a black and white print,
except that you are working in the dark, not by safelight (again, except for
Ilford's Ortho Plus).
Unload the film on the loading bench, then put it in the developer. Some people
develop multiple sheets at the same time, pulling one off the bottom, putting
it on top, pulling the next one off the bottom, and so forth. I'm not
brave enough for this: I'm too worried about scratching. Plenty do it
successfully, though.
 |
|
|
|
| |||||||||


![]()
Get the Latest Photo Tips, News & Reviews from Shutterbug!
| Camera Reviews Other Reviews | Mobile Reviews Photography Reviews Columns | News | Features | How-To | Resources |
 © 2026 Shutterbug
AVTech Media Americas Inc., USA
All rights reserved