- REVIEWS
Camera Reviews 
More Reviews Mobile Reviews Photography Reviews - GALLERIES
- VIDEOS
- BUYER'S GUIDES
The Darkroom
Using A Density Meter
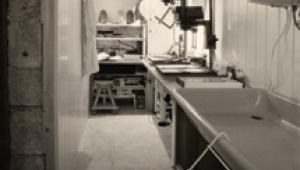
A density meter is a small battery-powered device that measures light. A density meter is to an enlarger what a light meter is to a camera. I can't imagine working in a darkroom without one. Most density meters measure only the brightness of light that is projected by the enlarger onto the easel. They do not measure color. A darkroom instrument that measures color and density is called a color analyzer. There are basically two types of density meters. One type is designed for use when printing black and white negatives. The other type is designed for use when printing color negatives. The difference between the two instruments is their sensitivity. A density meter that is designed for use when printing color negatives is a lot more sensitive than a density meter that is designed for use when printing black and white negatives. Color negatives have an orange mask which greatly reduces the brightness of light reaching the easel compared to black and white negatives. However, you can certainly use a black and white density meter with color negatives if you are careful to always take readings in the thinner portions of the negative. As a technique of printing, I like to print a series of small wallet-sized images on a single sheet of 8x10 paper. This allows me to do a lot of testing without wasting a lot of paper and chemicals. Also, it is a lot faster to print and process eight images on a single sheet of 8x10 paper than it is to make eight different 8x10 test prints. |
|
Then, when I
have made all the adjustments that are necessary in contrast and density
(and color if it is a color negative), I scale up the settings to the
final print size that I want.
A density meter makes it very easy to scale up the settings without having to do further trial and error testing. In fact, by using a density meter, I can scale up the test settings to several different print sizes--all without the need for further testing. Black And White Printing. When printing black and white negatives, the use of the density meter is pretty straightforward. After you have completed your trial and error testing, place the meter's sensor in a smooth-toned area of the image and turn the meter's dial until the little lights indicate that you have programmed the meter. Then, raise the enlarger head to the desired magnification and re-focus the enlarger. Next, place the meter sensor back in the same area of the image where you were before and this time, begin to slowly open the enlarger's lens aperture until the little lights on the density meter indicate that the brightness is now the same as it was before. You need to understand that a density meter does not measure contrast--at least not directly. If you want to measure the contrast range of a negative, you need to take a reading in the thinnest portion and the densest portion of the negative. Those two readings establish a ratio which can then be related to a contrast grade. Large ratios indicate high contrast; small ratios indicate low contrast. I've never been very successful at doing this. The trick to it is where you take the two readings. You want to take the highlight reading in an area of the print where there is just barely some tone value. That is very hard to determine when looking at the projected image on the easel. With a little experience you will be able to create several programs in the density meter. I have programmed mine for a typical skin tone, and for D-max. Using the programs saves me a lot of trial and error testing since the density meter will tell me how to set the lens aperture before I even make the first test print, regardless of the magnification and/or the density of the negative. I use skin tones because their density level is more constant from one picture to the next than other things such as the sky, grass, trees, etc. Of course, there are all the variations of skin tones such as shadows and highlights as well as different density levels resulting from makeup, suntanning, and ethnic and gender differences. Of course, the density meter is not foolproof, so it is usually necessary to do a little trial and error testing. But, using the meter sure helps to reduce the amount of testing necessary. |
|
Color Negative Printing. When printing color negatives, you will have to be careful to always take readings in the thinner portions of the negative if you are using a black and white density meter. Alternately, if you use a density meter designed for working with color negatives the meter will be more sensitive, which will allow you to take readings anywhere in the image. The more sensitive density meters that are designed for use with color negatives are very nice, and they work just fine with black and white negatives. However, they cost about four times as much as black and white density meters. As with black and white printing, you can also create programs. Skin tones work best--just remember that the meter only measures brightness, so it will only help you to adjust the density of the print. You will still have to do the regular type of color balance adjustments. I have a black and white and a color density meter. My black and white density meter is the Ilford EM-10. My color density meter is a Jobo Comparator-2. Both are battery powered. Manufacturers/Distributors Ilford Imaging USA Inc. Jobo Fototechnic Inc. |


![]()
Get the Latest Photo Tips, News & Reviews from Shutterbug!
| Camera Reviews Other Reviews | Mobile Reviews Photography Reviews Columns | News | Features | How-To | Resources |
 © 2026 Shutterbug
AVTech Media Americas Inc., USA
All rights reserved