- REVIEWS
Camera Reviews 
More Reviews Mobile Reviews Photography Reviews - GALLERIES
- VIDEOS
- BUYER'S GUIDES
The Darkroom
Softening And Vignetting
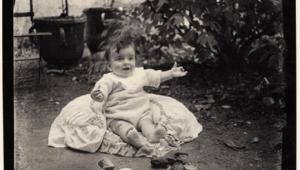
| One of the never-ending fascinations of darkroom work is the way in which you can manipulate your images. Two effects in particular, softening and vignetting, can give you lovely, vintage looking pictures with a minimum of effort. Both tend to work best with black and white, though they can be equally applicable to color. Softening can be desirable for a number of reasons. The most common is to give the print a romantic, dreamy quality. The accompanying illustration of Sophie in a flying helmet is a good example. In the straight print the edges are hard and the picture is very literal. In the softened shot you can imagine a young girl dreaming of being the next Amelia Earhart. Softening has other uses, too. Sophie was 14 or 15 when we shot that, but the same technique can help to flatter older, more time-worn skin. It makes wrinkles appear less deep, and smoothes the skin texture which makes it look younger. Even blemishes, freckles, and liver spots become less obvious. Softening is easy: hold a diffuser under the lens during the printing exposure. It is important to realize, though, that diffusion between the lens and the print does not replace a soft-focus lens at the taking stage. It doesn't do the same thing at all. With a soft-focus lens, spherical aberration in the lens allows a sharp image, but with highlights that seem to spread and glow. Adding diffusion at the enlarging stage simply softens edges and textures, but in effect, it spreads the shadows out, not the highlights, so the characteristic soft-focus glow is missing; unless, of course, you are using pos/pos printing, such as Ilfochrome Classic from transparencies. You can experiment with various materials, but a traditional diffuser is a nylon stocking stretched over a wire frame. For the diffused pictures which accompany this article I used an old wire coat hanger, covered with a black knee-high nylon stocking. The advantage of the knee-high (or even ankle high) stocking is that you don't have to cut it down. Cutting means that there is a risk of runs or "ladders" and therefore uneven diffusion. The actual shape of the diffuser is not critical, but the material has to be tightly stretched with no wrinkles. The easiest way to get a nice, even diffusion is to make the frame somewhat larger than the lens so any wrinkles or denser areas can be kept well away from the lens. I bent the coat hanger into a lollipop shape with a diameter of about 6" and a handle. I then stretched the stocking over it, taking up the slack at one end with a knot, and using the slack at the other end to cushion the handle. The color of the diffuser will influence both exposure and contrast. I find that if I use a black nylon stocking stretched over the wire frame, I generally have to give the print up to 11/2 stops extra exposure and up to a full grade of extra contrast. I have experimented with a double layer of white net, too, and in that case both the exposure and the contrast needed less adjustment: about 1/4 to 1/2 stop more exposure and up to 1/2 grade more contrast. The fastest way to determine exposure and contrast is first to do four or five tests on the same strip, at 1/2 stop increments. When you have the best exposure, you can do another test strip for contrast. Usually, trying three full grades (one at the same grade as the undiffused work print, plus one at a grade harder and another at two grades harder) will give you all the information you need to determine the best contrast. Vignettes There are vignetting tools available that fit under the enlarger lens, but beware: they don't all fit onto every enlarger. I have one set that I have been trying to adapt to my enlargers for years, and I still can't figure out how, even with a special adapter provided by the manufacturer. Hard-edge vignettes require masks which are precision cut and held down firmly to prevent light leaks. If you have a metal easel and magnetic strips this is fairly easy. Otherwise, soft-edged vignettes are easier to deal with and require less precision in both cutting and printing. I think they look better, too. Some people simply use their hands to mask the background, but I find this is not as reliable as a mask. The illustrations accompanying the article are all soft-edge vignettes. To get started, you need to cut a mask. It can be any shape you like. Oval masks are very traditional, fairly simple to cut, and easy to work with. Correct sizing of the mask is crucial. The background determines this, to some extent. Although you can use vignetting to eliminate unwanted backgrounds, the easiest pictures to vignette are ones which have a plain (or at least unobtrusive) light background. First, project the image you will be vignetting onto the baseboard. The mask for a white vignette around the subject needs to have an aperture that is smaller than the subject area by perhaps 25-30 percent. If you make the mask from stiff card then you can hold it by the edge, as shown in the illustration. Black construction paper works well, too, but it may need to be supported. I often tape a mask made of construction paper to the same wire frame I use for softening. Once you have determined the correct exposure for the subject, make a print using the mask. To get soft, fading edges, keep the mask moving up and down, parallel with the light beam. Alternatively, use a gentle circular motion at right angles to the light beam. The movement does not have to be great. Don't be discouraged if you don't get it right the first time. You may need to adjust the size of the mask to make the vignette larger or smaller, or you may only need to hold the mask higher or lower. It is simply a matter of practice. Black vignettes are much more difficult and seldom look as good as white ones. The technique involves masking the subject, then overexposing the background around it. The center that was cut out to make the aperture for a white vignette can be used for making black vignettes, or you can cut a new mask. The main thing to remember is that this time the mask will need to be somewhat larger than you might expect because light has a habit of creeping in around the edges of the mask and fogging the image. Again, you may need to make adjustments to the size of your mask when you start printing. A firm wire or a piece of thin, but firm, flexible plastic is needed to hold the mask. This handle must move during the exposure, otherwise you can get a light streak on the print. Two exposures are required for a black vignette. The first exposure gives you the image. The second exposure can be a white-light exposure with no negative in the carrier, or you can use a diffuser--usually a piece of translucent plastic--under the lens. With a white-light exposure you will need to stop the lens down as far as it will go and keep the exposure brief. If you go for the other option you need to be able to swing the plastic in below the lens as you would a red filter. Before you start printing black vignettes it is a good idea to take your mask in hand and do a dry run. Project the image on the baseboard and practice masking it. Remember, you won't be able to see it when you are making the second exposure, so it is important to memorize where you want the mask to be when you start printing for real. To make up for any fogging during the vignetting exposure, print a little lighter and with somewhat more contrast than usual. The adjustments will depend on the image you are printing. To soften the edges of any vignette even more, you can glue a small amount of white cotton to the edges of the mask. You don't need very much. Because of their "vintage" connotations, vignetted prints (especially white vignettes) often look good when toned--usually sepia--and they can take very well to handcoloring. You can go for a naturalistic color, or you can just color parts of the image: in a portrait the eyes, maybe, or the lips, or in a street scene, just one automobile. And, of course, you can use everything together for really old-fashioned pictures: softening, vignetting, toning, and handcoloring. Try it! |


![]()
Get the Latest Photo Tips, News & Reviews from Shutterbug!
| Camera Reviews Other Reviews | Mobile Reviews Photography Reviews Columns | News | Features | How-To | Resources |
 © 2026 Shutterbug
AVTech Media Americas Inc., USA
All rights reserved