Site Links
|
 |
 |
 |
Master Class Want To Turn Pro
By Monte Zucker November, 2003
| |
1
Photos © 2003, Monte Zucker, All Rights Reserved
|
|
How many times have I heard
people tell me that they want to quit their jobs and become professional
photographers? This is always followed by, “How do I know when
I’m ready to quit my full-time job and become a photographer?”
“You’re not,” I tell them. “If you have to ask,
you’re not ready. You should quit your full-time employment and
switch to being a professional photographer only when you have no other
choice. Only when you know that there’s no other way. Only when
your daytime job is keeping you from making more money through your
photography than you can make doing your old job.”
|
|
When I was still a kid wanting
to get married and at the same time get into photography full-time, my
future mother-in-law took me to see her former boss, Roy Stryker, for
advice. I wanted to know what school to go to. How should I begin? Stryker,
by the way, was the leading force behind some of this world’s greatest
images being created during the depression years.
Some Good Advice
His advice to me at that time (back in the late 1940s) was to simply go
out and do it! Find out if you really like it. Find out if you’re
really good. Go to the school of hard knocks. Then, when you get stuck
because you don’t know enough to make any further progress, you’ll
know what you need to learn. You’ll find the person who can teach
you those things. And you’ll understand and appreciate what that
person is teaching you.
|
|
I believe in his philosophy
to this day. At the same time, I know that today more and more professionals
are sharing their techniques with others. So, now you really don’t
have to wait until you get “stuck” to find out how to make
progress. Through magazine articles like this one and through educational
websites you can learn while you earn…and never really get stuck.
So, with this in mind I’ll share some of my pro techniques that
I believe you can use regardless of the subjects you’re photographing.
Here’s how to place people in an indoor environmental photograph
and still have the subjects stand out more than the background. In all
three of these first pictures I used a wide angle 17-35mm lens on a Canon
EOS 10D digital camera. The technique I use for environmentals is to keep
the subject close to the lens and let the background become incidental.
One of the great things about wide angle lenses is that the size of objects
drop off quickly as they are farther from the camera. So, I always try
to bring my subjects as far from the background as possible and as close
to the lens as possible.
|
|
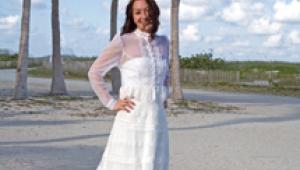
The next thing to decide is
whether or not the area between the subject and the background is important
to the photograph. In the first example of the bride and groom in church,
only the stained glass window and the couple were important (Photo 1).
Certainly, detail in the pews behind them was not nearly as important
as good color saturation in the window. To achieve that with film I would
take an exposure meter reading by the window, turning the meter toward
the window and seeing what the meter reads. Then, I’d set my exposure
for one f/stop less than what the meter calls for—this would help
me to get great color saturation in the glass.
|
|
With my digital camera I just
zoomed in to let the window fill the frame, let the camera figure out
the exposure, and then set my camera manually one f/stop below that. I
shot again and loved the results.
Now that I knew what exposure I needed, I set my Quantum T2D flash (their
digital version of the QFlash) to match the f/stop. I placed a second
light behind the couple to backlight her veil. I had that flash on as
low a power as I could get. A light coming through from behind and pointed
toward the camera always appears brighter than you might expect. This
second light was triggered by Quantum’s FreeWire attachment on top
of my camera, allowing me to fire both flashes simultaneously without
having a cord connecting them.
|
|
I didn’t use a bare-bulb
flash on either of the two flashes, because I didn’t want the flashes
to light up any more of the pews than was necessary. The area between
the couple and the window went completely dark, exactly how I intended
the photograph to look.
Here the environment in which she’s standing is definitely an integral
part of the photograph (Photo 2). So, the exposure in this case was based
upon the ambient light in the room. Fortunately the window (just out of
view in the picture) kept the piano area of the room from going dark.
There was a second window to the left of the
fireplace that gave me additional ambient light from that direction.
|
|
To light the bride I took the
reflector off my Quantum flash and used the soft light of the bare bulb
to augment the ambient light on her face and gown. Again, with Quantum’s
TTL adapter on top of my 10D I was able to dial-in how I wanted the power
of the flash to relate to the f/stop that I was using. In cases where
the room has subtle indoor ambient light as we had here, I simply dialed
in that I wanted the flash to be one f/stop less and it ended up appearing
as if there had been no extra light added.
When compared with the same photograph made entirely with ambient light,
there are many subtle differences (Photo 3). Which is better? I leave
that up to you. I definitely see benefits to each of the techniques. This
photograph, entirely unretouched, shows you how I toned down the furniture
in the foreground of the previous picture to keep the attention on the
bride.
|
|
Too many times, I’m afraid,
the whole purpose of a photograph is often lost in an attempt to show
too much in the viewfinder (Photo 4). In this photograph of the interior
of the home, for instance, I had to carefully compose the image with my
17-35mm wide angle lens to include enough of the room to tell the story,
but not so much that it would detract from the bride.
I used the two windows to light the background and frame the subject.
The furniture adds depth to the photograph.
I can’t believe how simple digital cameras allow you to determine
exposure in instances like these. I set the white balance to flash. I
set the ISO rating to 400, taking advantage of the ambient light. I set
the lens to aperture priority (f/8 to achieve depth of field) and let
the camera do the rest. With the incredible assistance of Quantum’s
accessories, the amount of flash was automatically generated to match
the ambient light. An extension cord from the camera to my digital flash
allowed me to place the light several feet from the camera. It lit the
bride perfectly without over lighting the furniture in the foreground.
|
|
With the controls we now have
available to us by all the manufacturers currently working in the digital
arena is it any wonder that it’s become so easy to balance flash
to ambient light without even needing an exposure meter? Just look at
the picture on the back of the camera and decide if the balance is the
way you like it, or if you want to change it a little. Life is good in
the professional market nowadays!
Going outdoors for portraits is easy. Going outdoors for pro portraiture
is also easy, as long as you learn how to work in a controlled environment.
Unfortunately, many photographers go outside for the backgrounds and the
“ease of lighting,” when they really need to go outdoors to
find lighting that creates three-dimensional portraiture with little or
no distracting elements in the background.
This portrait was made outdoors, but not exactly where you may be thinking
of looking (Photo 5). This portrait of the young girl was actually created
on a narrow outdoor stairway. There was an opening at the top of the steps
and another below and it was covered overhead. This is a perfect lighting
situation for a profile with a hairlight. All I had to do was turn her
face to achieve my normal lighting pattern and compose the portrait to
take advantage of the angle of the handrail.
With cover overhead and directional light it’s easy to create professional
portraits. All one needs to understand is that lighting outdoors should
be the same as for any good portrait. Professional standards must be maintained
wherever you’re working. The simple background of the textured wall
allows one to center all the attention on the subject. It just doesn’t
get much easier than this, does it?
These last portraits (Photos 6-9) may have the appearance of precision
lighting in a studio environment. Precision lighting—yes! Studio—no!
Far from it. They were created during a class session in Cape May, New
Jersey, a few months ago. Location? Outside, in a parking area below some
condominiums. Here’s the “outdoor” setting and the actual
setup.
Once again, no light from overhead. The sole source of light was coming
in from a small opening between two corner walls. The background was my
Black/White Westcott fold-out background. All I had to do was to block
some of the light coming in from the large drive-in opening to my left
and to place a Westcott silver reflector in front of and below their faces.
Give Your Portraits
A Pro Look
What do most professional portraits have in common?
1. Impact.
2. Simplicity.
3. Little or no distractions from the main subject/s.
4. Exact camera positions of the face—either full face, 2/3, or
profile.
Is The Pro Life For
You?
Is it easy to go pro? Only if you figure a way to make money while you’re
on your way.
Is it worth it to go pro? You betcha. I can’t think of anything
that I could have done with my life that could have brought me this much
pleasure.
Was the advice I received as a young man from Roy Stryker on target? A
bull’s eye!
Do I think that you should go pro? Only you can answer that. What’s
your gut feeling?
You can see more examples on my website, www.montezucker.com.
|
 |
|
 |
|
|
 |
 |
 |
|