- REVIEWS
Camera Reviews 
More Reviews Mobile Reviews Photography Reviews - GALLERIES
- VIDEOS
- BUYER'S GUIDES
Master Class
Light Control; The Key To Good Portraits
All Photos © 2004, Monte Zucker, All Rights Reserved
Good portraits need to be created with controlled light. You just can't bring people out into open spaces--where light is coming in from all around--and get good results. There are many ways to control light for portraits both in a studio environment and outdoors. I illustrated several of my techniques for a class recently in Whitewater, Wisconsin, at Michele Gauger's studio. I think that the examples are worth sharing with you.

During the lighting demonstration I realized that our models, Elizabeth and
Jason, were a perfect couple to illustrate how to handle a couple where the
man is much taller than the woman.
Notice how I've positioned them with Elizabeth covering much of Jason's
body. By placing her in front of him you see much more of her than you see of
him. Makes sense, doesn't it?
I selected a location for the picture that had light coming through from behind
trees. I kept them as far from the background as possible. Even with bright,
direct sunshine coming almost straight down from above, I was able to turn them
so that the light came from behind them. Then, to light their faces, I positioned
a bare-bulb flash (a Quantum digital flash without the reflector on it) to light
them from my right side.
I chose to light it from my right, so that it would cross over both of their
bodies and keep detail in their white shirts. I exposed for detail in the background
using a 28-135mm lens on a Canon EOS 10D digital camera. The flash was equal
to the f/stop, giving me great detail throughout the entire image.

In a more secluded area I posed them on a bench, again backlighting them. He's seated on his right leg to keep him slightly higher than his fiancée. This time I had someone hold my Westcott silver/black Monte Illuminator in a spot about 10-15 ft from them. The reflector picked up direct sunlight and bounced it back onto their faces. I'm using just the edge of the reflected light. If I were to angle the reflector too directly onto them they wouldn't be able to keep their eyes open.

Not far from the bench was a gazebo. I posed them on the outside rail, just under cover of the rooftop. Standing inside the gazebo I photographed their profiles, shooting from the shadowed side of their faces out toward the open light. The light on his profile was from the natural light, but the light on her profile was reflected light from my silver reflector outside the gazebo.

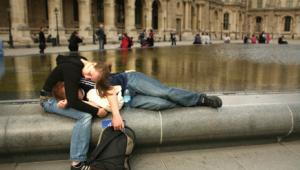
Just to show what you can do out in clear open spaces, I had Jason
lie down on his back in the middle of the lawn. Elizabeth laid down on her left
side, facing in the opposite direction. She put her head on his shoulder and
I had them both look at each other.
Above them two photographers held a 4x6 ft Westcott translucent panel, softening
the direct sunlight to what appears to be open shade. Flat lighting like this
works well when you have two faces going in opposite directions.

Always a favorite shot in a wedding coverage is this silhouette
of the bride and groom toasting with a single wine glass.
It's created by lighting just the background and turning off all the other
lights. I overexposed the background by three f/stops, changing the dark green
background to almost white. This, by the way, is the ideal way of lighting a
glass. That is, lighting the background and letting the light bounce back through
the glass. The "wine," by the way, is mostly water with a touch
of coffee blended into it.

I've been creating bridal portraits for years with studio lighting. It's only recently, however, that I've gotten more specific about how I place the main light when I'm photographing one person's profile over the 2/3 view of the second person. I light for the profile, split-lighting the face of the 2/3 view.
By lighting for his profile I'm able to keep his ear in
shadow and hold the viewer's attention on both faces. The left side of
her face and the shadowed side of his face are opened up by both a reflector,
camera left, and a fill light that is two f/stops under the main light. I'm
always exposing for the main light, since exposing for digital imaging is pretty
much the same as exposing for slide film. You can't afford to burn out
detail in the highlights.
|
| |||||||||


![]()
Get the Latest Photo Tips, News & Reviews from Shutterbug!
| Camera Reviews Other Reviews | Mobile Reviews Photography Reviews Columns | News | Features | How-To | Resources |
 © 2026 Shutterbug
AVTech Media Americas Inc., USA
All rights reserved