- REVIEWS
Camera Reviews 
More Reviews Mobile Reviews Photography Reviews - GALLERIES
- VIDEOS
- BUYER'S GUIDES
Lesson Of The Month
Understanding Digital White Balance
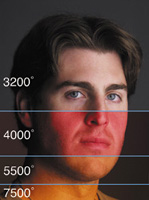
Color temperature refers to the frequency of color that can be measured from any particular light source. The efficiency of our own visual experience, however, can make the idea of color temperature somewhat confusing. This is because our eyes have the intrinsic ability to adjust to color shifts such that a white piece of paper will appear white no matter what type of light is being cast on it. Many people only become conscious of color shifts when witnessing a scene lit with light sources of differing color temperatures, like yellow light emanating through the windows of a house contrasted against the blue light of dusk. Color temperature is measured in degrees Kelvin. The most important thing to remember in color temperature is that the higher the Kelvin number, the cooler (more blue) the light source. The following chart illustrates an approximate color temperature scale (#1). |
|||
Color Balance White Balance |
|||
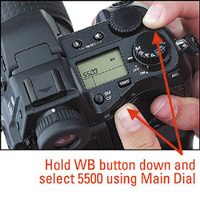
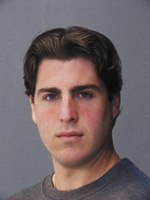
Since the built-in flash of any camera (film or digital) is balanced to the color temperature of daylight (5500ž Kelvin), I set the white balance accordingly. The E-20N has white balance controls external to the main menu navigation that allow for a faster change in settings. To set the white balance to 5500, I first pressed and held down the small WB button on the top of the camera and jogged the main dial until 5500 appeared in the control panel (#2). I then pressed the button to pop-up the flash, set the camera to Program (automatic) and took a shot of my assistant/model, Jarred, in front of a sweep of white seamless paper (#3). |
|||
I decided to light Jarred with a large diffused light source for a more natural-looking effect. I deactivated the flash and set up a Photoflex Large Starlite Kit and positioned it to the right of him at approximately a 45ž angle. The Large Starlite Kit uses a 1000w tungsten lamp that's color balanced to about 3200ž Kelvin, about 2300ž warmer than daylight or flash. For demonstration purposes, however, I left the white balance on 5500. I then set the camera to manual to achieve a custom exposure. Since I wanted Jarred's eyes to be in sharp focus and for the background to be relatively soft, I opened the aperture up to f/4 (the wider the aperture, the more selective the focus). I then set the shutter speed to 1/60 sec to render the proper exposure, focused and shot (#4). |
|||
The result shows a tremendous difference in the look of the shot. The SilverDome softbox from the Starlite Kit had diffused the light to render a soft, wraparound light on Jarred's face. The effect is that of a window light. And since the lamp in the Starlite Kit is continuously on, it forces Jarred's pupils to close down to reveal more color in his irises. Notice the natural-looking catchlight in his eyes. The color of the shot, however, is much warmer than in #3 because the camera recorded the relatively warm light from the Starlite (3200) at a cooler daylight/flash setting (5500). Remember the lower the color temperature, the warmer (more yellow) the light. To balance the color, I changed the white balance preset from 5500 to 3000 (the closest preset to 3200 in the E-20N) and took another shot (#5). |
|||
In the result, notice how Jarred's skin tone looks more natural and that the blue in his eyes is truer in color. The next morning at about 11:00am, we decided to shoot a similar portrait outside. I wanted to shoot against a background that was neutral in color (as we did with the white background paper inside) to illustrate clearly the shifts in color, so we went up to the roof of the studio and set up against the shadow side of a neutral gray wall. Jarred stood with the sunlight raking across the side of his face and I set the camera on a tripod and framed up the shot. I left the aperture on f/4, set the shutter speed to 1/500 sec to compensate for exposure, set the white balance back to 3000 (the neutral white balance point for tungsten) and shot (#6). |
|||
Now our color shift has flopped to the blue side! With the white balance dialed to 3000, the camera was set to record our subject illuminated with tungsten light. But again, shooting at an "incorrect" color setting can sometimes render an interesting look. At this point, I had a couple of options for achieving color balance. I could either dial the white balance to the 5500 preset or I could create a custom white balance setting. Here's how to set the white balance to neutralize any single light source. |
|||
Listed among the white balance presets is the option -0-. Once that is selected, you will want to find something neutral, like a white sheet of paper or cardboard, from which to take an exposure. The E-20N has a One Touch White Balance button placed on the front of the camera. Fill the frame with the white sheet of paper or neutral gray card and press this button. After the exposure is taken, the LCD will present one of two windows. If the exposure is either too dark or too light, the window will read "NO GOOD" and you will have to take another shot of the paper in either more or less light. If the window reads "GOOD," press the OK button and you are ready to shoot. After I recorded my custom setting, I shot (#7 and #8). Now our result is much more natural looking. However, similar to the on-camera flash shot indoors, the shot is very high in contrast. The major difference between these shots is the positioning of the light. Here, the sun rakes across Jarred's face, whereas inside, the flash was hitting him straight on. |
|||
We went about softening the sunlight similar to the way we softened the Starlite with the softbox indoors. We attached a Photoflex 42" Trans-lucent LiteDisc to a Photoflex LiteDisc Holder, secured it to a Photoflex LiteStand, and positioned it in between Jarred and the sun. To create a negative fill (similar to the look in the studio), we set up a Photoflex 42" Black LiteDisc and positioned it to the right of Jarred to both block the ambient light of the sky and to absorb the light passing through the Translucent LiteDisc. Once it was in place, I took another shot with the same settings (Final Image). It's good to keep in mind, however, that there is no definitive way to light a headshot. The architecture of each person's face is unique and as such may require a very different lighting approach. It will only help you to experiment and develop different lighting techniques and white balance settings for different situations. |
|||
This lesson will be posted in the free public section of the Web Photo School at: www.webphotoschool.com. You will be able to enlarge the photos from thumbnails. If you would like to continue your digital step by step education lessons on editing, printing, and e-mailing your photos it will be on the private section of the Web Photo School. To enroll for WPS just go to www.shutterbug.net and click on WPS Free Lessons. Technical Equipment |


![]()
Get the Latest Photo Tips, News & Reviews from Shutterbug!
| Camera Reviews Other Reviews | Mobile Reviews Photography Reviews Columns | News | Features | How-To | Resources |
 © 2026 Shutterbug
AVTech Media Americas Inc., USA
All rights reserved