- REVIEWS
Camera Reviews 
More Reviews Mobile Reviews Photography Reviews - GALLERIES
- VIDEOS
- BUYER'S GUIDES
Lesson Of The Month
Techniques For Shooting Jewelry
There are many photographers who absolutely dread the thought of shooting jewelry. After all, jewelry is often highly reflective, very small in size, and can be difficult to work with in creating a composition. However, anyone armed with a few basic lighting tools and a rudimentary understanding of camera and lighting methods can truly work wonders. Thanks to many improvements in camera and lighting technology, the cost of producing professional-quality images has become remarkably inexpensive. |
|||
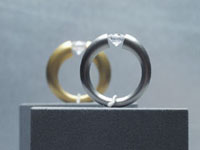
For a modern jewelry look, we decided to shoot these tension rings against a sheet of brushed aluminum. We picked out two different sizes and secured them upright on gray ring stands. We placed the smaller one in front so that it would appear similar in size to the rear one from the camera's point of view (#1). We set up our first light source, a small (16x24") Photoflex Starlite Kit, and positioned it over the set to illuminate the tops of the rings and sheet of aluminum. Notice how we propped up the sheet of aluminum by clamping a Photoflex Litedisc Holder to the edges and securing it to a Litestand (#2). |
|||
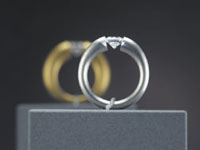
I mounted an Olympus E-10 digital camera to a tripod and zoomed all the way out on the lens to keep the rings proportionally sized to each other. I set the aperture down to f/11 to maintain a large depth of field, set the shutter speed to 1/30 of a sec and took a shot (#3). |
|||
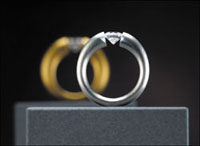
Looking at the image playback on the LCD, I realized that we needed to be able to come in closer. Fortunately, Olympus makes an optional macro lens attachment for the E-10 for situations like this. I attached the lens, came in a little tighter, and took a shot (#4). |
|||
In this result shot (#5), notice how the attachment lens helped our composition by minimizing the relative size difference between the rings. Even though the light from the overhead softbox had lit the top and bottom of the rings nicely, the sides of the rings appeared dark and flat. |
|||
To add more dimension to the shot, we set up another small Starlite Kit, positioned it off to the left-hand side and took another shot (#6). |
|||
The result shot (#7) shows a big improvement. The transition between light and dark is smooth, and interesting shapes are formed by the addition of this second softbox. |
|||
Next, we decided to add another Starlite Kit to the right side to balance the reflections of the ring. Without changing the camera settings, I took another shot (#8). |
|||
Although this third light source filled in the dark areas and balanced the reflections, it still maintained a good contrast level to the shot and a sense of dimension to the rings (#9). |
|||
The addition of both side lights, however, brightened the background considerably. To keep the light solely on the rings, we attached grids to each of the side softboxes, a set of louvers to the top softbox and took another shot (#10). Notice how the background has darkened, and yet the light and reflections on the rings have not changed. |
|||
The result shot shows a significant difference in contrast and overall feel to the shot (#11), as the rings now pop forward from the background. |
|||
Finally, we decided to adjust the amount of focus on the rear ring. We wanted it to be recognizable, but not so much that it would draw attention away from the front ring. I opened the aperture up to f/4.5, adjusted the shutter speed to accommodate for the correct exposure and took a shot (#12). |
|||
After the shoot, we opened the Final Image in Adobe Photoshop and used the Rubber Stamp tool to erase the metal clips that held up the rings. We also boosted the contrast a little more to make the background appear even farther away. This lesson will be posted in the free public section of the Web Photo School at: www.webphotoschool.com. You will be able to enlarge the photos from thumbnails. If you would like to continue your digital step by step education lessons on editing, printing, and e-mailing your photos it will be on the private section of the Web Photo School. To enroll for WPS just go to www.shutterbug.net and click on WPS Free Lessons. Technical Equipment |


![]()
Get the Latest Photo Tips, News & Reviews from Shutterbug!
| Camera Reviews Other Reviews | Mobile Reviews Photography Reviews Columns | News | Features | How-To | Resources |
 © 2026 Shutterbug
AVTech Media Americas Inc., USA
All rights reserved