- REVIEWS
Camera Reviews 
More Reviews Mobile Reviews Photography Reviews - GALLERIES
- VIDEOS
- BUYER'S GUIDES
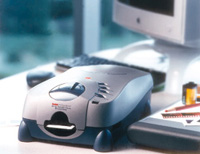
The Kodak Professional RFS 3600 Film Scanner
Worth A Second Look
Well over a year ago I sat down to write about the Kodak Professional RFS 3600 slide and 35mm film scanner. Physically, in what I then called a swoopy design, was a mechanical package offering good specifications of 3600dpi resolution, 36-bit color depth scanning at a dynamic range of 3.6. Besides the contemporary design, this Kodak product offered a very different approach to scanning with a stationary film stage and moving sensor and illumination array. This allows for a motor driven strip feed that automatically advances the film from frame to frame. In addition, the Kodak engineers included Film Terms, profile-like files describing the characteristics of all of the Kodak films and some of their popular competitors, so an ideal interpretation could be made of each image. |
|||
Unfortunately, in their zeal to make a product that would be easy for consumers, the Kodak software engineers were blinded to the fact that automation cannot be successfully applied to the processing of a photographic image, due to the fact each photograph is made unique by its subject and the perception of the individual photographer. There is no way software can recognize and distinguish one unique photographic subject from another, much less be aware of the unique character of perception of each user. So, by ignoring that uniqueness, the automation assumes all photographs should have the same measurable content of color and density attributes. This reduces every image processed to a common, low level of mediocrity. In addition, the design interface of the Kodak software driver assumed that because the adjustment of the image was automatic there was little need for the user to clearly see the preview, and the post-auto adjustment tools were considered too inconsequential in importance to make them intuitive and user friendly. When I received the news release announcing new Kodak software and the addition of LaserSoft SilverFast to the software bundle, I immediately responded because the RFS 3600 hardware is well designed and offers some worthwhile advantages. So, now I have re-tested the Kodak RFS 3600, using it to scan a diverse selection of film images on all kinds of media, with both the new Kodak driver as well as driving the scanner from within Photoshop with the LaserSoft SilverFast Ai 5.5 plug-in. |
|||
Working With The New Version
2.10 Software Driver The Kodak software, whether
scanning slides or color negatives, subjects each image to be scanned
to automatic adjustment processing which cannot be turned off. If the
auto-processing misinterprets the subject, it cannot be voided, and there
is no way to then obtain an ideally adjusted scan, as manual controls
only add to the auto-adjustment. It took only a few scans before I was
finding images that the software was incapable of providing an acceptable
scan. In other words, unless your images fall within a rather close approximation
of a typical average subject or style of photography, you cannot expect
to obtain satisfactory scan results with the Kodak Version 2.10 software. |
|||
Using The RFS 3600 With
LaserSoft SilverFast As soon as I got the first preview image on screen using SilverFast I had a hunch everything was right with the world and I'd be on my way making all kinds of good scans with the RFS 3600. After numerous pages of slides scanned with the RFS 3600 and SilverFast there was no doubt about my original feelings that Kodak had designed a good piece of hardware. It ran smoothly, reliably, and efficiently, producing one scan after another of slides on all kinds of film including Kodachrome, Ektachrome, Agfa, Fuji, and a few most of you have probably never tried. In half a dozen pages of slides there was not one image that I was not able to obtain a very satisfactory, and usually better, scan. I was able to pull good detail from both highlights and shadows and fine color fidelity from the palest tints to the deepest saturated colors. Image detail and sharpness was consistently sharp (at least of the grain, even if my subject was not all that sharp). |
|||
Software When you install Nikon View 5 it searches your system for compatible software applications and will install a plug-in in Photo-shop for you. I found no way to install the plug-in without installing Nikon View 5. Once installed, you can open NEF files in Photoshop, but the plug-in does not work with Photoshop 7's browser to view NEF files, so you must go back to Nikon View 5 to browse. Back in Photoshop when you click on Open in the File drop-down menu, a new dialog box opens and allows you to select color balance, add exposure compensation, view a magnified section, and rotate the image. Once you have made your selections and click Open in this dialog box the file opens and can be manipulated like any other file in Photoshop and saved in any file format desired. Color |
|||
It was time then to switch to negatives in strips of film (it is usual for mine to be in lengths of six frames stored in plastic pages). I began with sets from recent shoots done on Kodak Supra film, primarily 100 speed. I quickly found the NegaFix function, whose window comes up automatically in SilverFast when you select to scan negatives, and brought the image in pretty close as soon as the manufacturer, brand, and film speed was selected. Then, I adjusted the slider for "exposure" and thereafter the procedure was just like adjusting an image of a slide pre-scan preview. After success with three different recent sets on Kodak Supra I tried scanning some older images on Agfa XRS and Fuji Reala, and obtained comparable satisfaction in the final scan results. A New Evaluation And Recommendation |


![]()
Get the Latest Photo Tips, News & Reviews from Shutterbug!
| Camera Reviews Other Reviews | Mobile Reviews Photography Reviews Columns | News | Features | How-To | Resources |
 © 2026 Shutterbug
AVTech Media Americas Inc., USA
All rights reserved