- REVIEWS
Camera Reviews 
More Reviews Mobile Reviews Photography Reviews - GALLERIES
- VIDEOS
- BUYER'S GUIDES
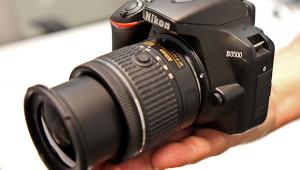
Nikon’s D60 D-SLR; Next Step In Amateur Line-Up Has Some Inside Tricks
Nikon keeps cranking out new D-SLRs, most recently with the D3 and D300 (see Shutterbug reviews at www.shutterbug.com), and now, building on the great success with their amateur line-up of the D40 and D40X, the new D60. Sporting 10.2 megapixels (same as the D40X), the D60 has the lightweight and portable feel of the D40 series, with some extra tricks up its sleeve. Foregoing LiveView, which seems to be featured in most new D-SLR cameras these days, the camera incorporates a dust reduction system that "flows" air within the mirror box to prevent it from settling on the sensor and a sensor cleaning function that uses vibrations to shake off dust on start up. Another nice touch is how the camera automatically turns off the back LCD when you bring the camera to your eye, and how the LCD read-out panel switches to vertical when the camera is so oriented.
|
Front, Top, And Back Views
|
|
 |
|
 |
|
 |
|
|
Priced at $749 with the kit AF-S DX Nikkor 18-55mm f/3.5-5.6G VR lens, the new camera, dubbed by Nikon as their smallest D-SLR ever made, sports Nikon's EXPEED image processor that delivers 3 frames per second (fps) for up to a 100 JPEG burst, plus a unique Stop-Frame mode that allows you to create near GIF-like animations of a series of images. There's more inside, including Quick Retouch, in camera NEF processing (the original NEFs are 12 bit), a cross star filter for sparking up highlights, and various color intensifier filters. I guess Nikon's aim, and appeal for the intended audience, is to allow you to work with your images prior to downloading to get them print-ready right out of the box.
|
LCD Display
|
|
 |
|
 |
|
|
As with the other cameras in the amateur line-up, the D60 only delivers full functionality with AF-S lenses attached. Others in the Nikon glass legacy can be used, but with some loss of AF or, with very old lenses, metering functionality. We have noted that many independent lens makers have jumped on the built-in motor bandwagon of late, which attests to both the Nikon amateur line-up's popularity and the fact that this trend will continue. Focusing in this camera is with three-area AF, which is quite uncomplicated for the intended audience and quite efficient in the bargain.
The shutter can fire as quickly as 1/4000 sec and ISO range is from 100-1600, with a 1 EV boost (dare we say push) available to 3200. There are all the usual Exposure modes, plus Scene modes that take what Nikon dubs the "Vari-Program" idea further; in other words, when you choose a Scene (VP) mode, Nikon adds certain image attributes that affect settings that go beyond shallow depth of field for Portrait mode and fast shutter speed priority for Sports mode. Now portraits made with that VP mode will also have certain color and contrast attributes as well. For light metering there is Nikon's extremely accurate 3D Color Matrix Metering II, plus you can, if desired, use center-weighted averaging and spot metering.
|
Sharp & Steady
|
|
 |
|
 |
|
|
|
| |||||||||


![]()
Get the Latest Photo Tips, News & Reviews from Shutterbug!
| Camera Reviews Other Reviews | Mobile Reviews Photography Reviews Columns | News | Features | How-To | Resources |
 © 2026 Shutterbug
AVTech Media Americas Inc., USA
All rights reserved